vscode配置C/C++运行环境的步骤(超级详细)
准备工作
在 Vscode 里配置C/C++运行环境,首先,需要下载 C/C++ 的开发环境,然后将 C/C++ 的开发环境添加至系统变量中。
第一步 下载vscode
VsCode大家应该都会下,这里就不提供VsCode的下载与安装教程了
具体的可以查看这篇文章 https://www.jb51.net/softjc/860164.html
第二步 下载mingw
这里采用mingw作为 C/C++ 开发环境,官网链接如下
官网链接:MinGW官网

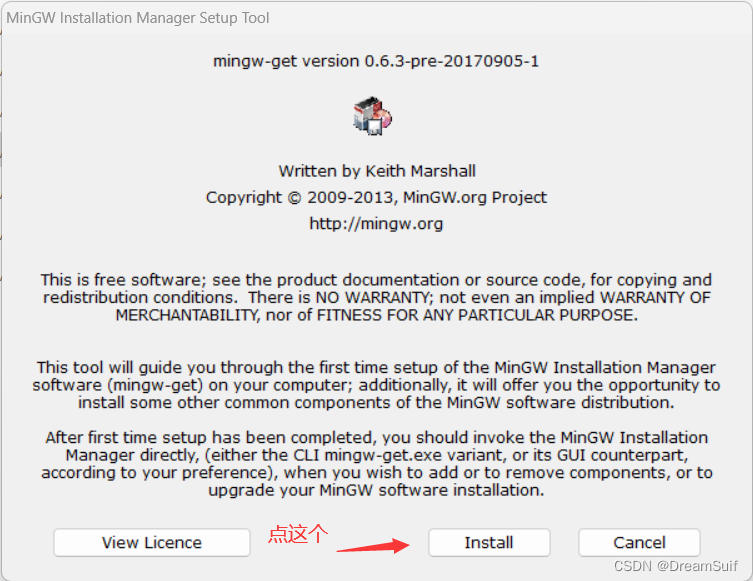
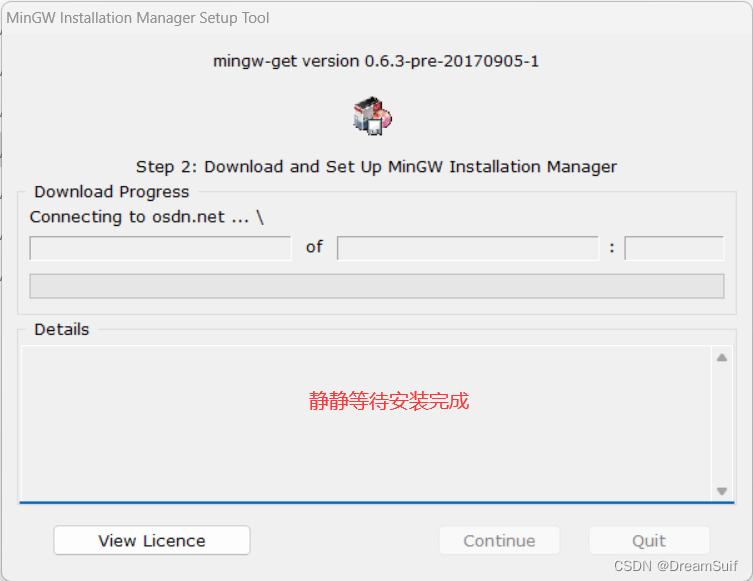
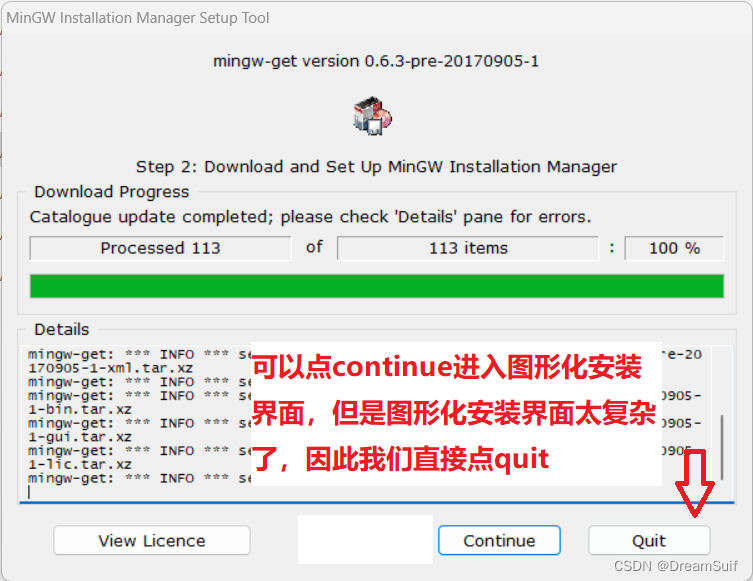
下载完成后我们会得到这样一个安装程序

双击打开

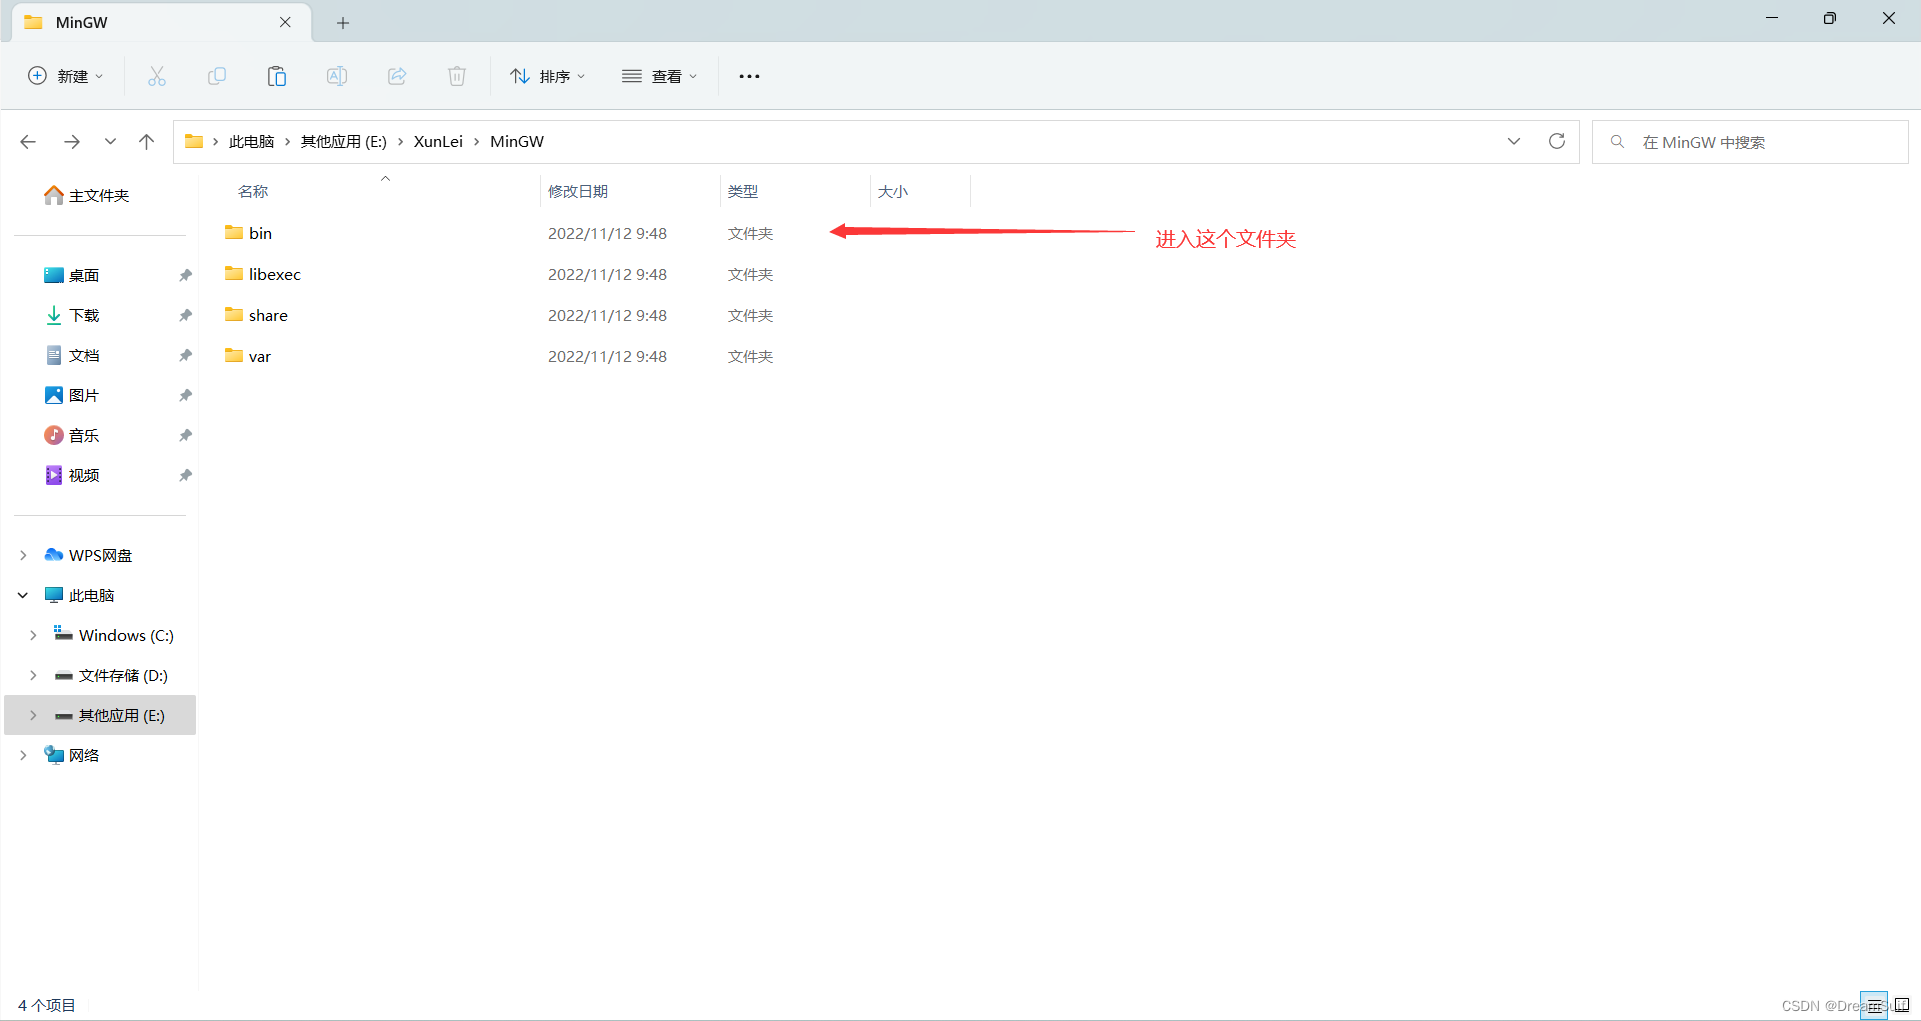
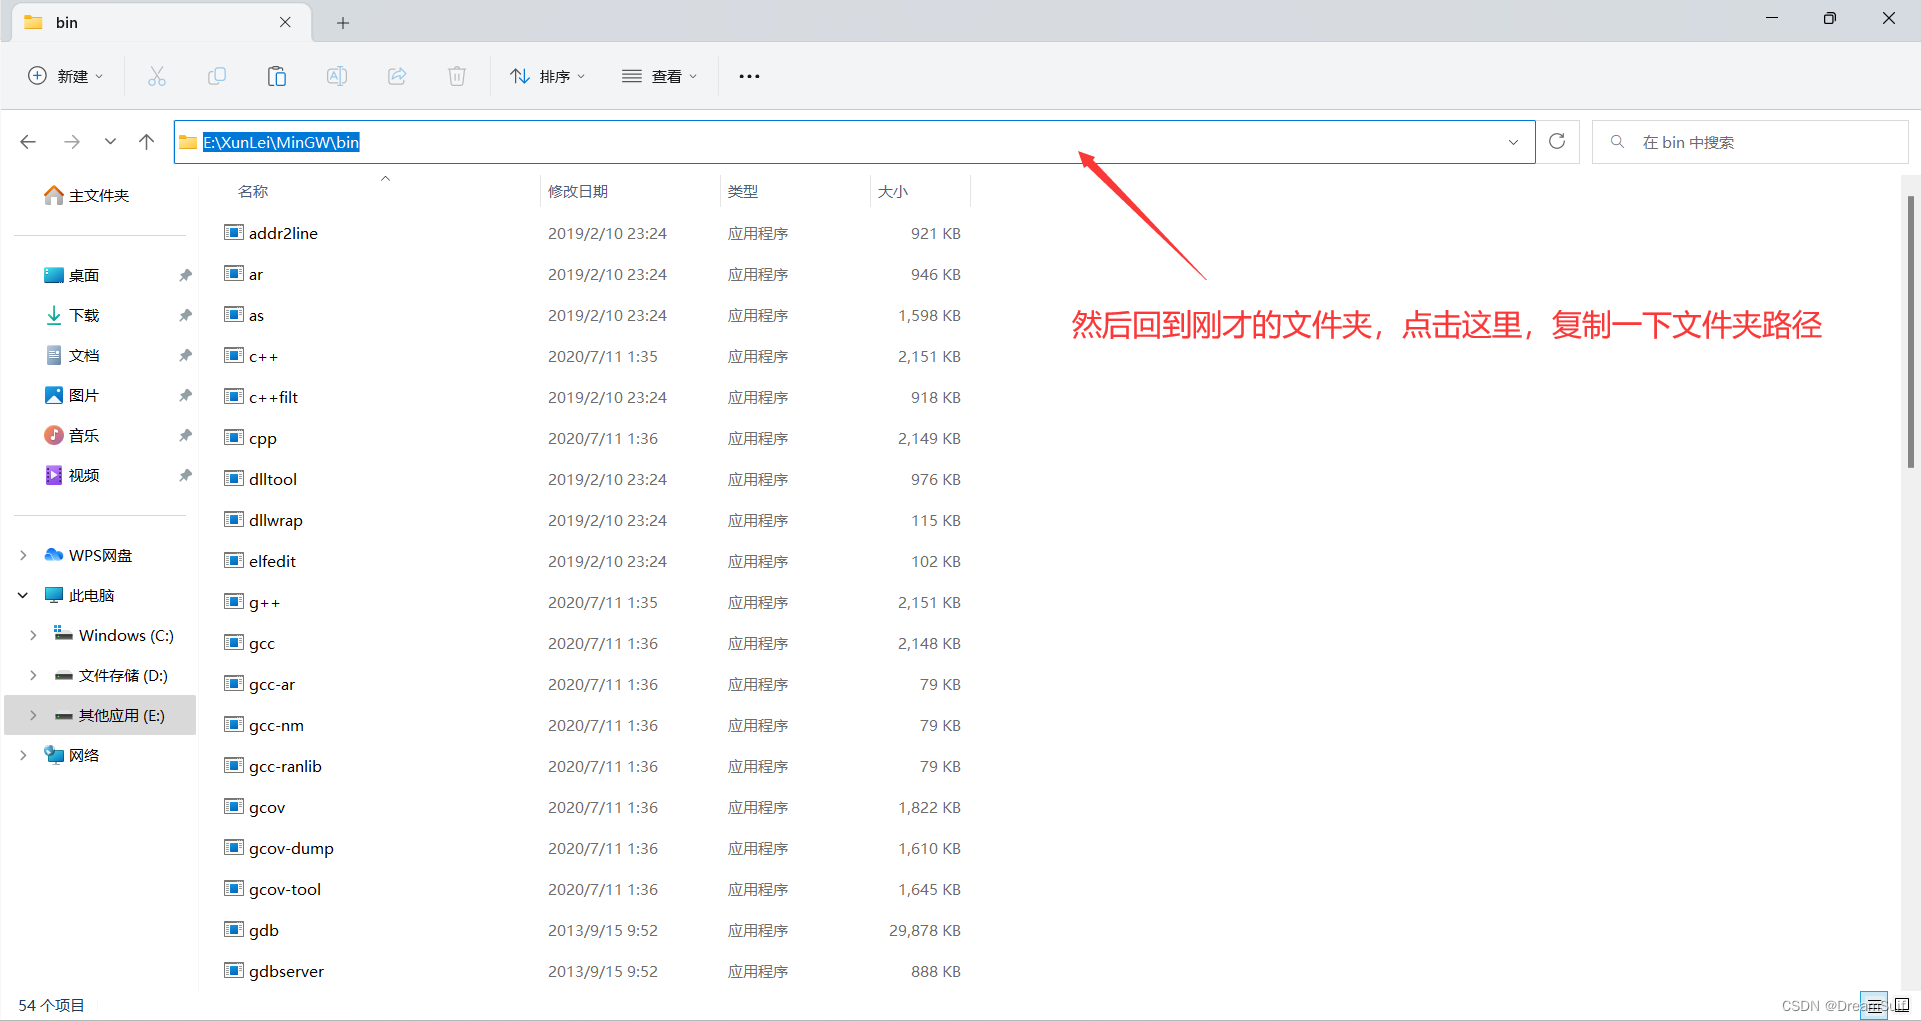
然后我们找到mingw的安装文件夹


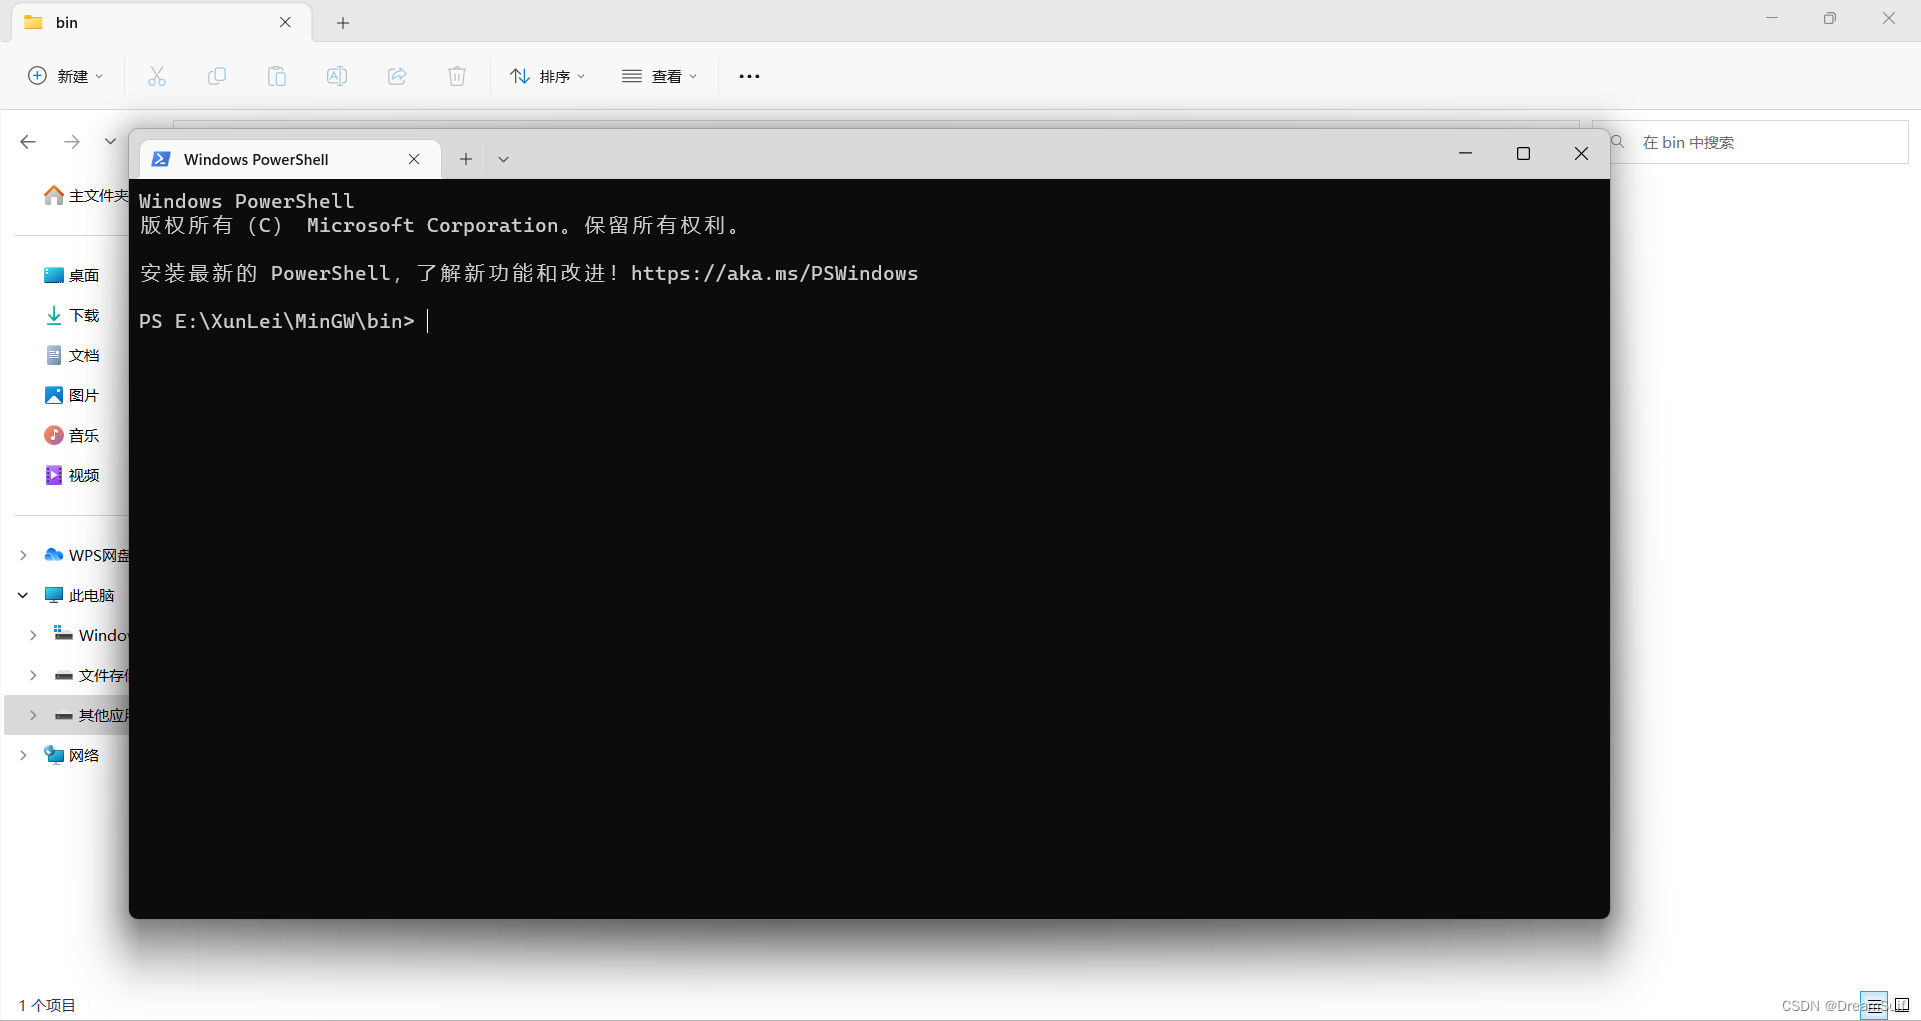
依次输入
mingw-get install gcc
mingw-get install g++
mingw-get install gdb
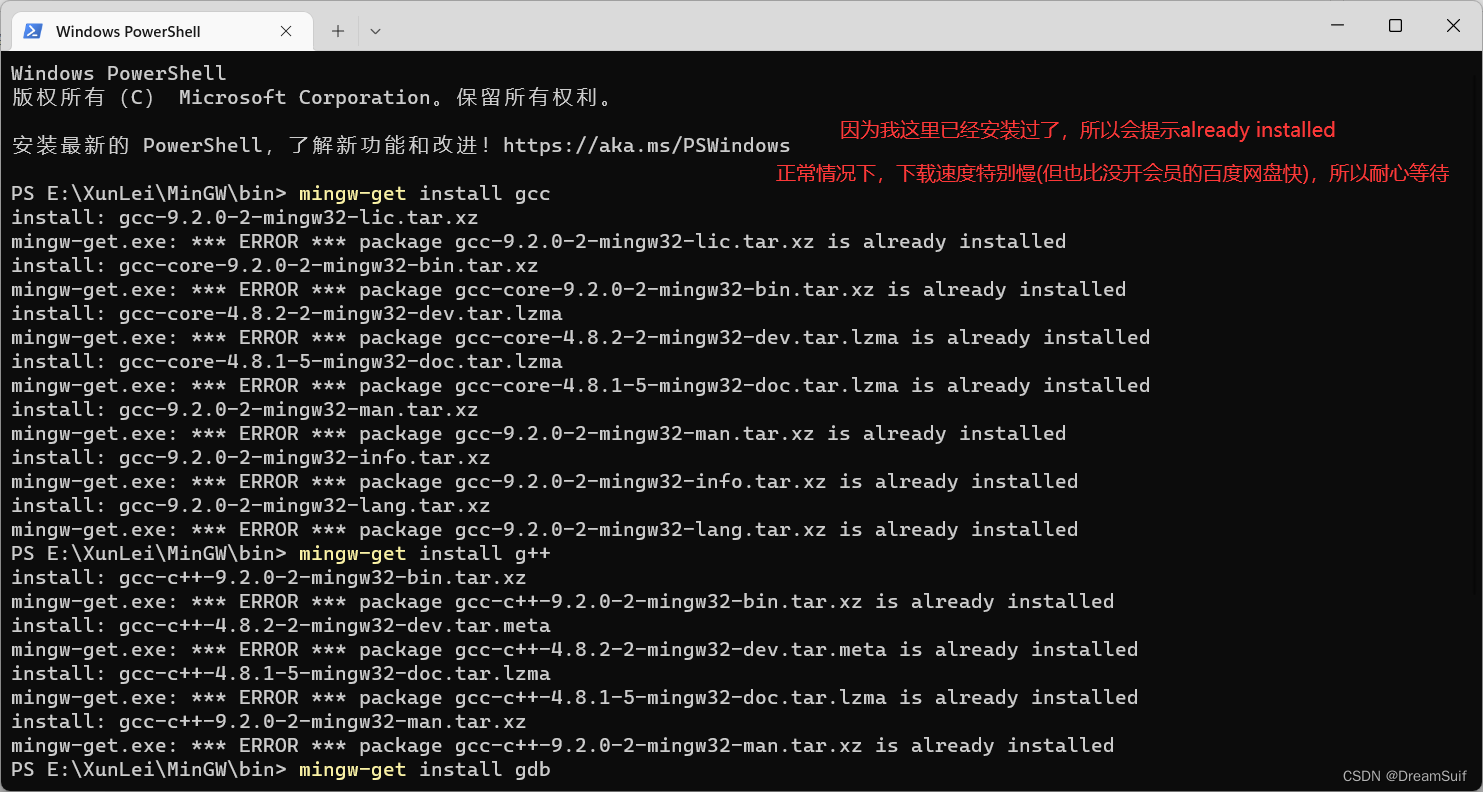
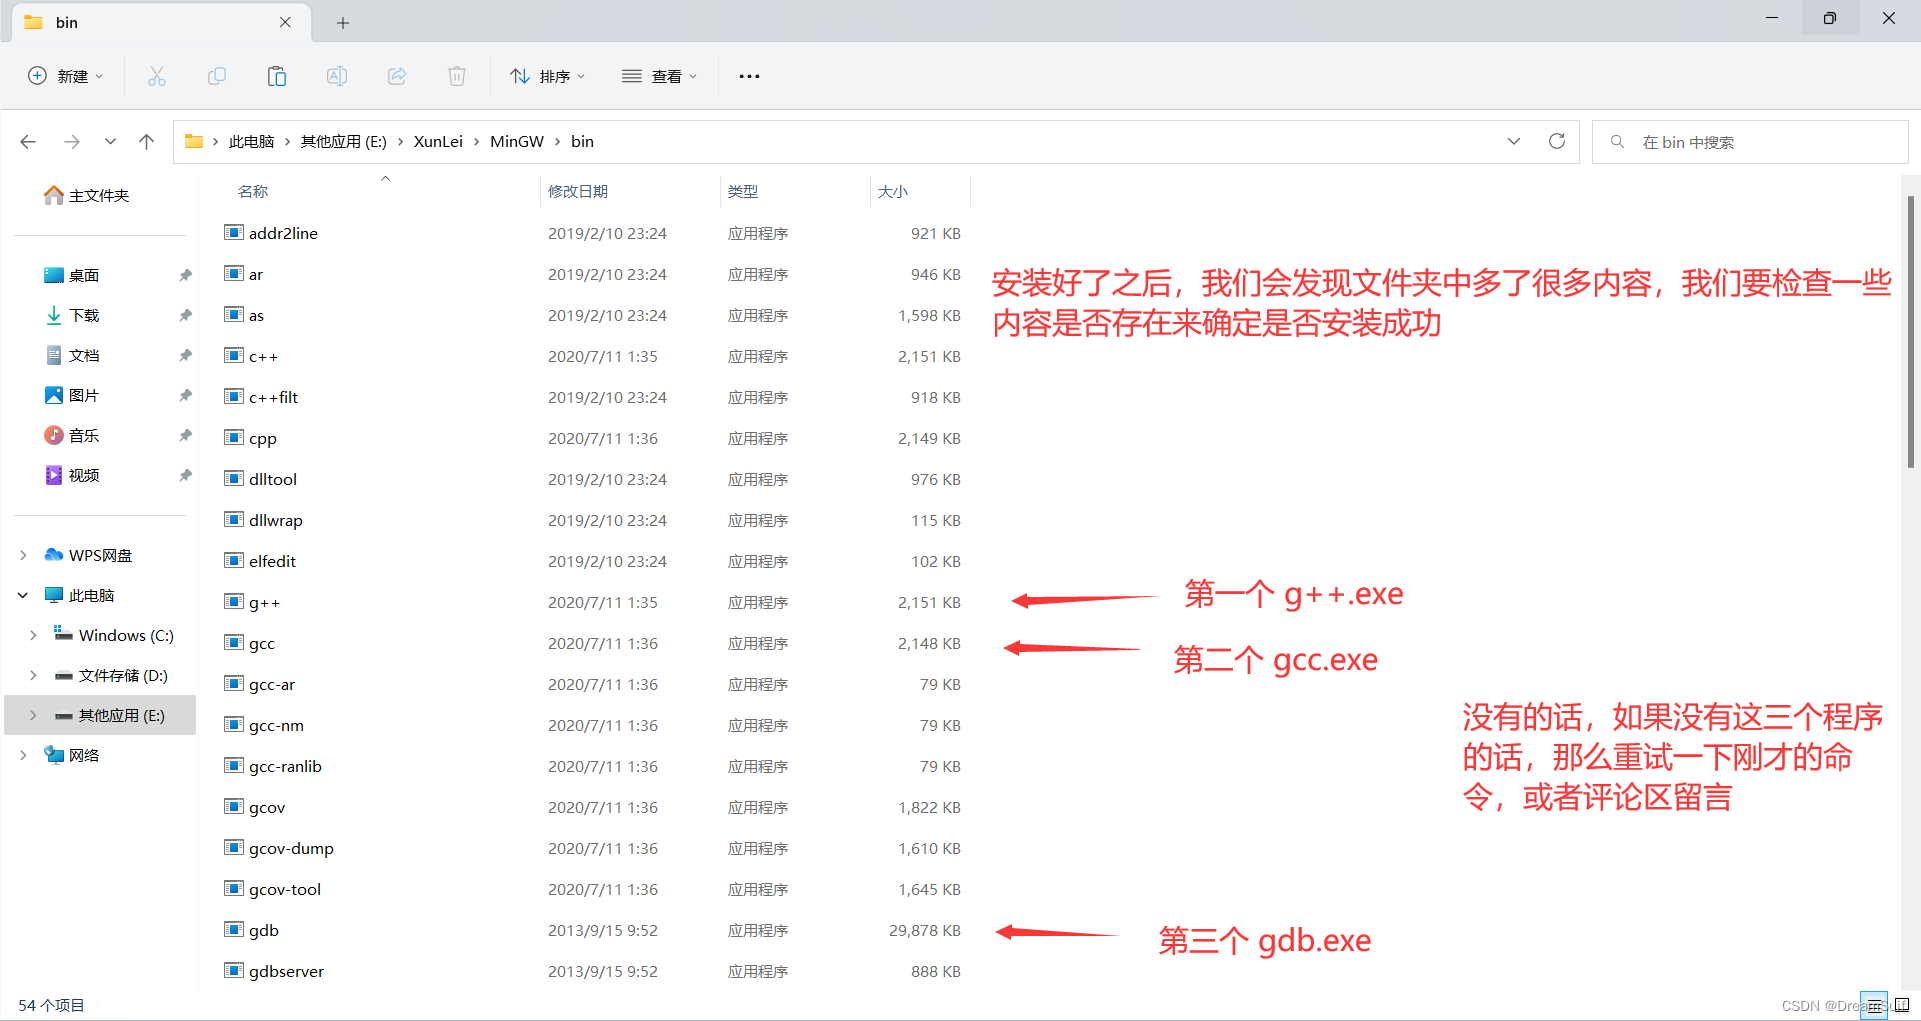
然后mingw就下载完成了
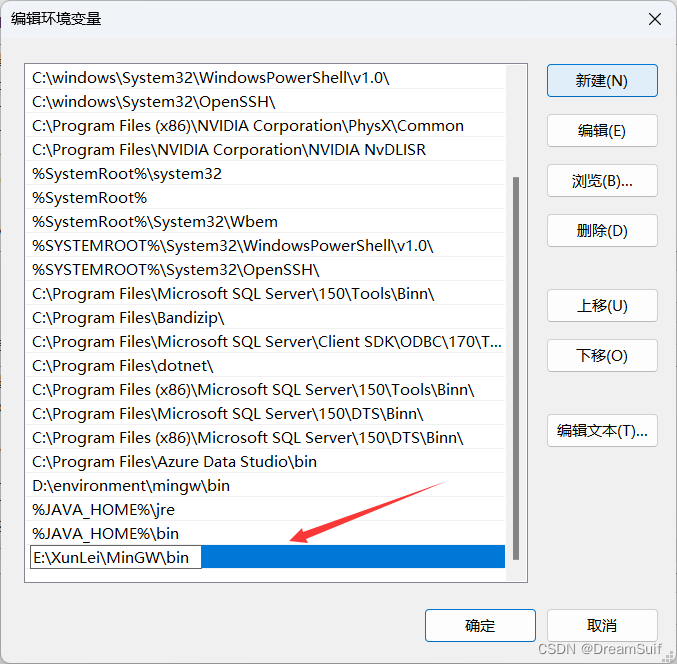
第三步 将mingw添加至系统变量中
这一步就是告诉电脑,可以在哪个文件夹里找到 C/C++ 的运行环境


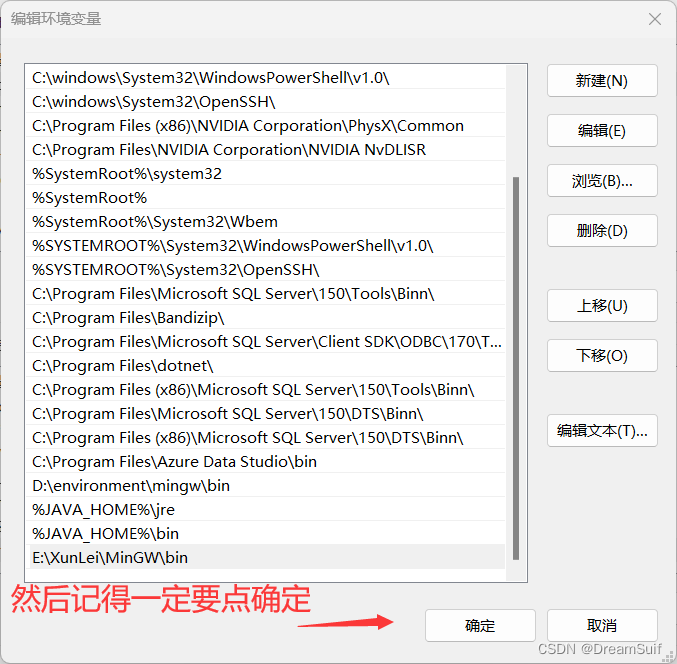
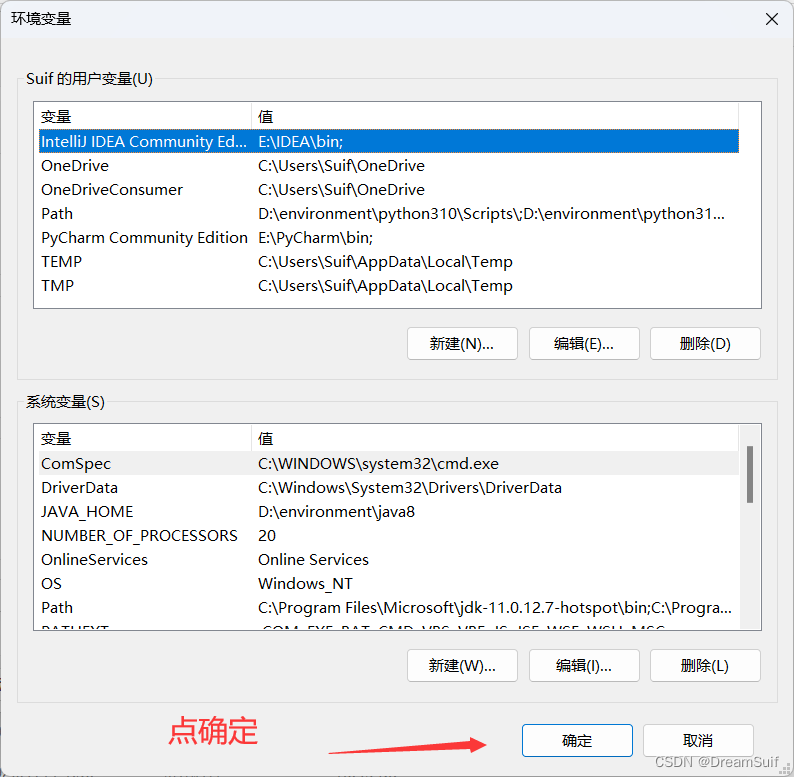
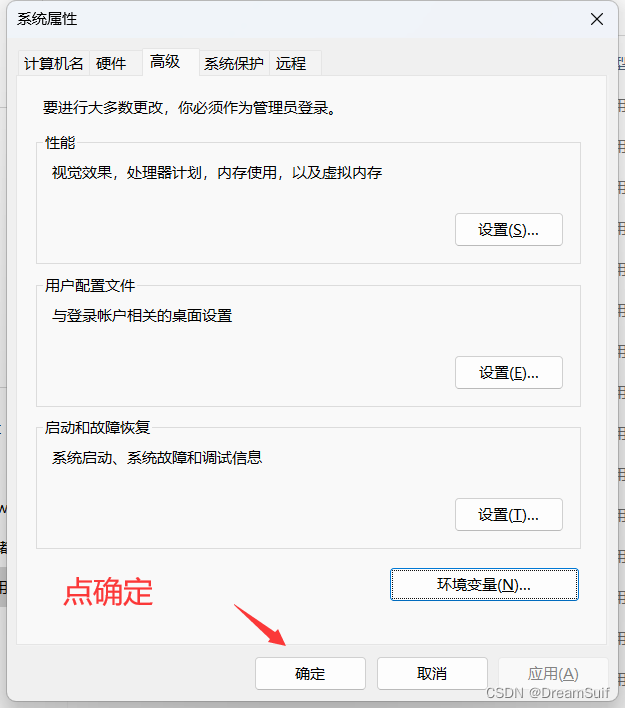
这样我们的系统环境就配置完成了
我们可以来检验一下是否配置正确
按住 win + r 打开以下界面
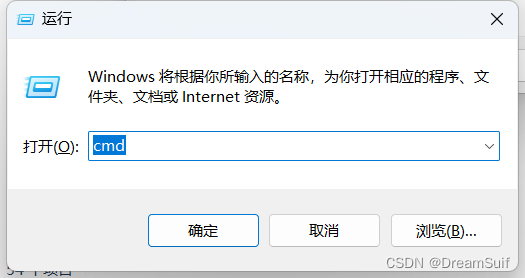
输入 cmd, 然后点确定

依次输入
gcc -v
g++ -v
gdb -v
看看是否显示正常结果
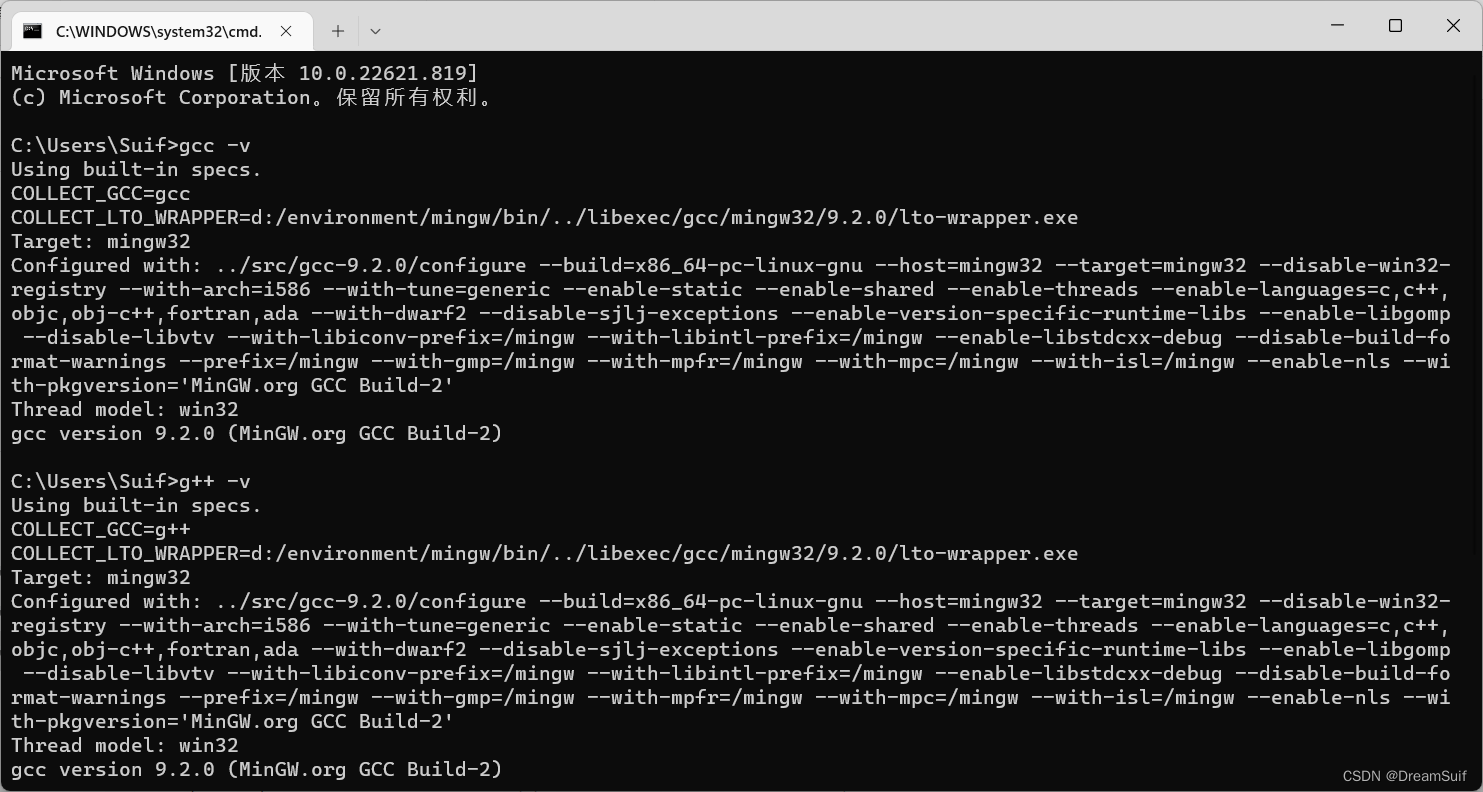
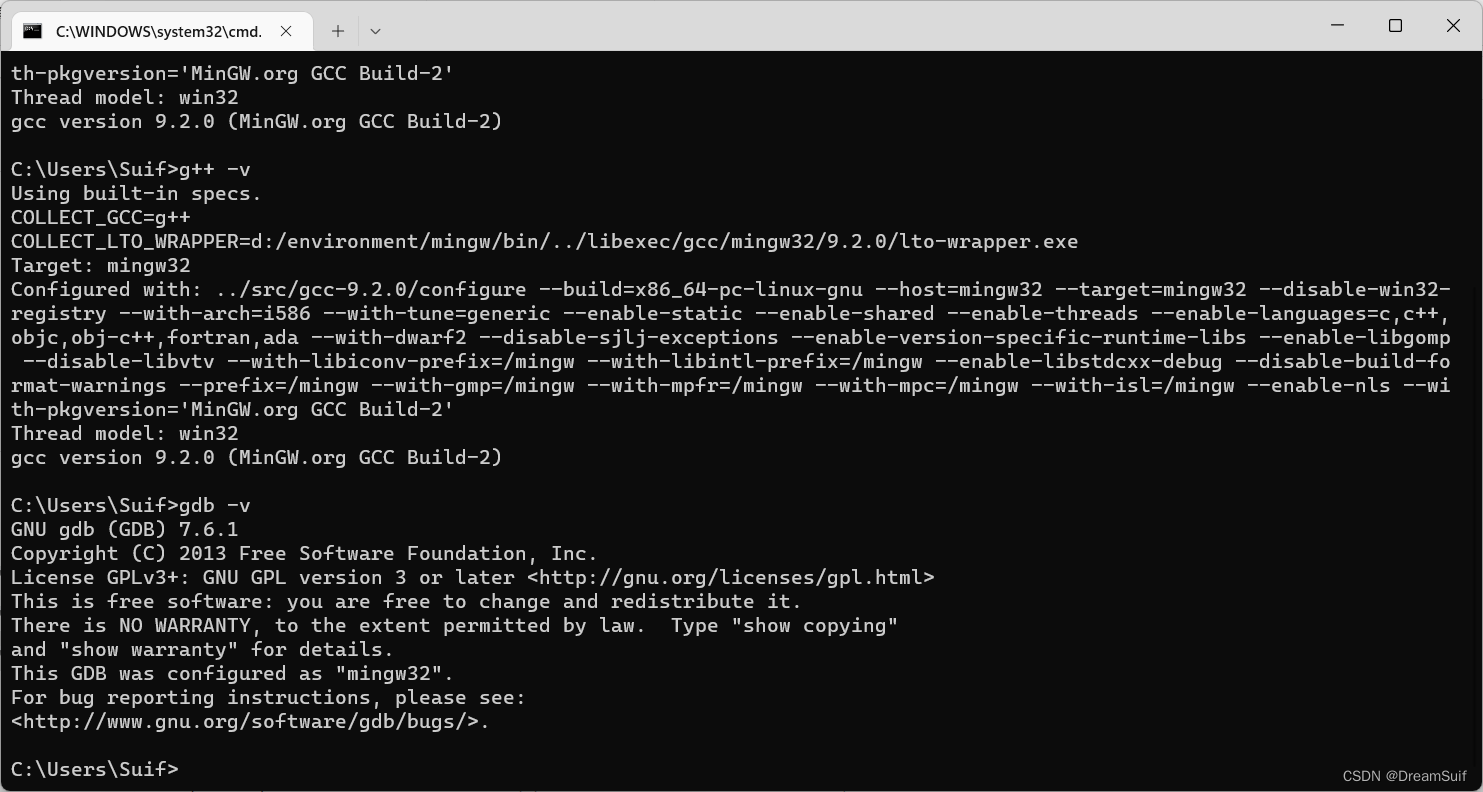
结果正常显示就表示系统环境配置正确,这时候建议重启一下电脑(当然也可以不重启)
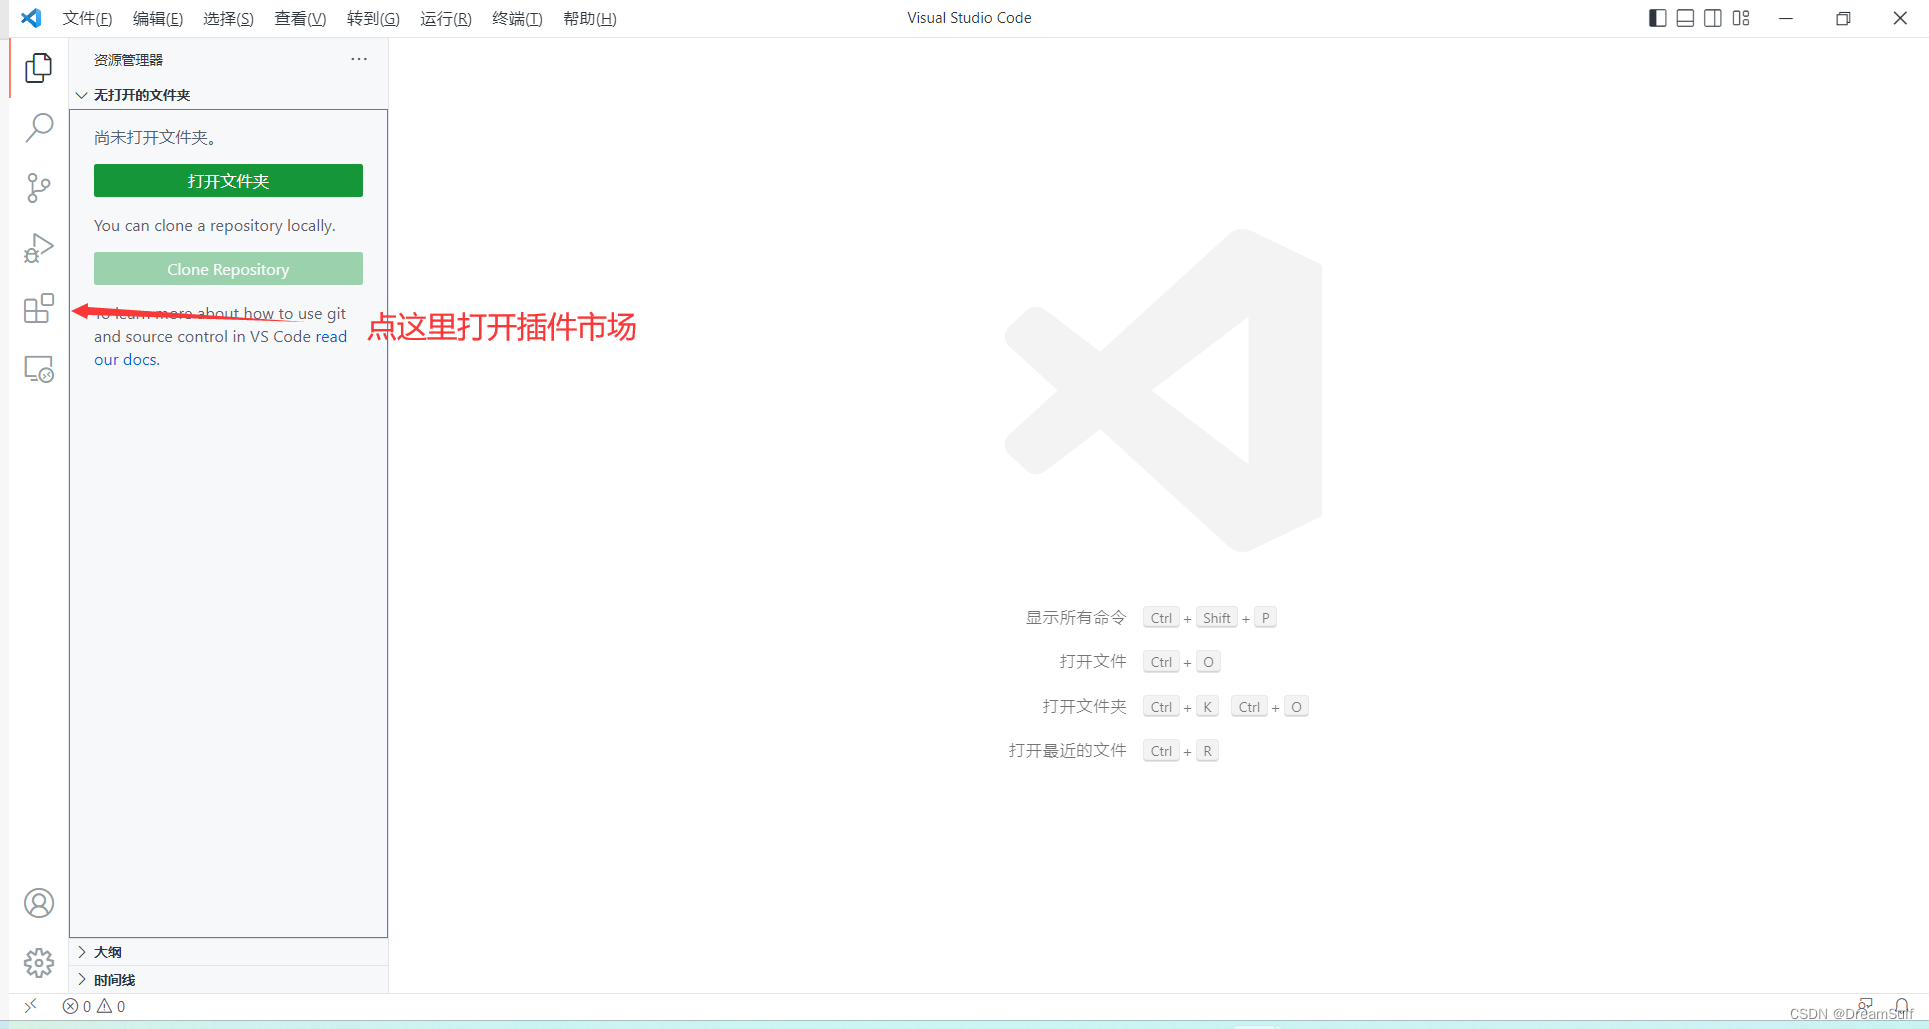
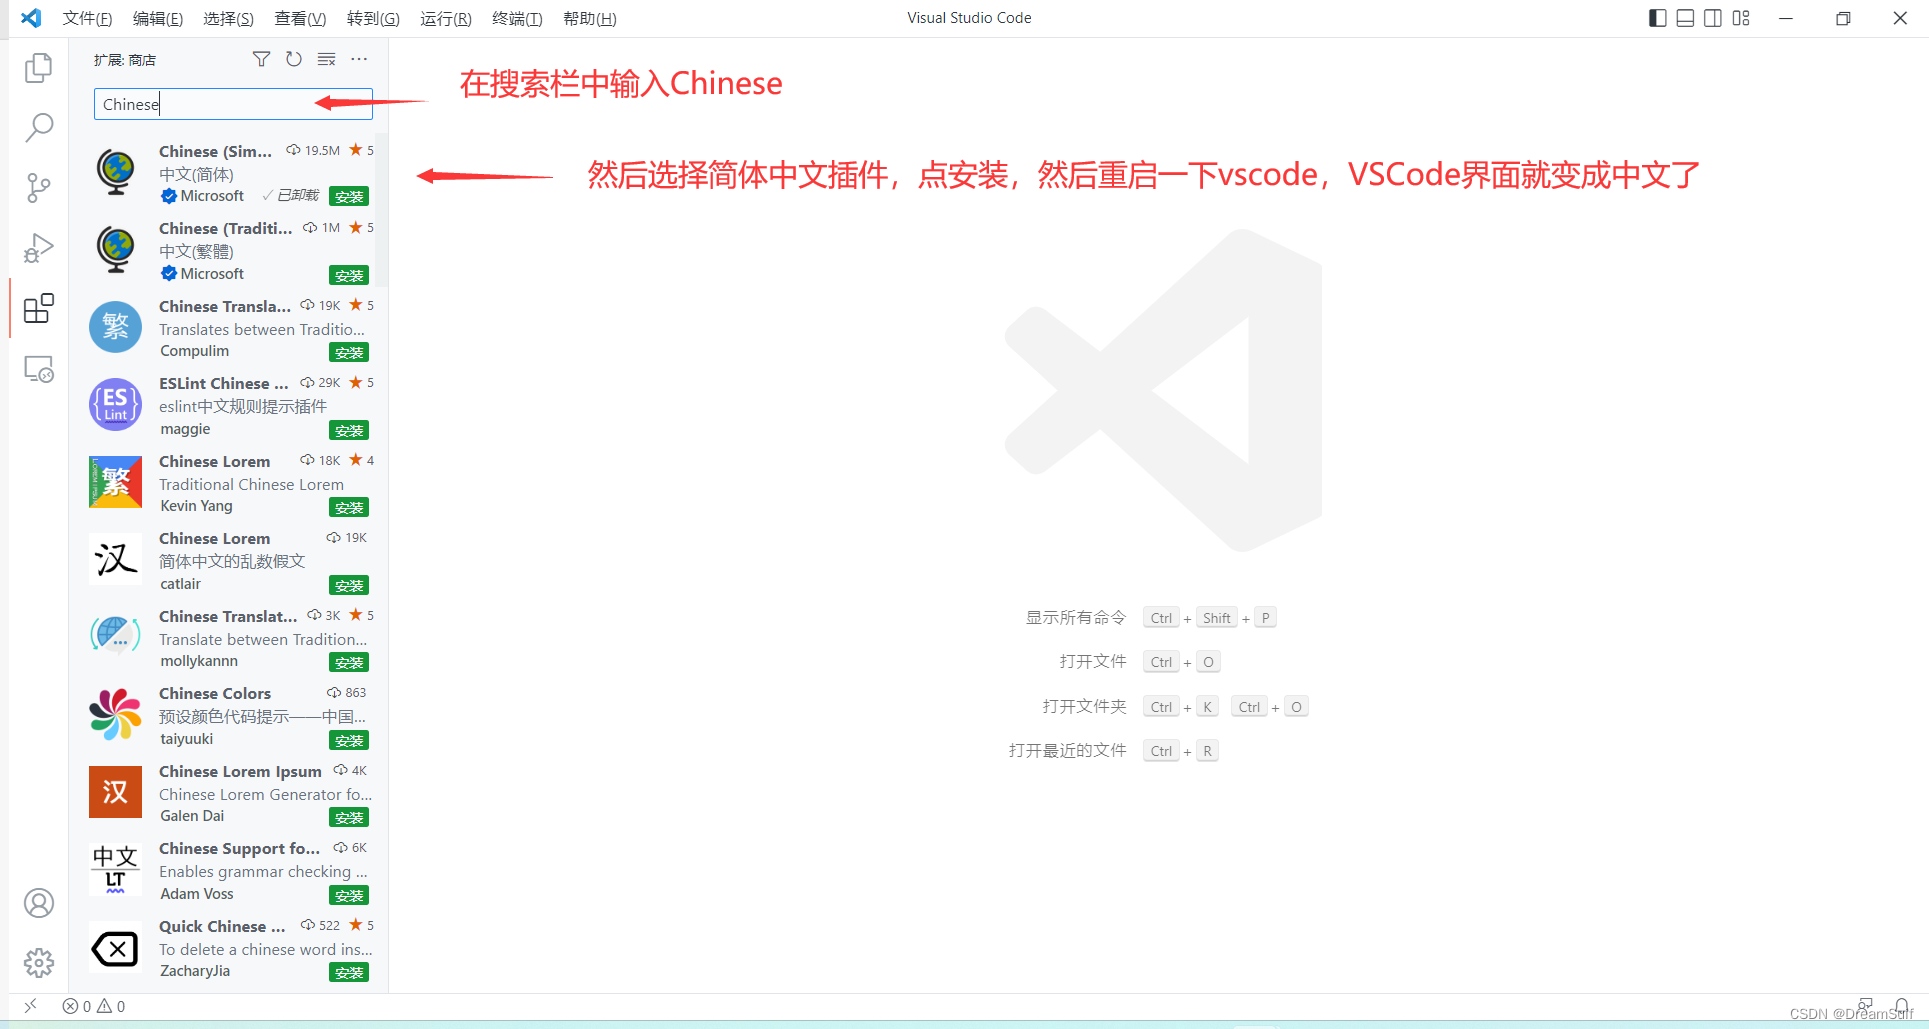
第四步 打开VsCode安装一下必要的插件

我们的vscode配置 C/C++ 的准备工作就完成了
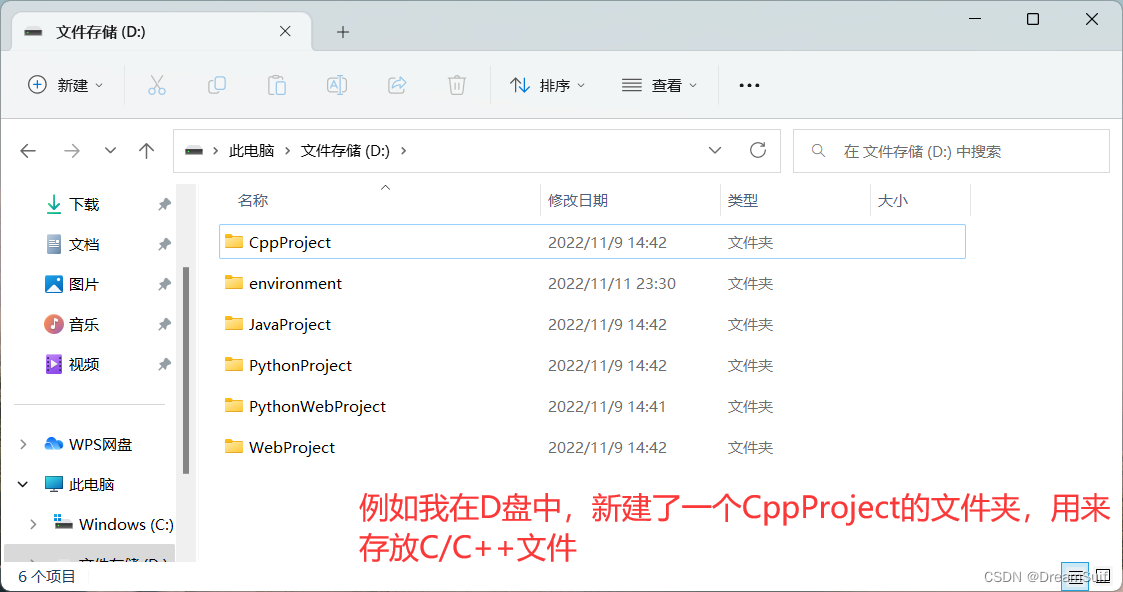
正式开始配置 第一步 新建个存放C/C++文件的文件夹,并新建个cpp文件

我们在vscode中打开那个文件夹


然后我们就可以开始配置环境了,配置的环境只适用于这个大文件夹内
第二步 (1)简单的环境配置方法 - run code调试
这个方法需要用到一个插件, run code,我们打开扩展商店安装一下run code插件
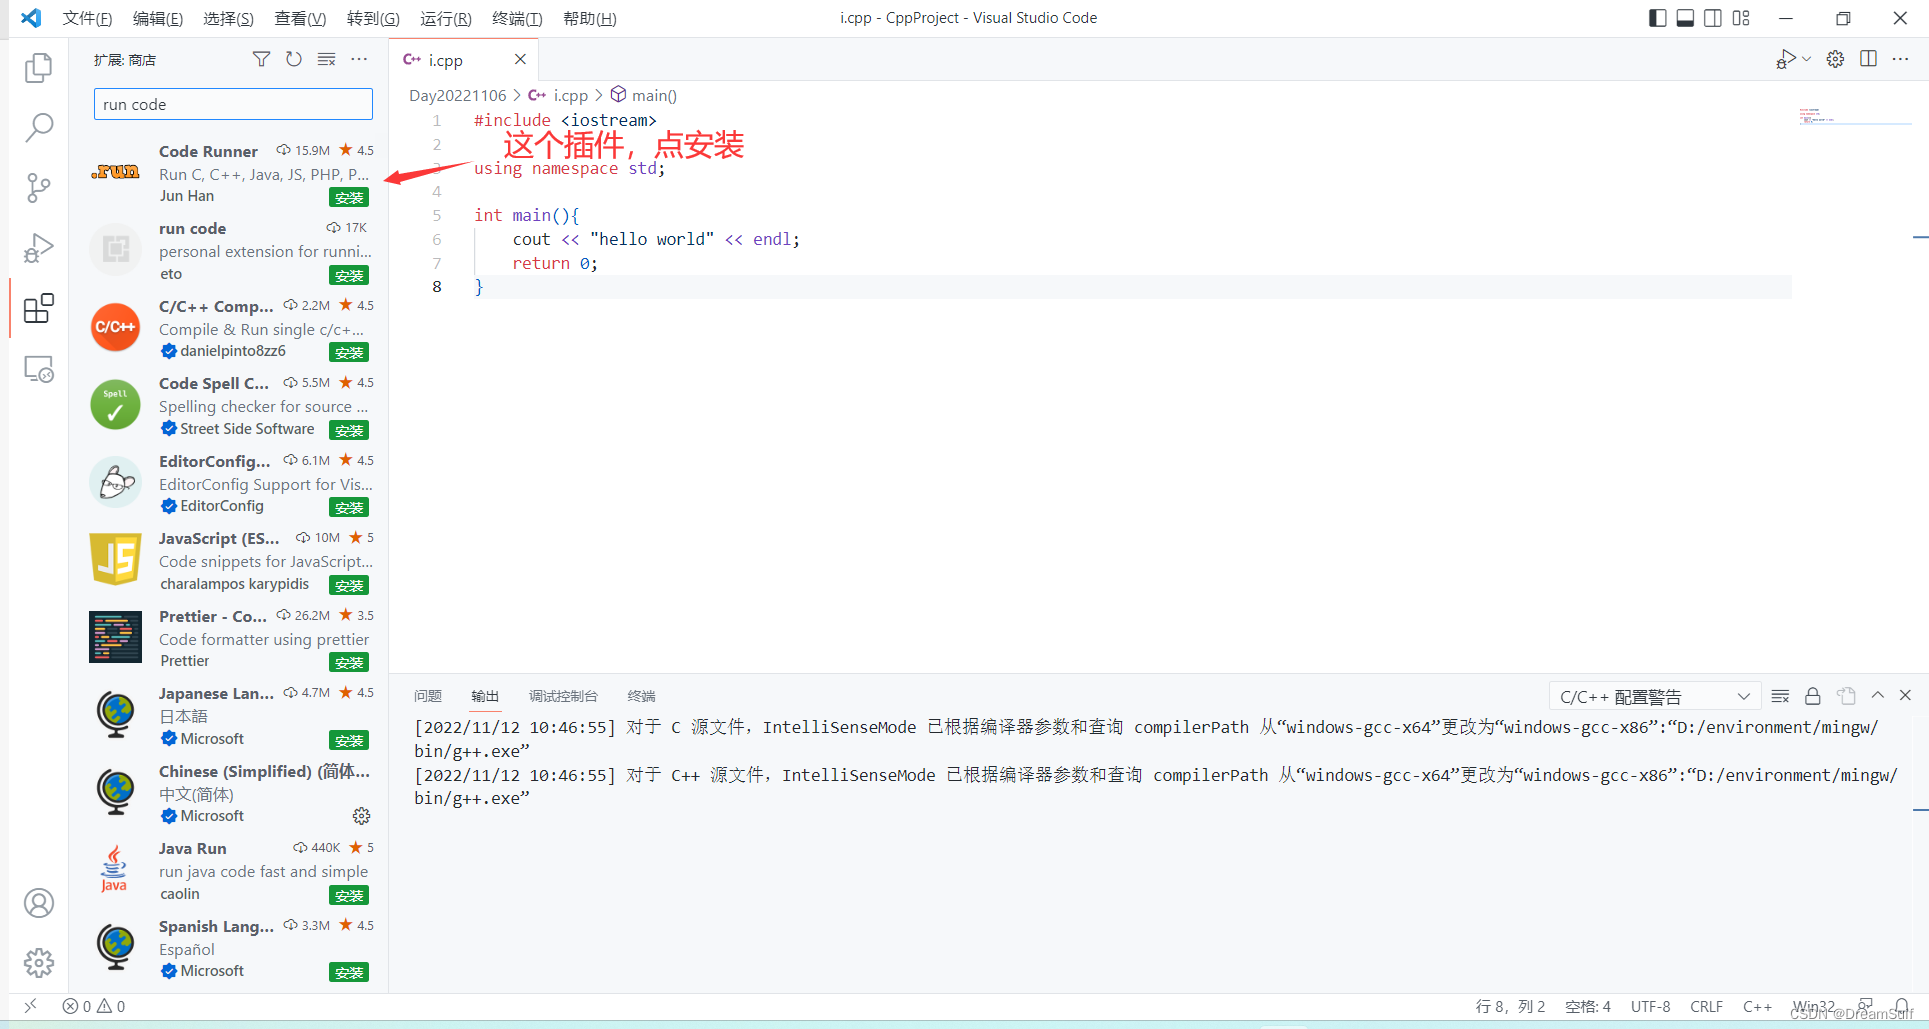
安装完成了后,我们会发现右键多了个run code

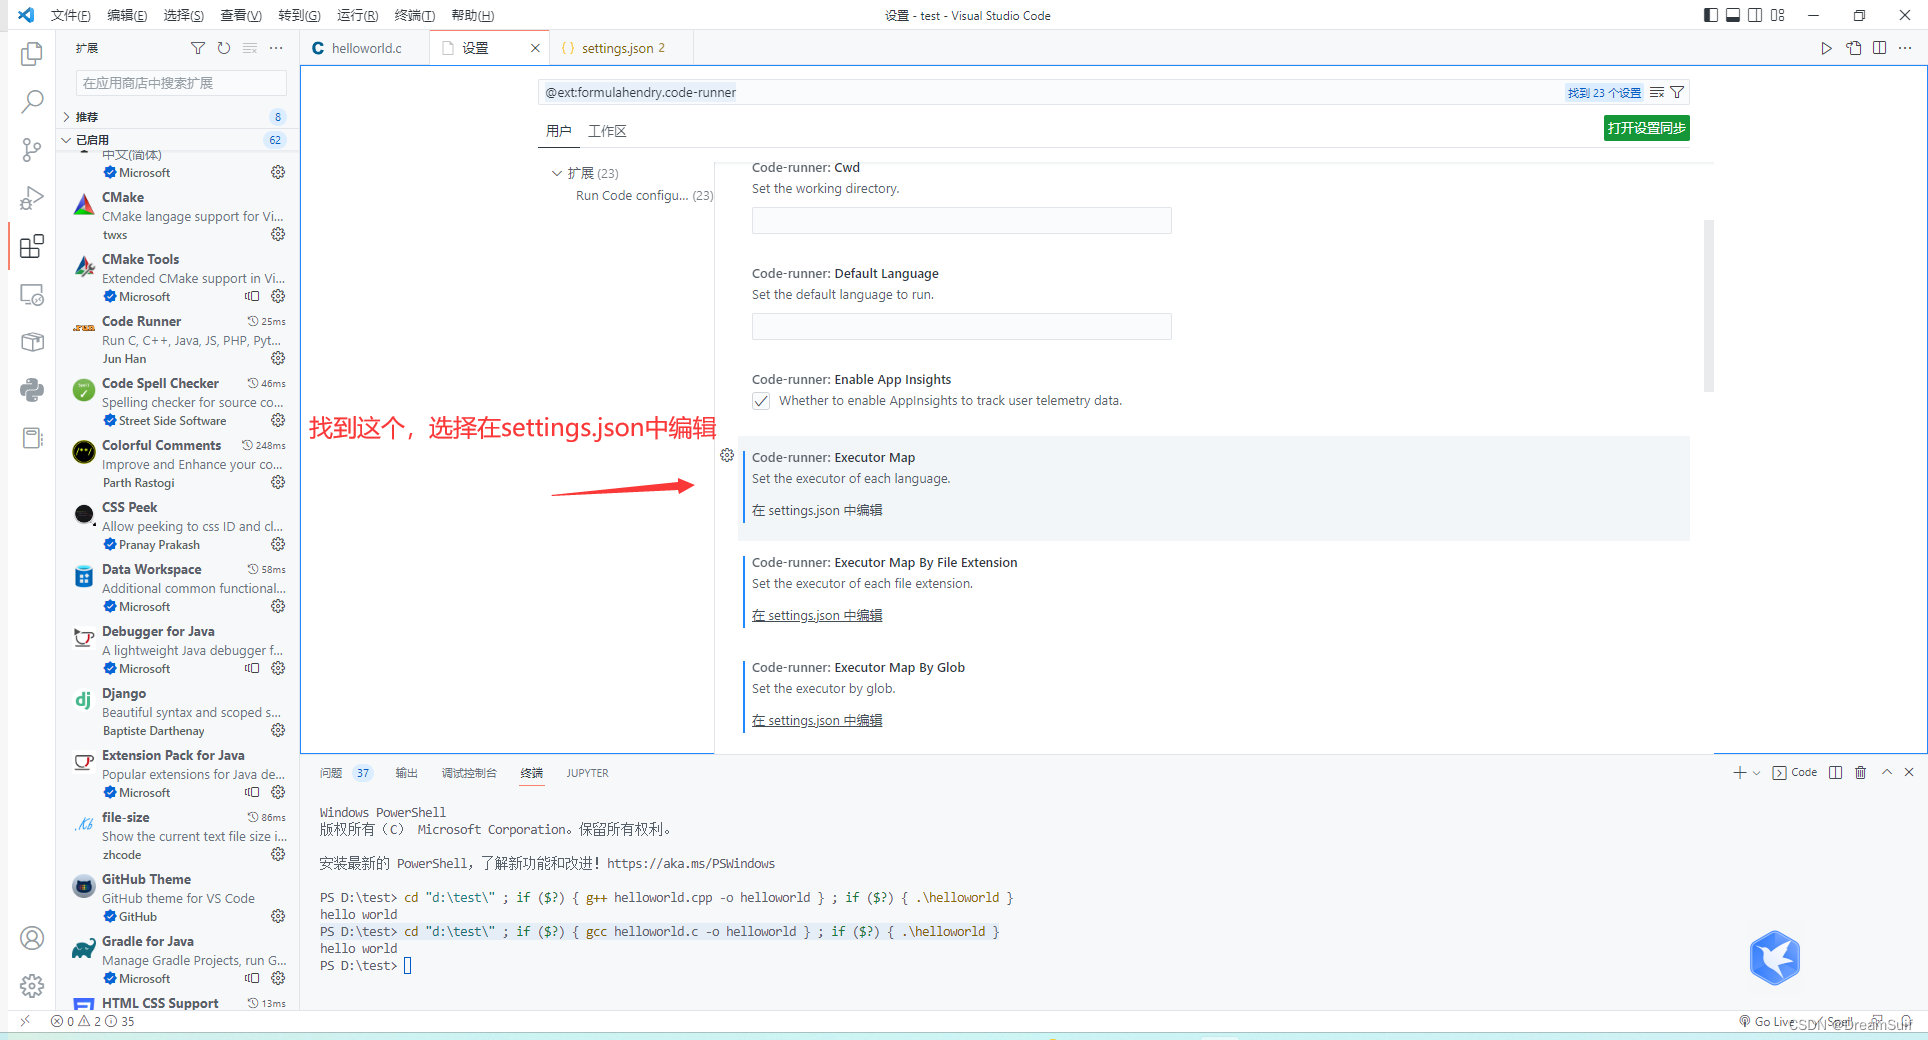
直接点run code就能够编译运行程序了,当然,这样只能得到输出结果,而不能直接在vscode中向程序中输入内容,所以我们还需要一些设置来调整一下run code,我们按 ctrl + ,进入设置(,是一个按键,在M键旁边)


重启一下vscode,这样我们就可以在vscode中向程序输入内容了
问题1:run code执行代码出现gcc(或g++) :error; no such file or directory的错误 原因分析
这个错误可能是编译命令执行前没有进入指定的文件夹前导致的,所以我们加一个cd 目标文件夹路径即可
解决办法 第一步 打开code runner扩展设置

第二步 进入指令设置界面
第三步 修改编译指令

"c": "cd $dir && gcc $fileName -o $fileNameWithoutExt && $dir$fileNameWithoutExt",
"cpp": "cd $dir && g++ $fileName -o $fileNameWithoutExt && $dir$fileNameWithoutExt",
第二步 (2)复杂的环境配置方法 - gdb调试
当然,不借助run code的方法我们也有,而且,我个人更推荐这种环境配置方法。
第一步 配置编译器环境
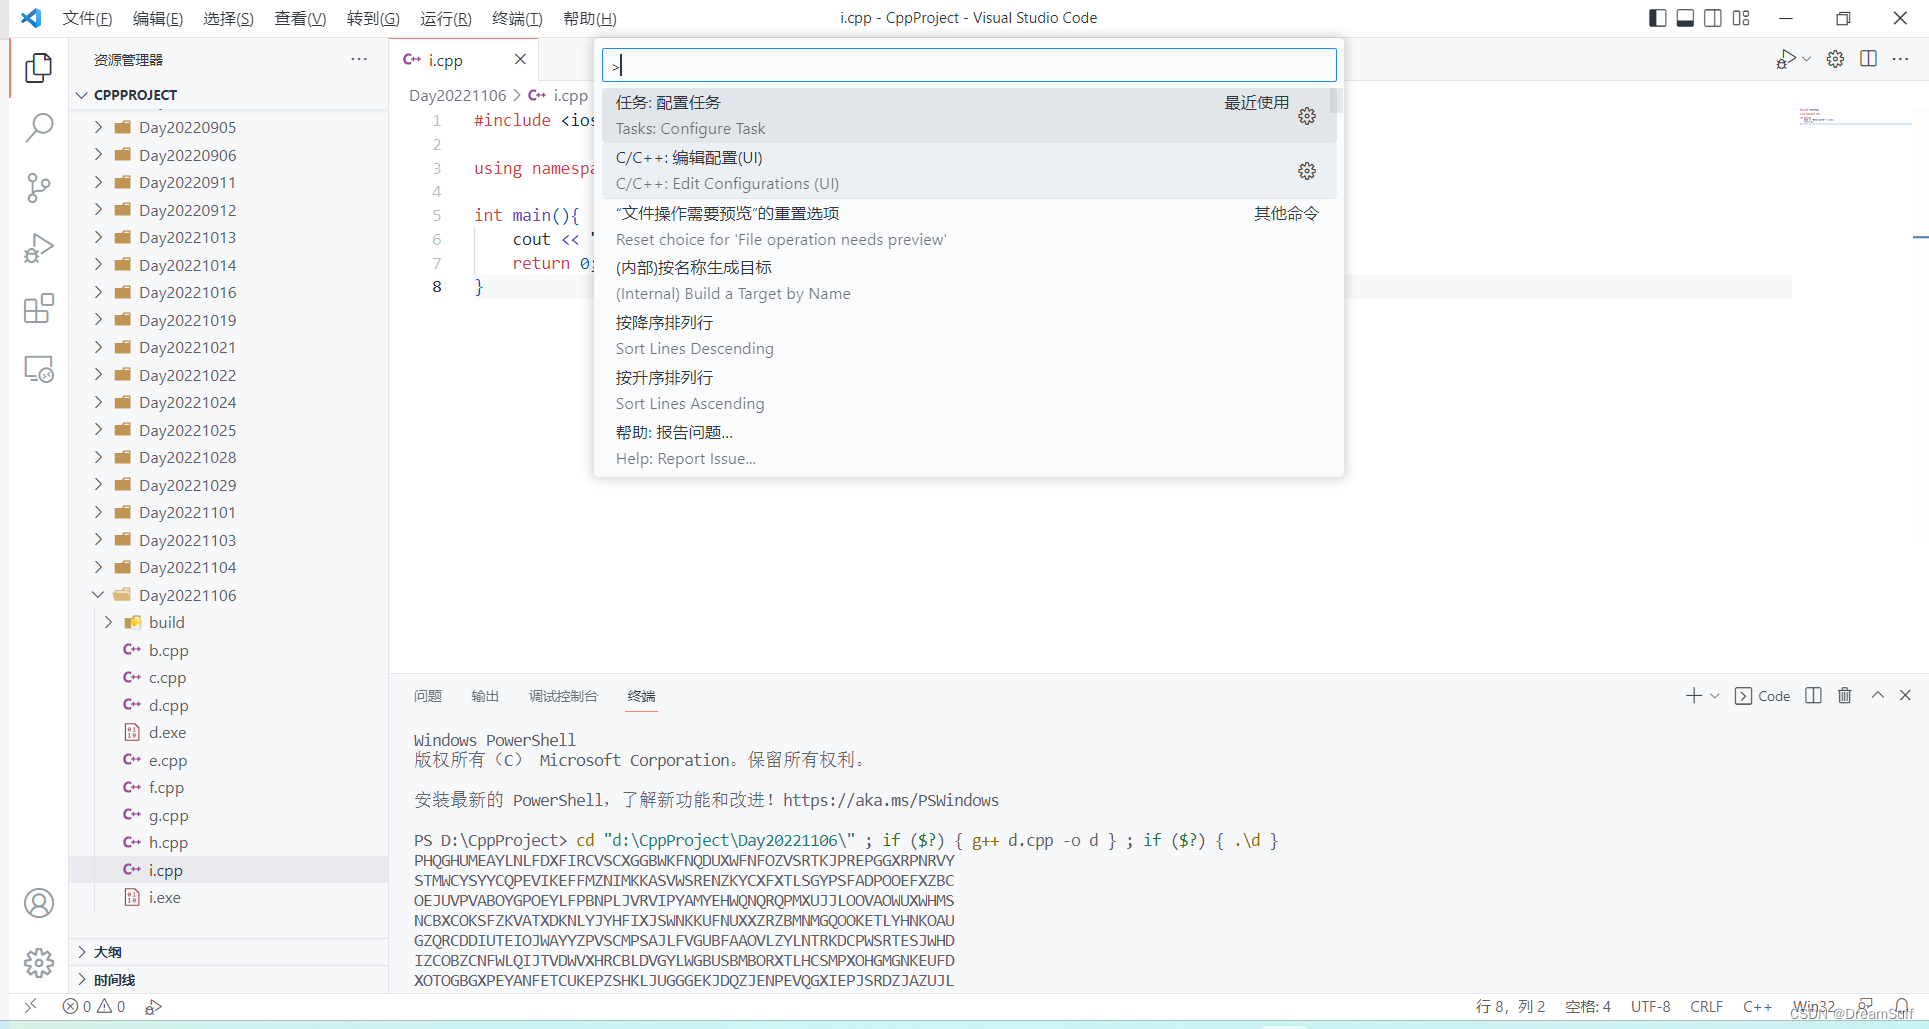
我们按住 ctrl + shift + p

我们配置一下编译器路径


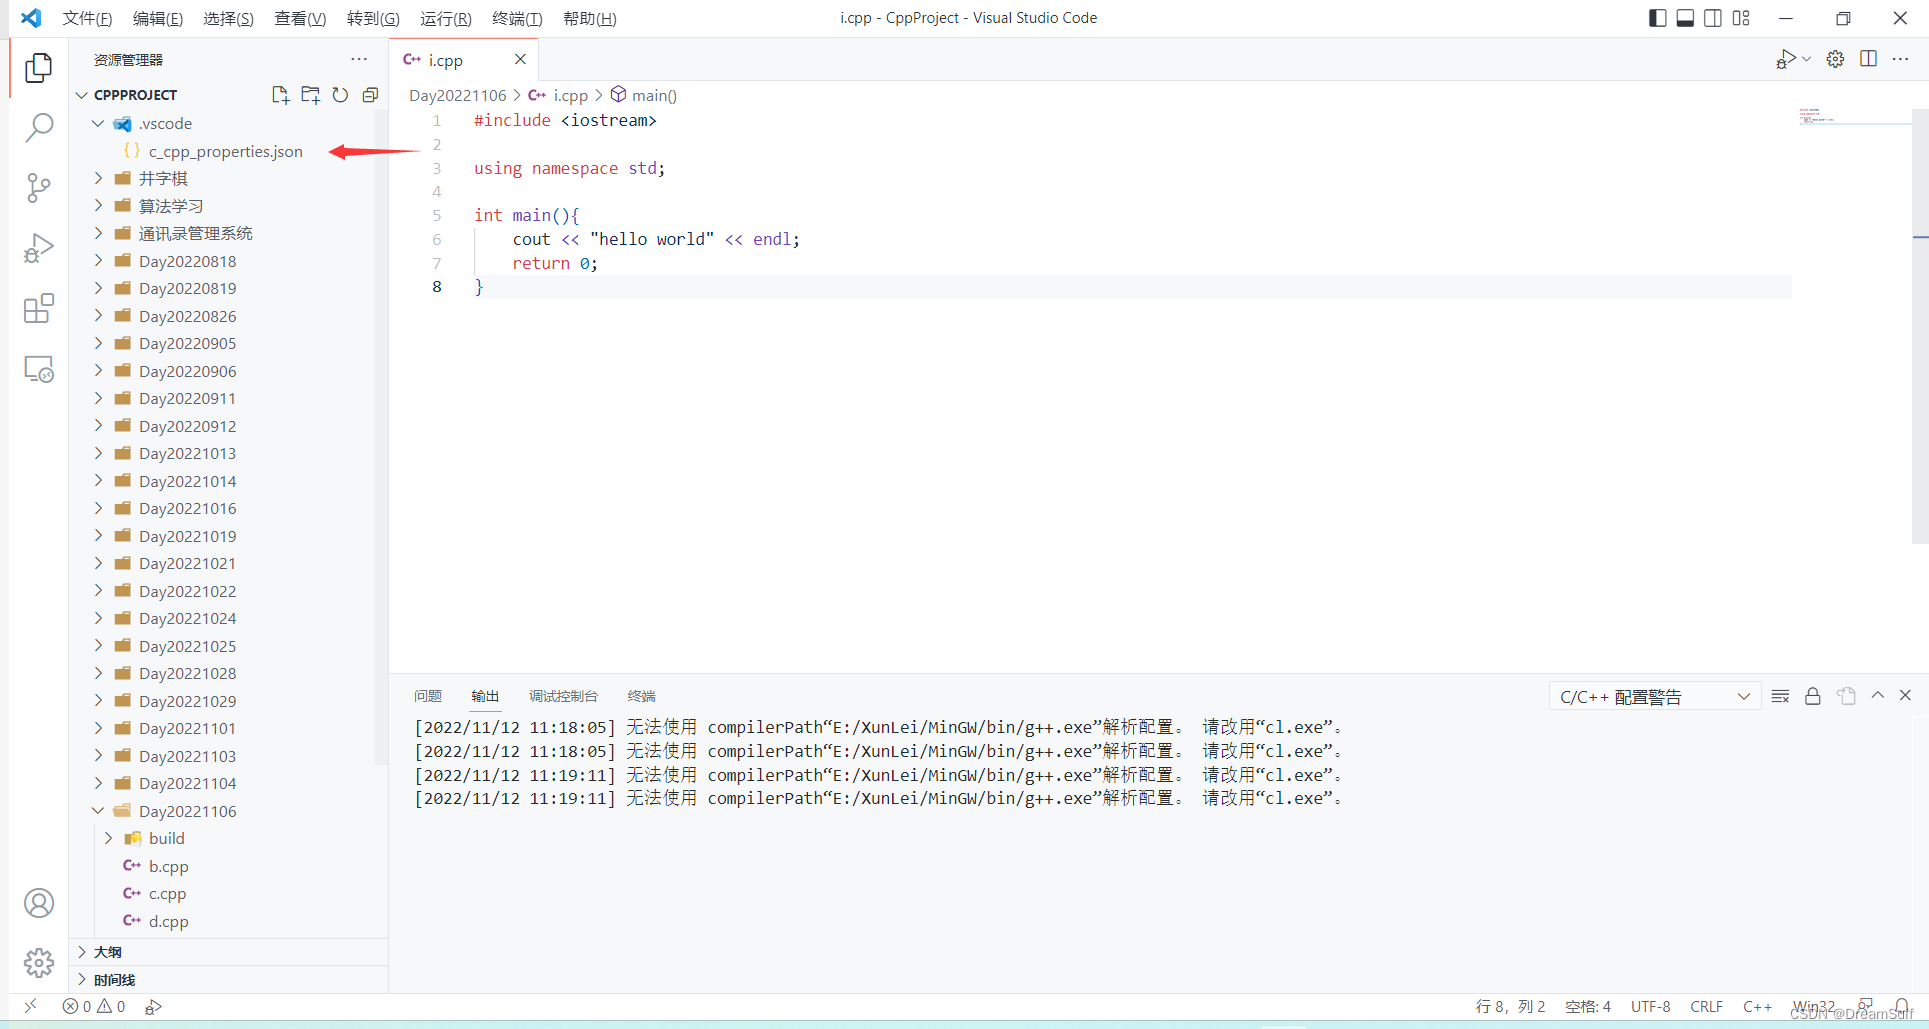
然后关闭这个界面,我们会发现CppProject文件夹中多了一个.vscode文件夹
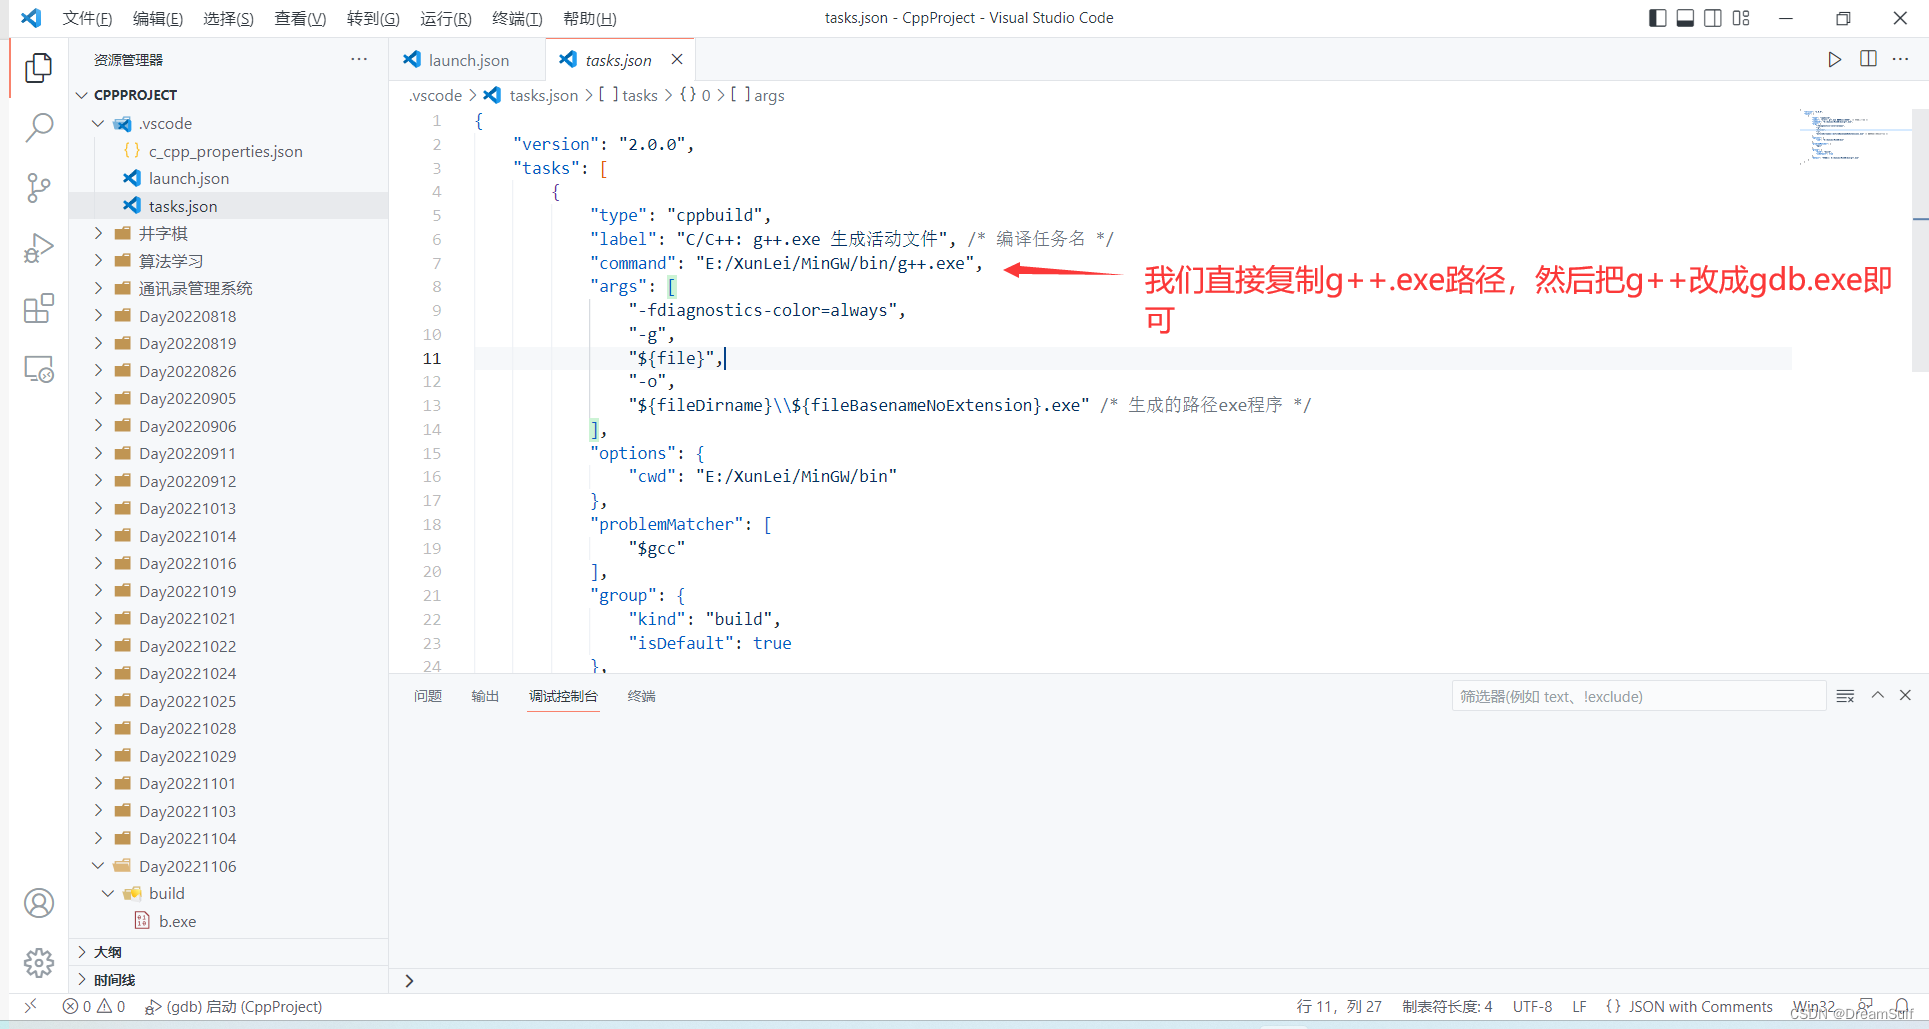
第二步 配置task编译任务
同样,我们按住 ctrl + shift + p
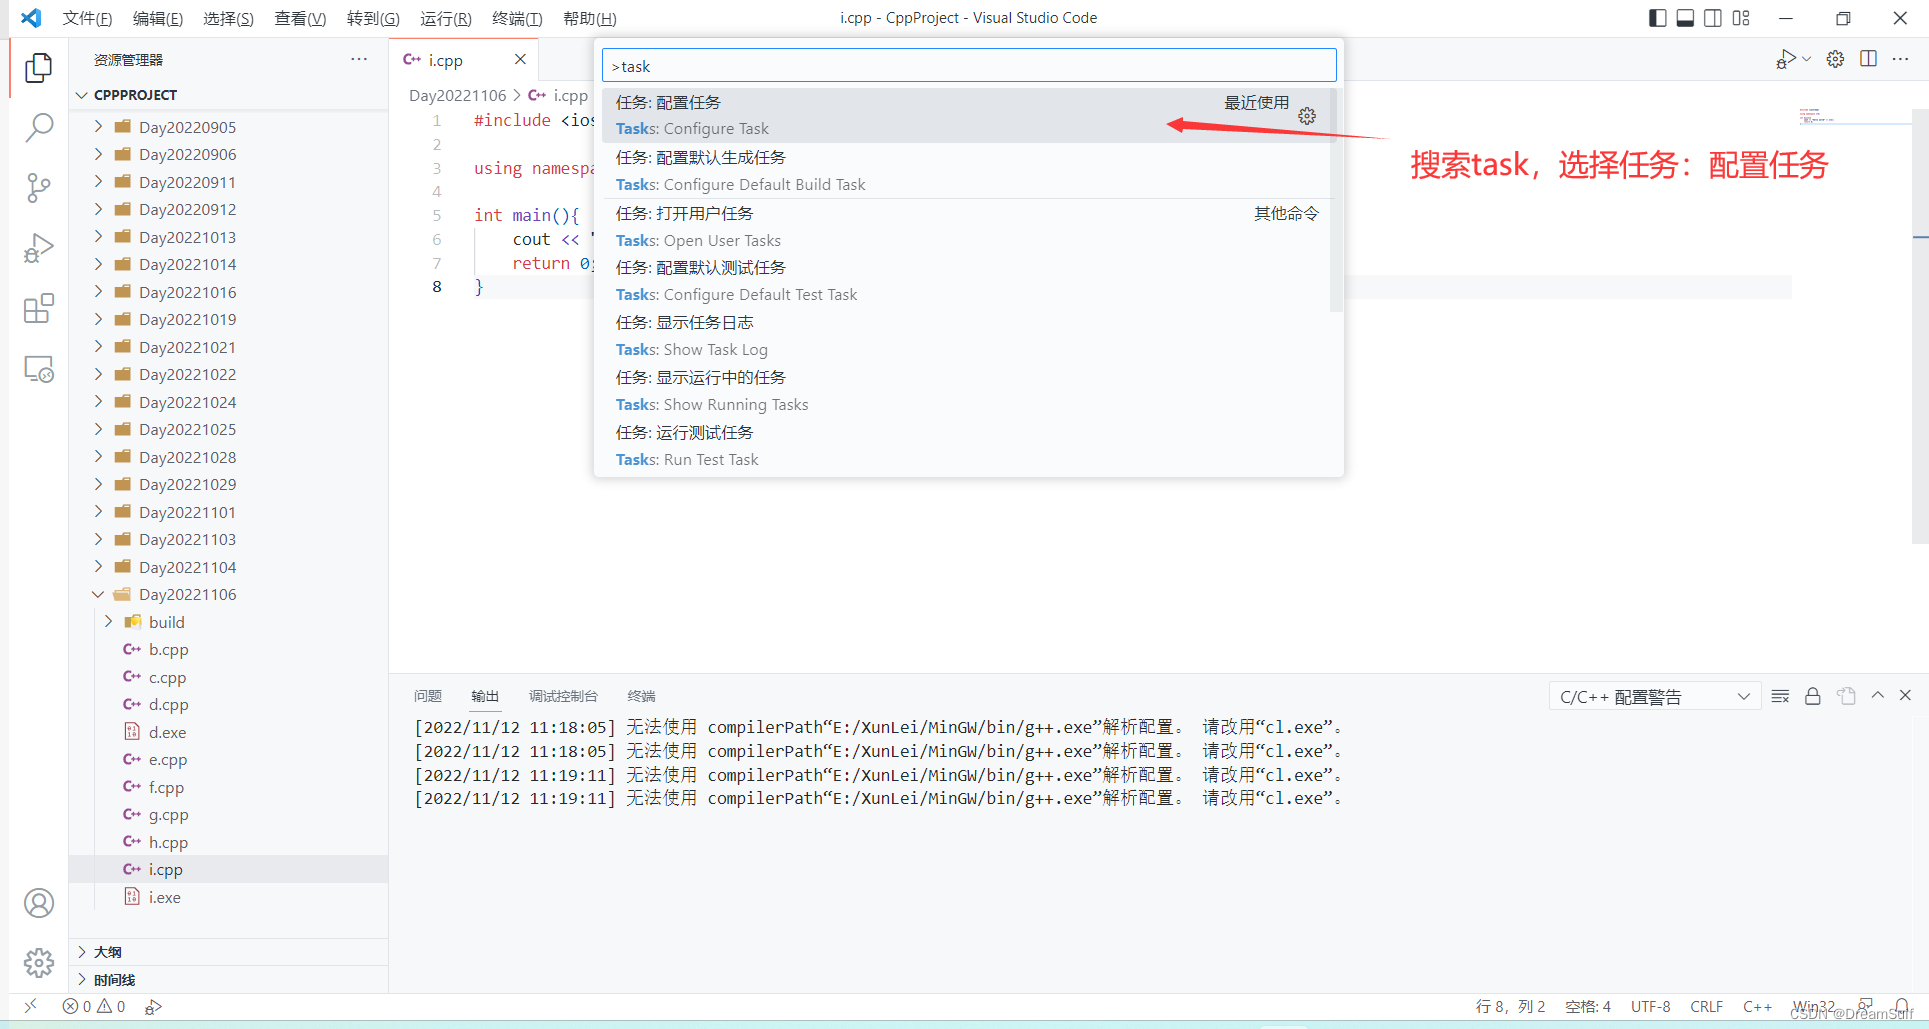
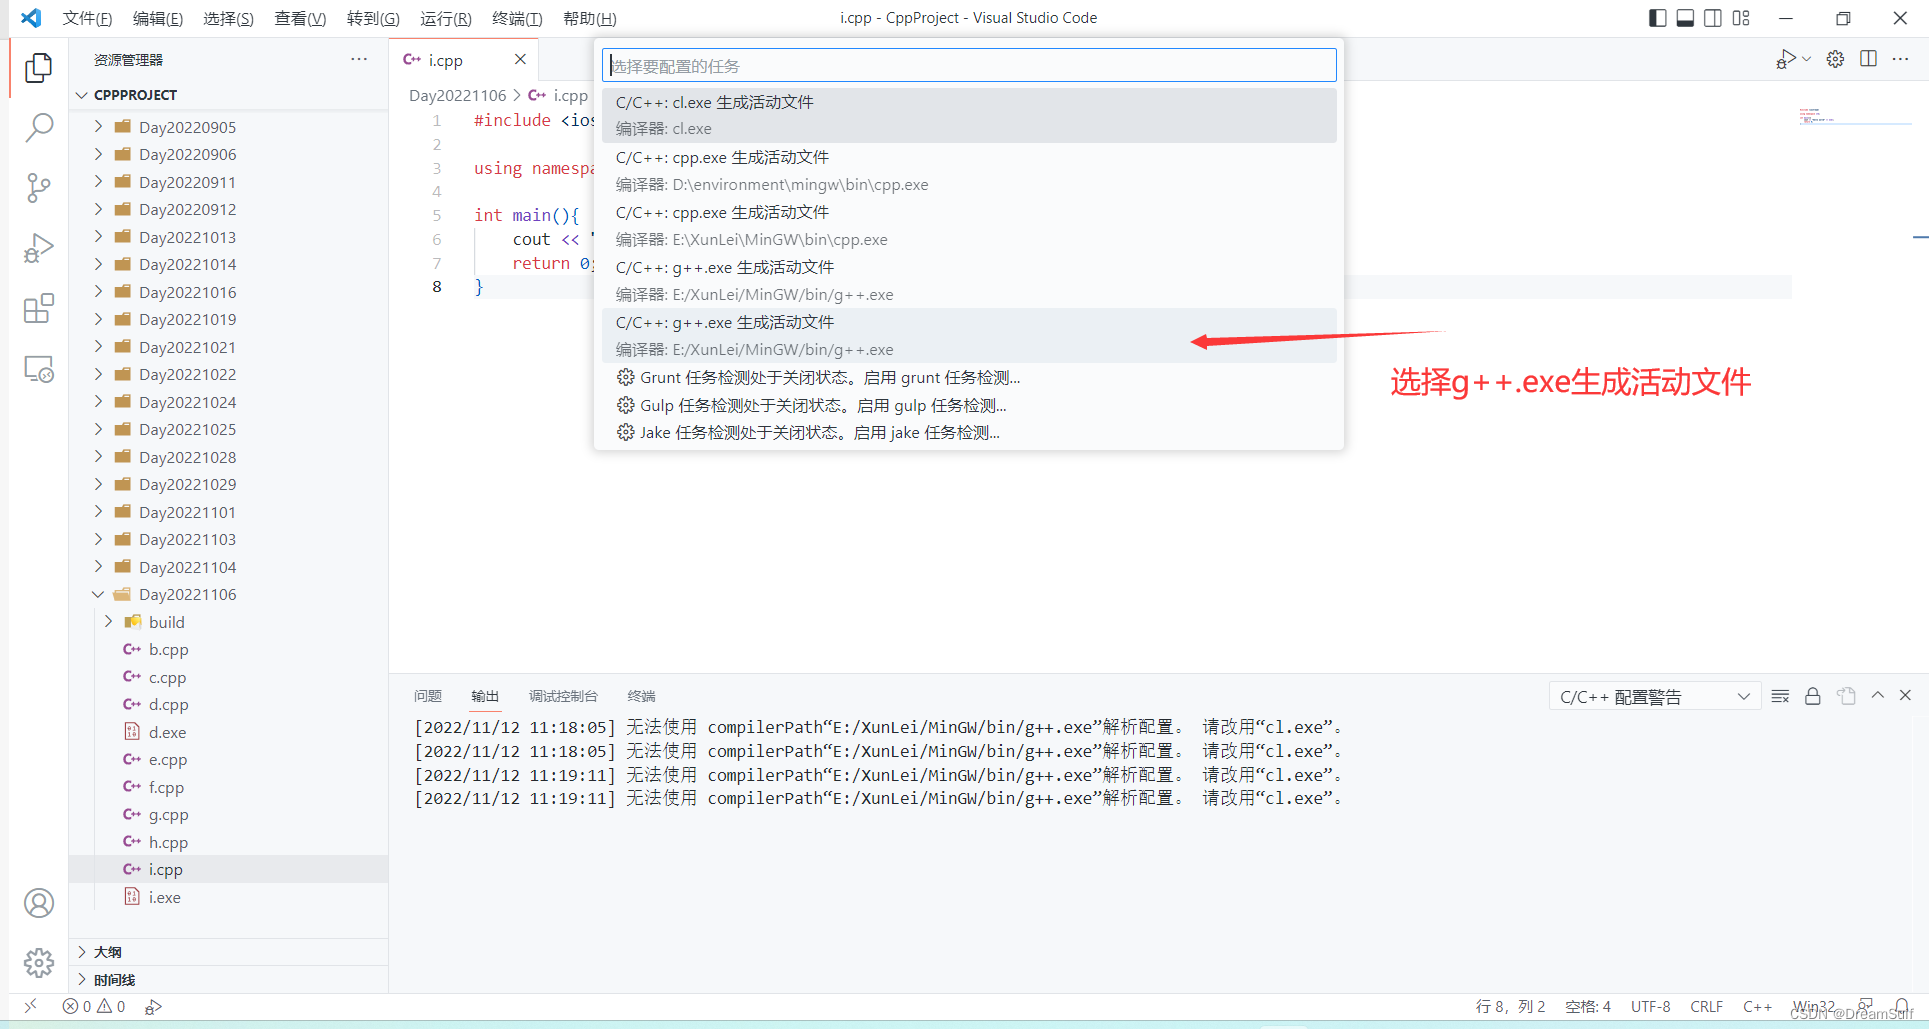
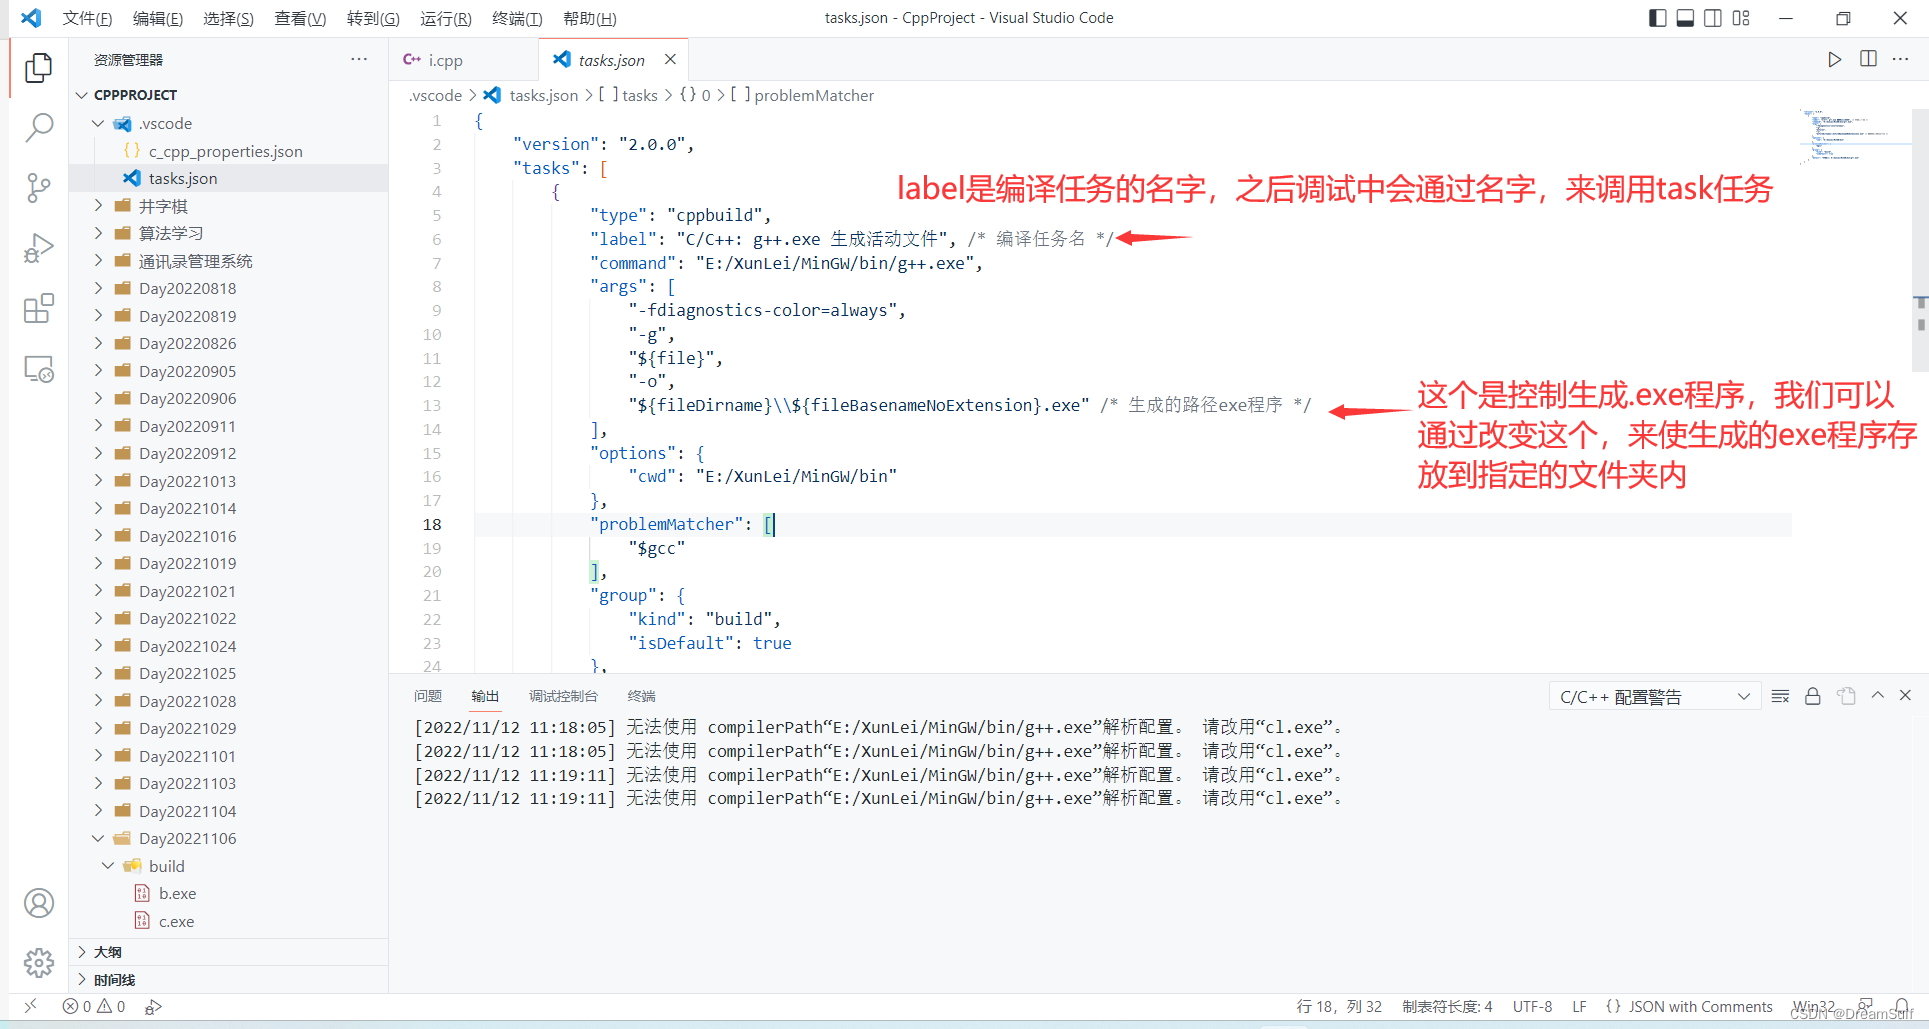
此时我们会发现.vscode文件夹中多了tasks.json
简单地介绍一下tasks.json中需要注意的内容
第三步 配置launch调试任务
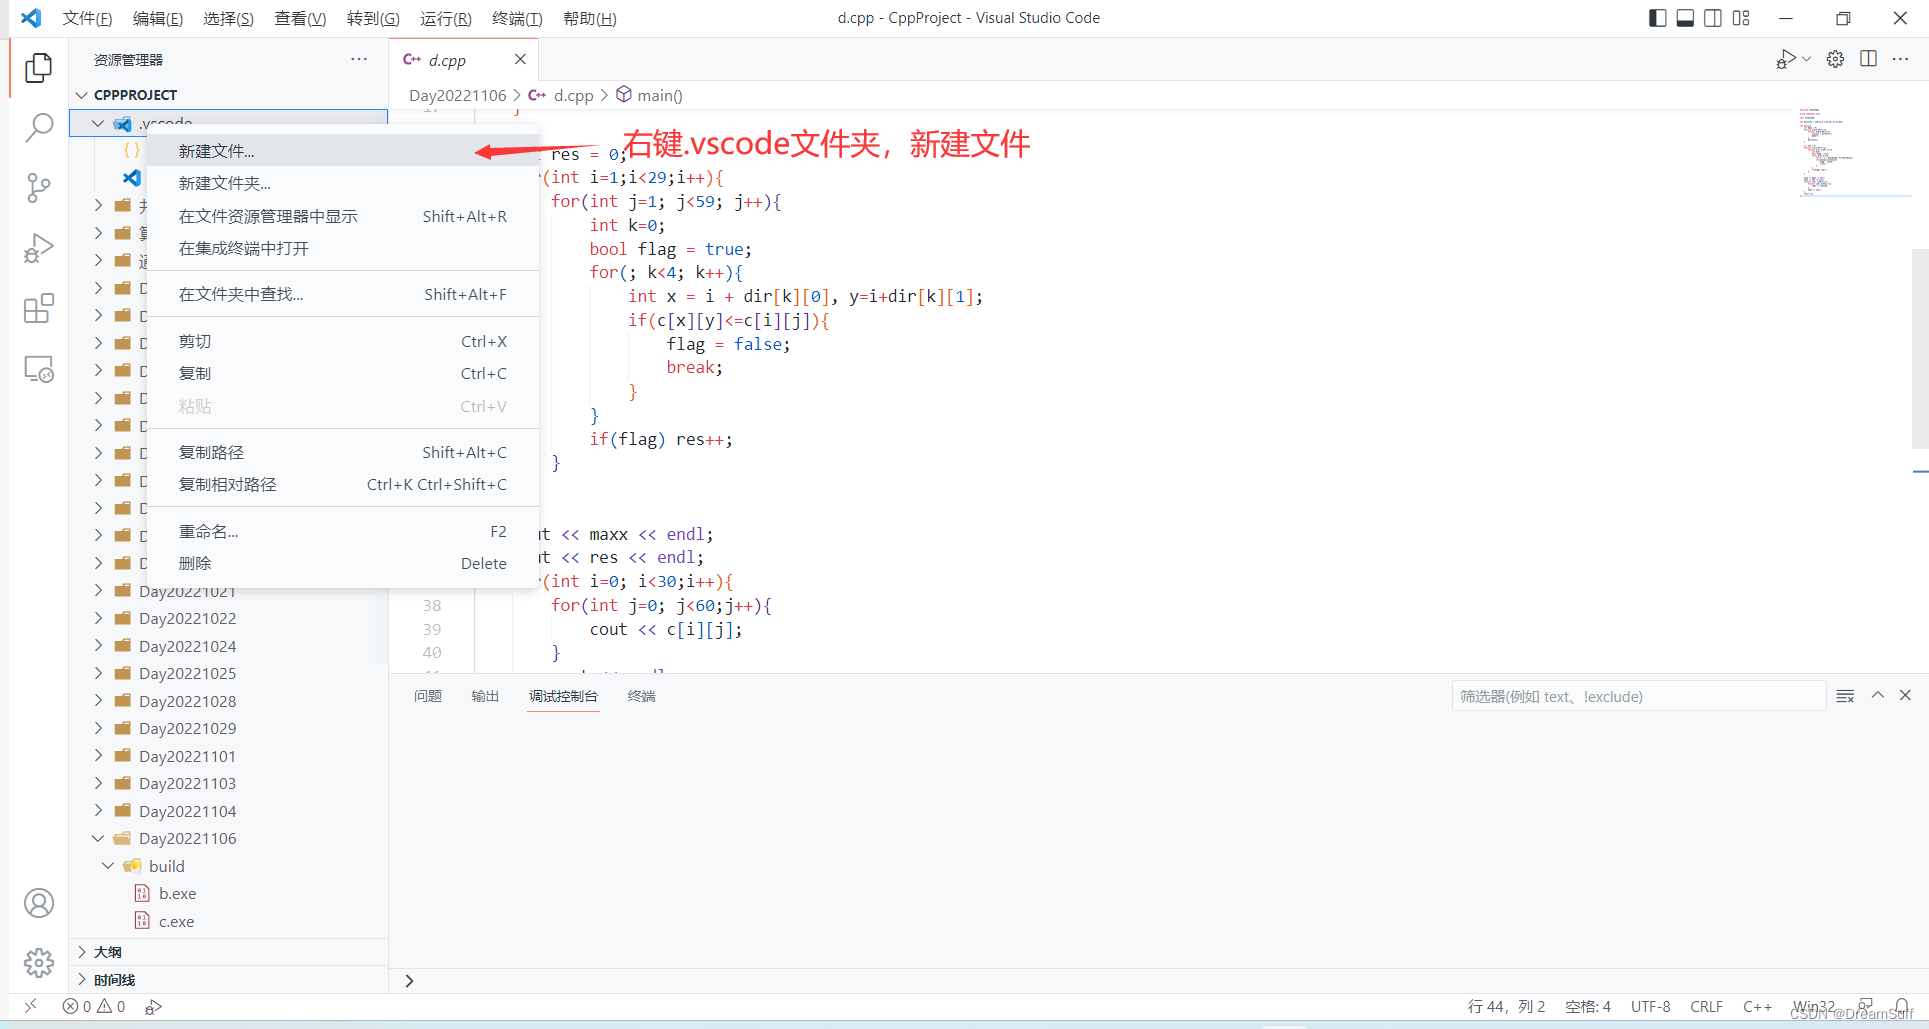
因为C/C++插件不会自动生成launch.json,因此launch.json需要我们自己编写,在.vscode文件夹内新建一个launch.json文件
我们会发现,这里有个添加配置
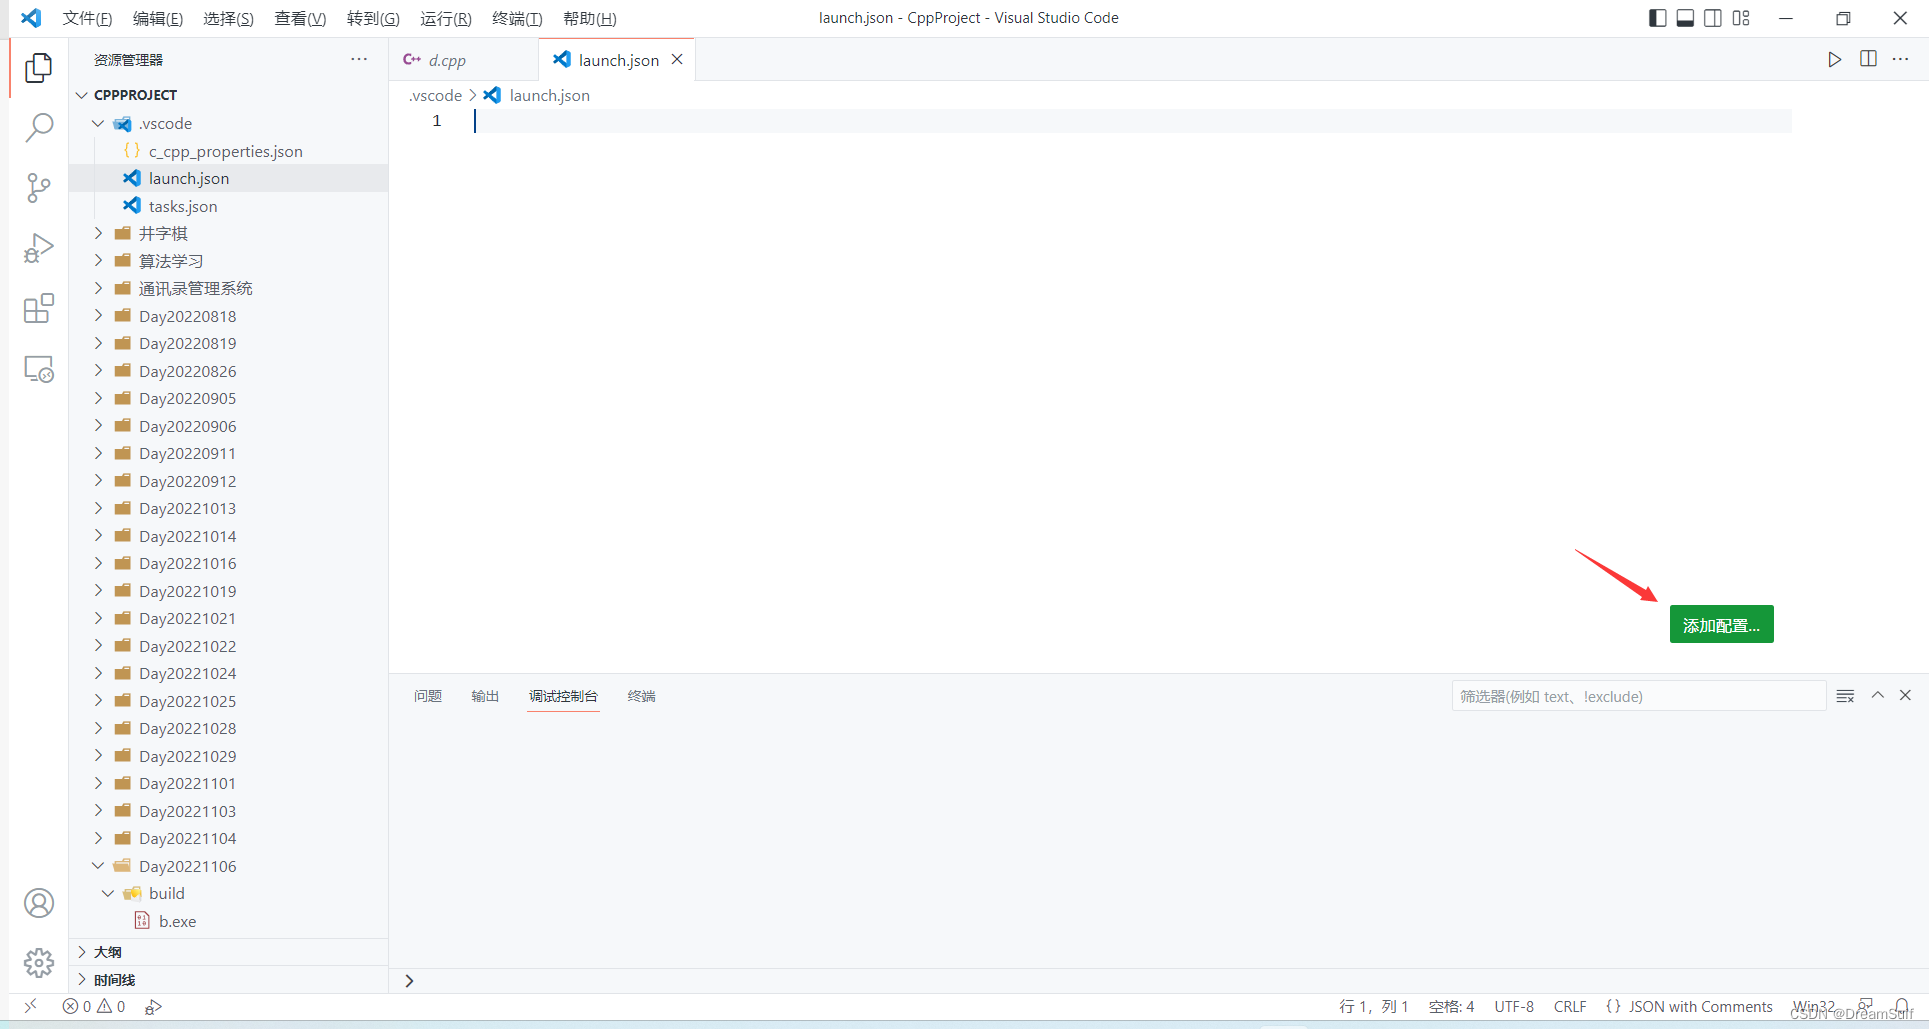
我们点添加配置,选择gdb启动
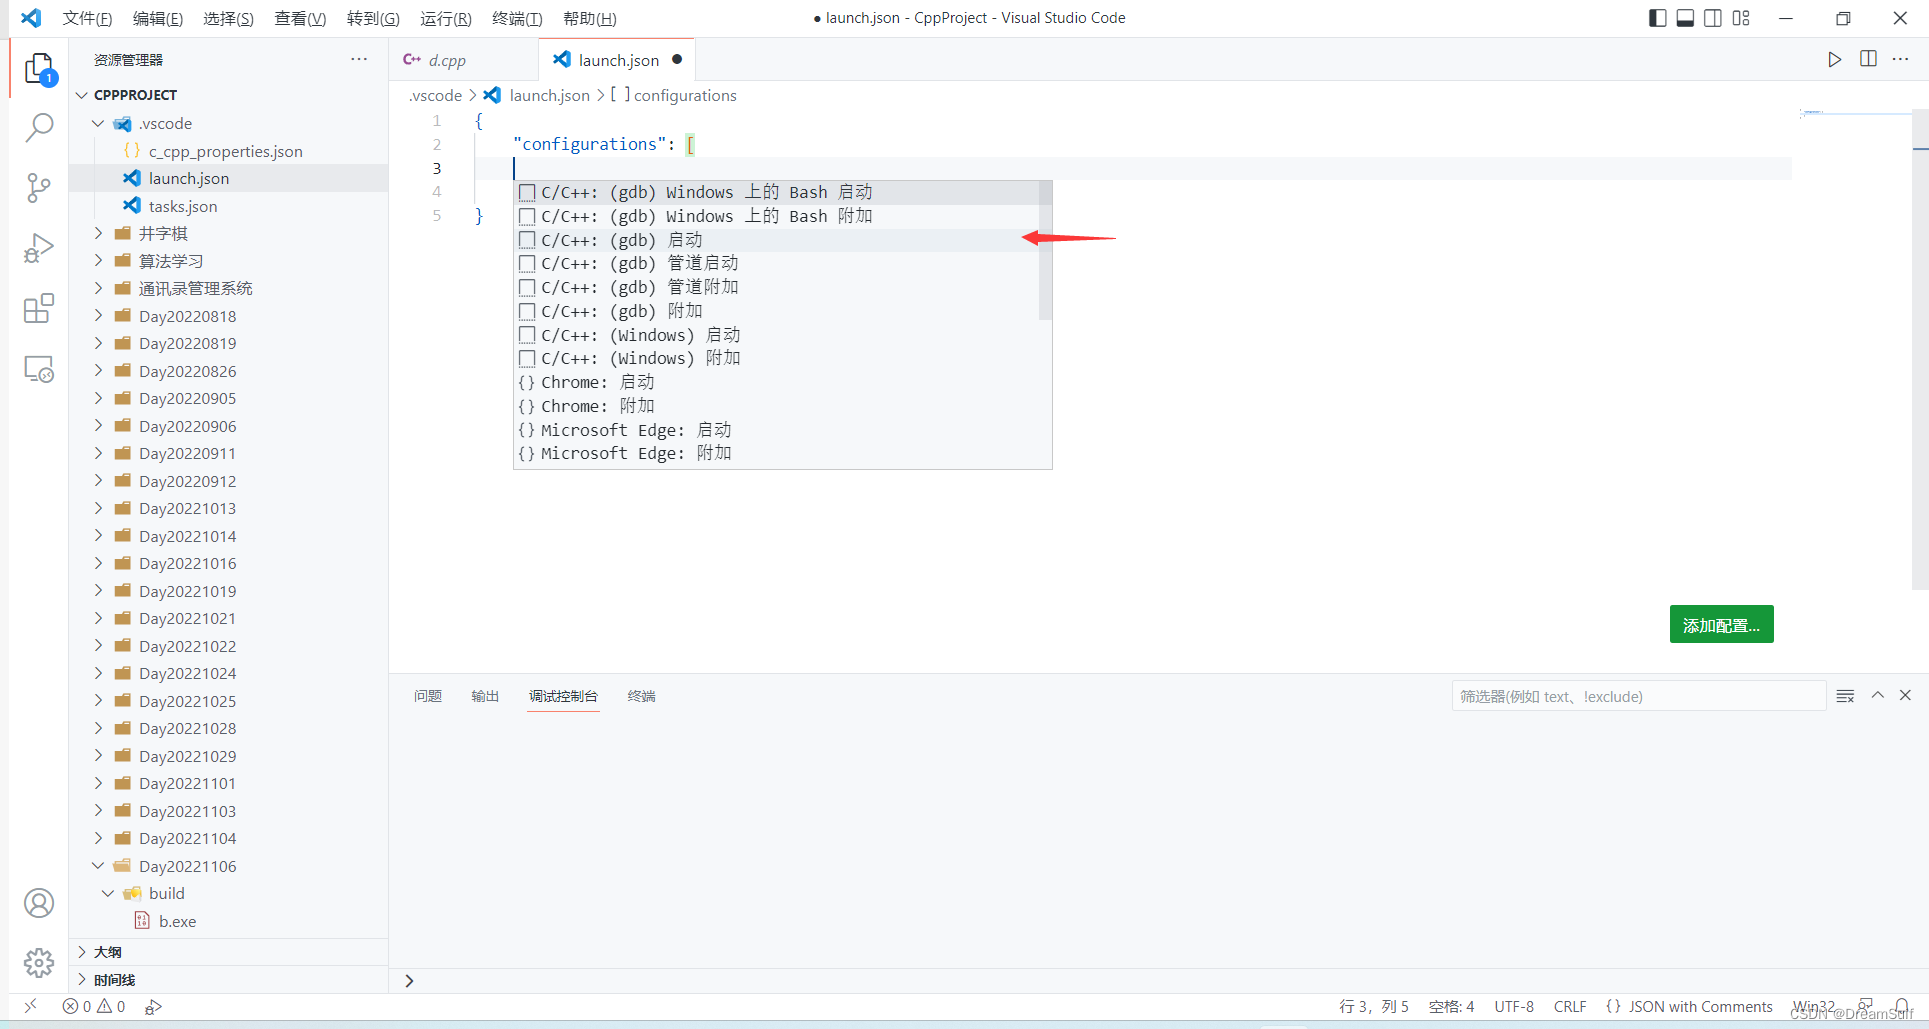
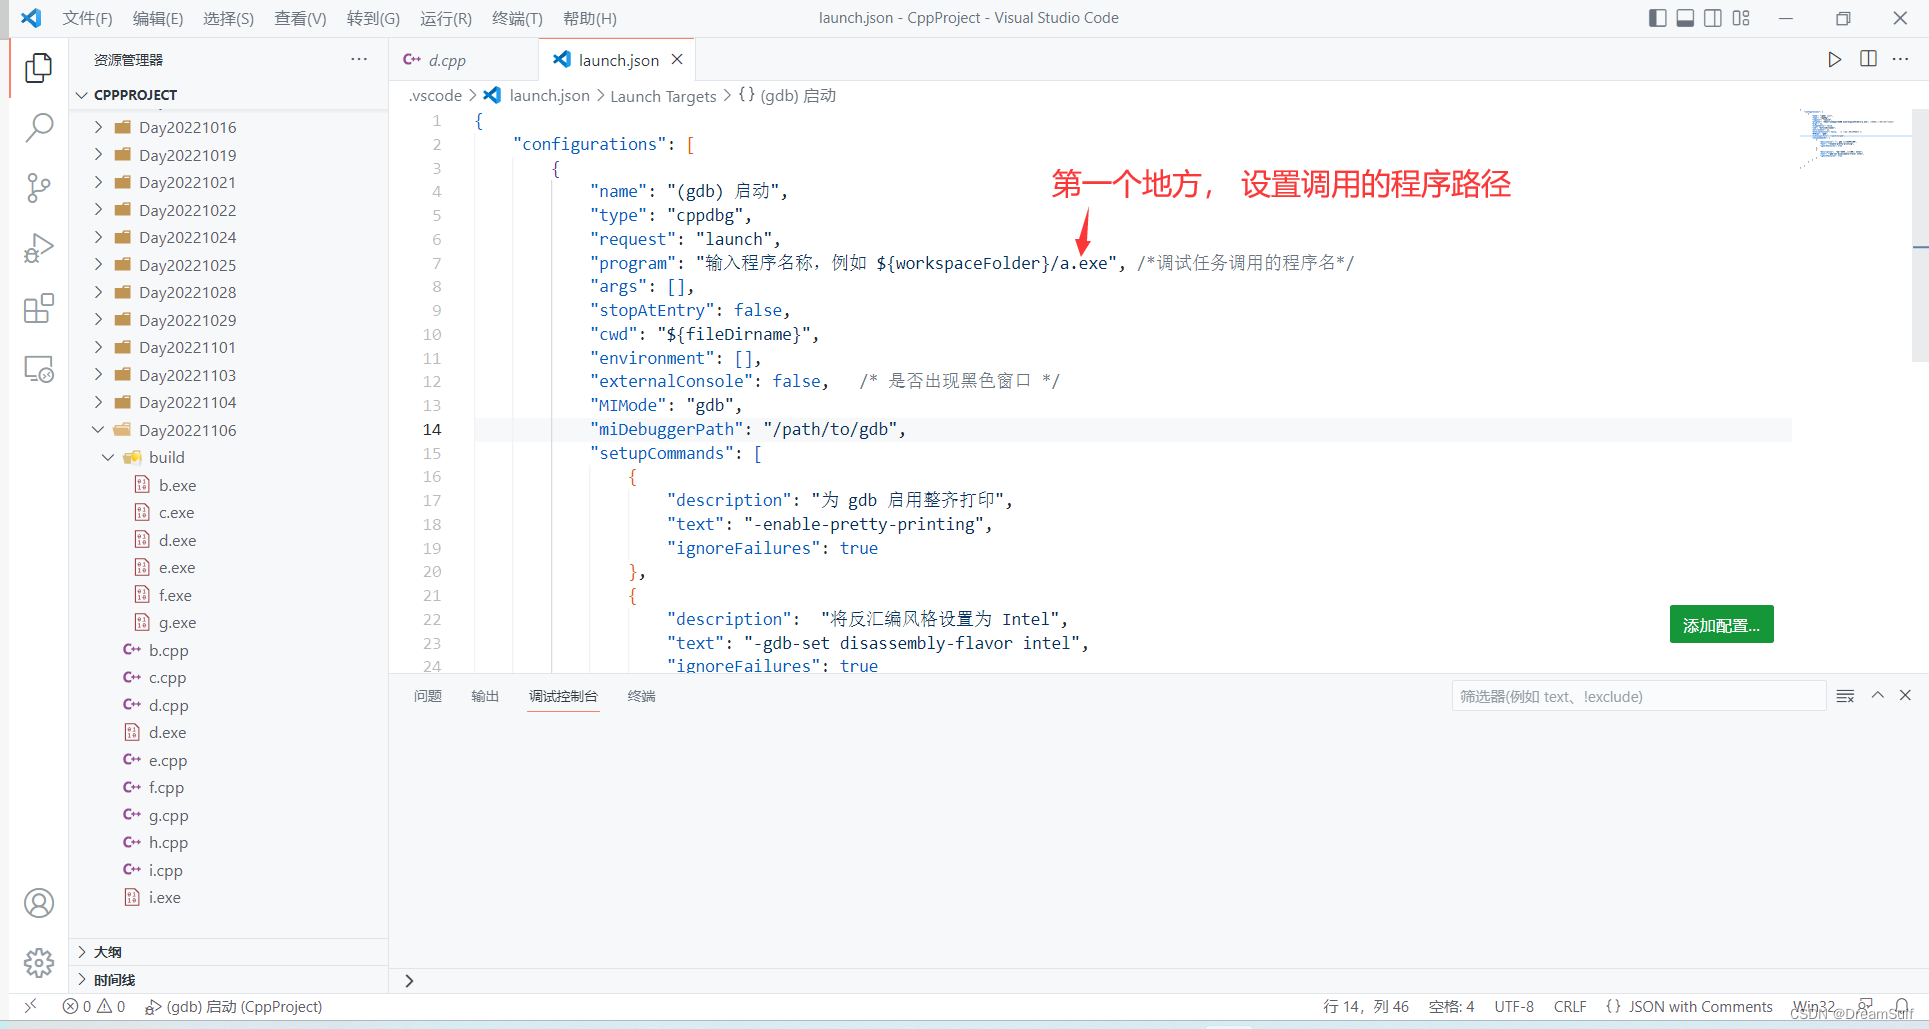
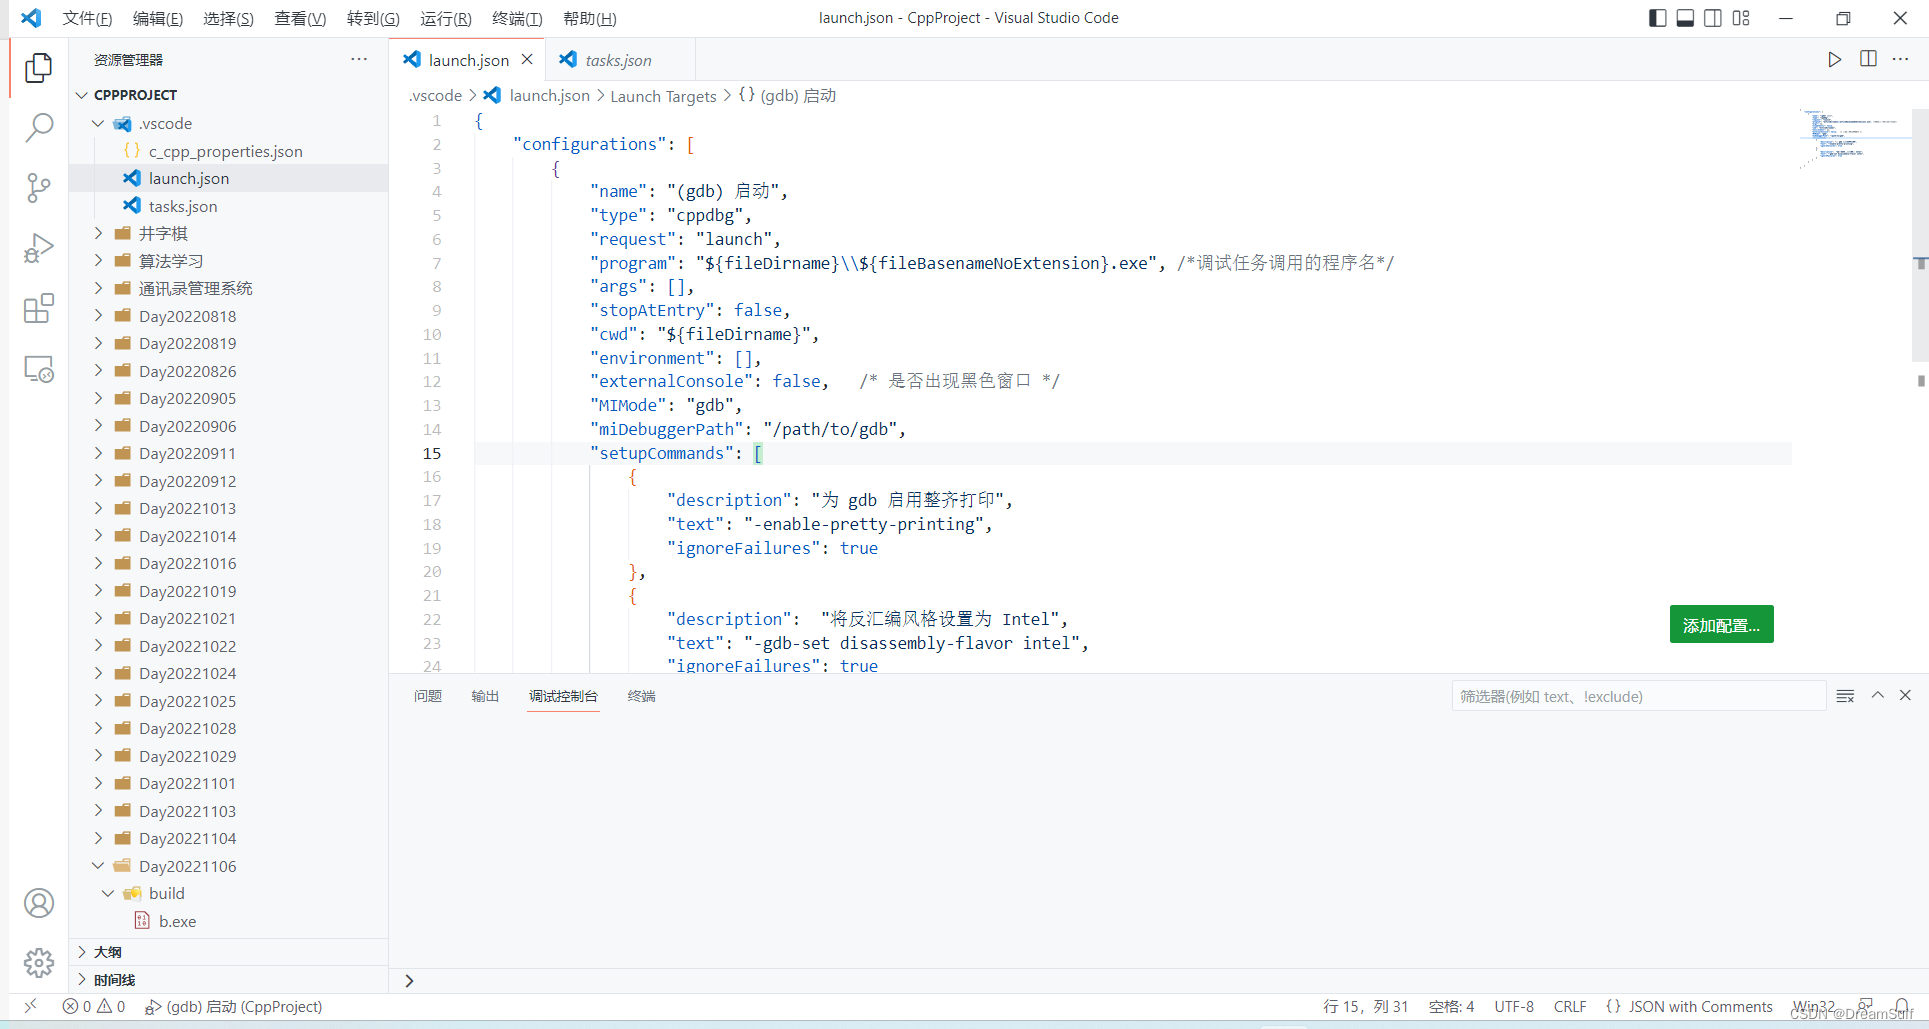
我们需要修改3个地方
第一处

第二处

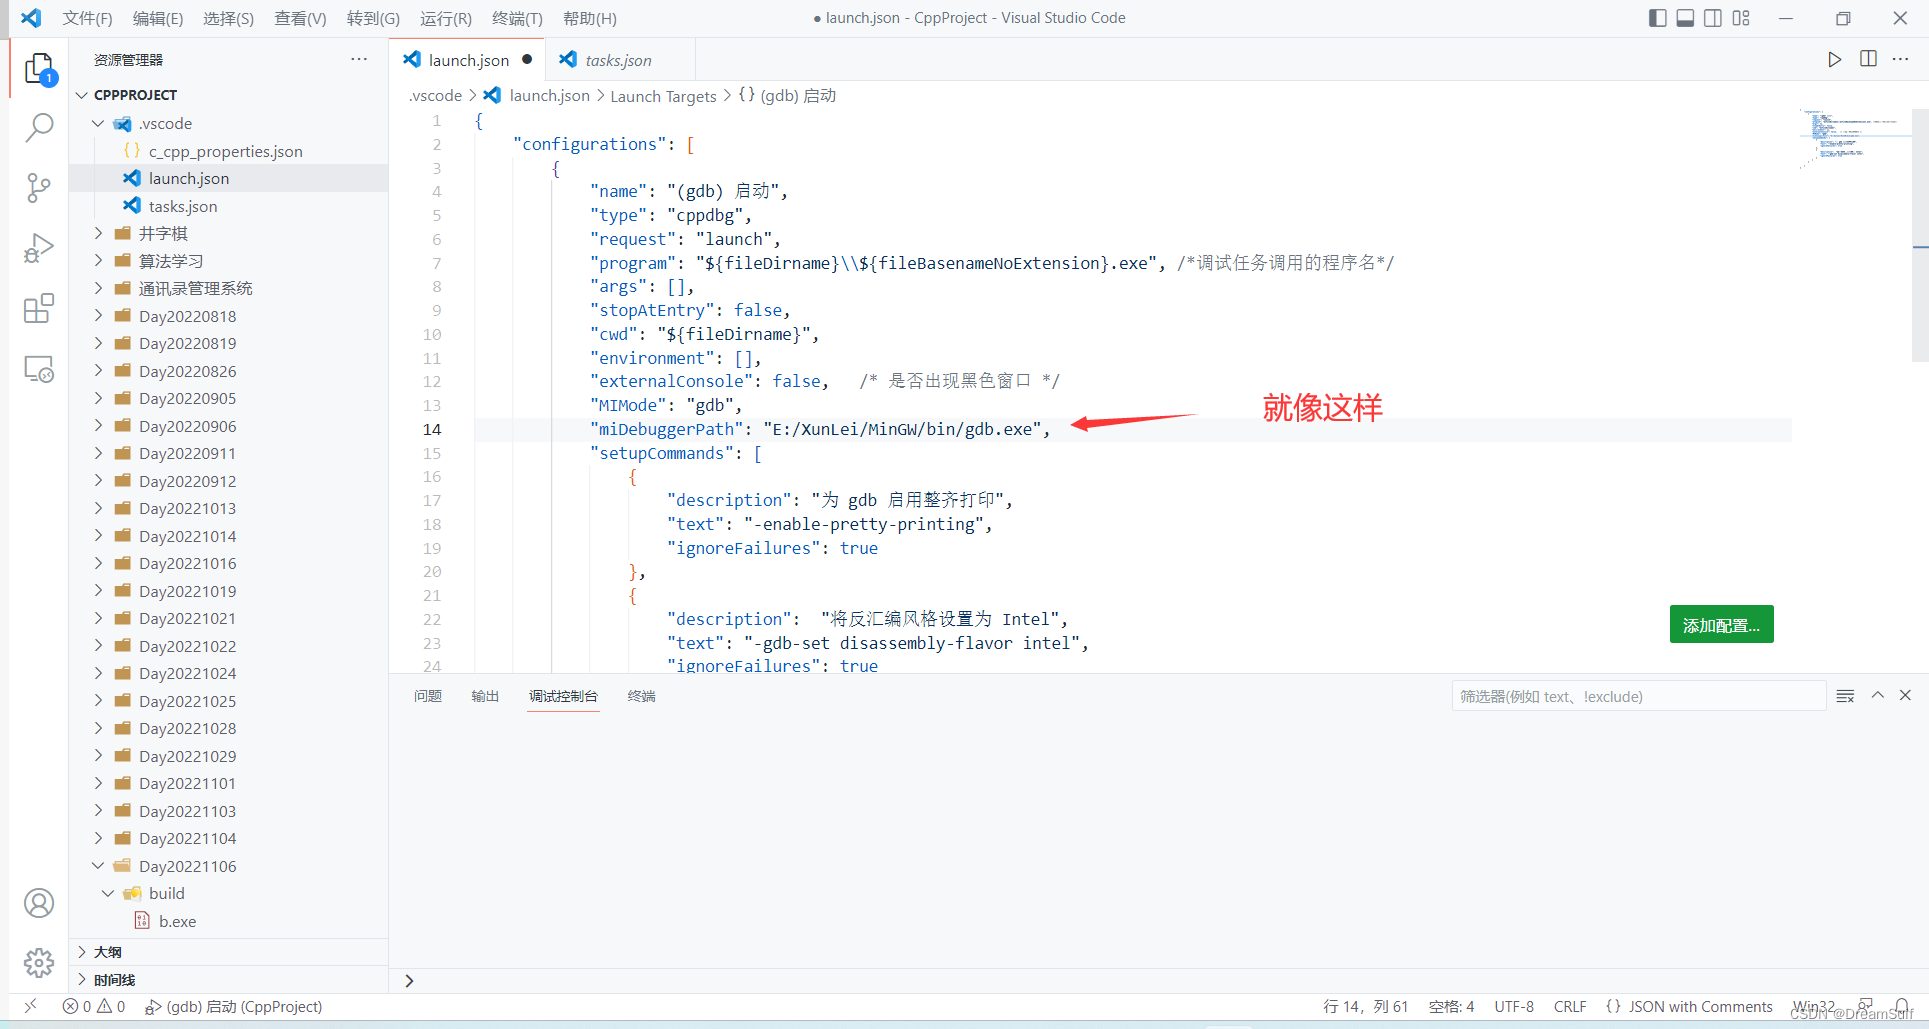
第三处
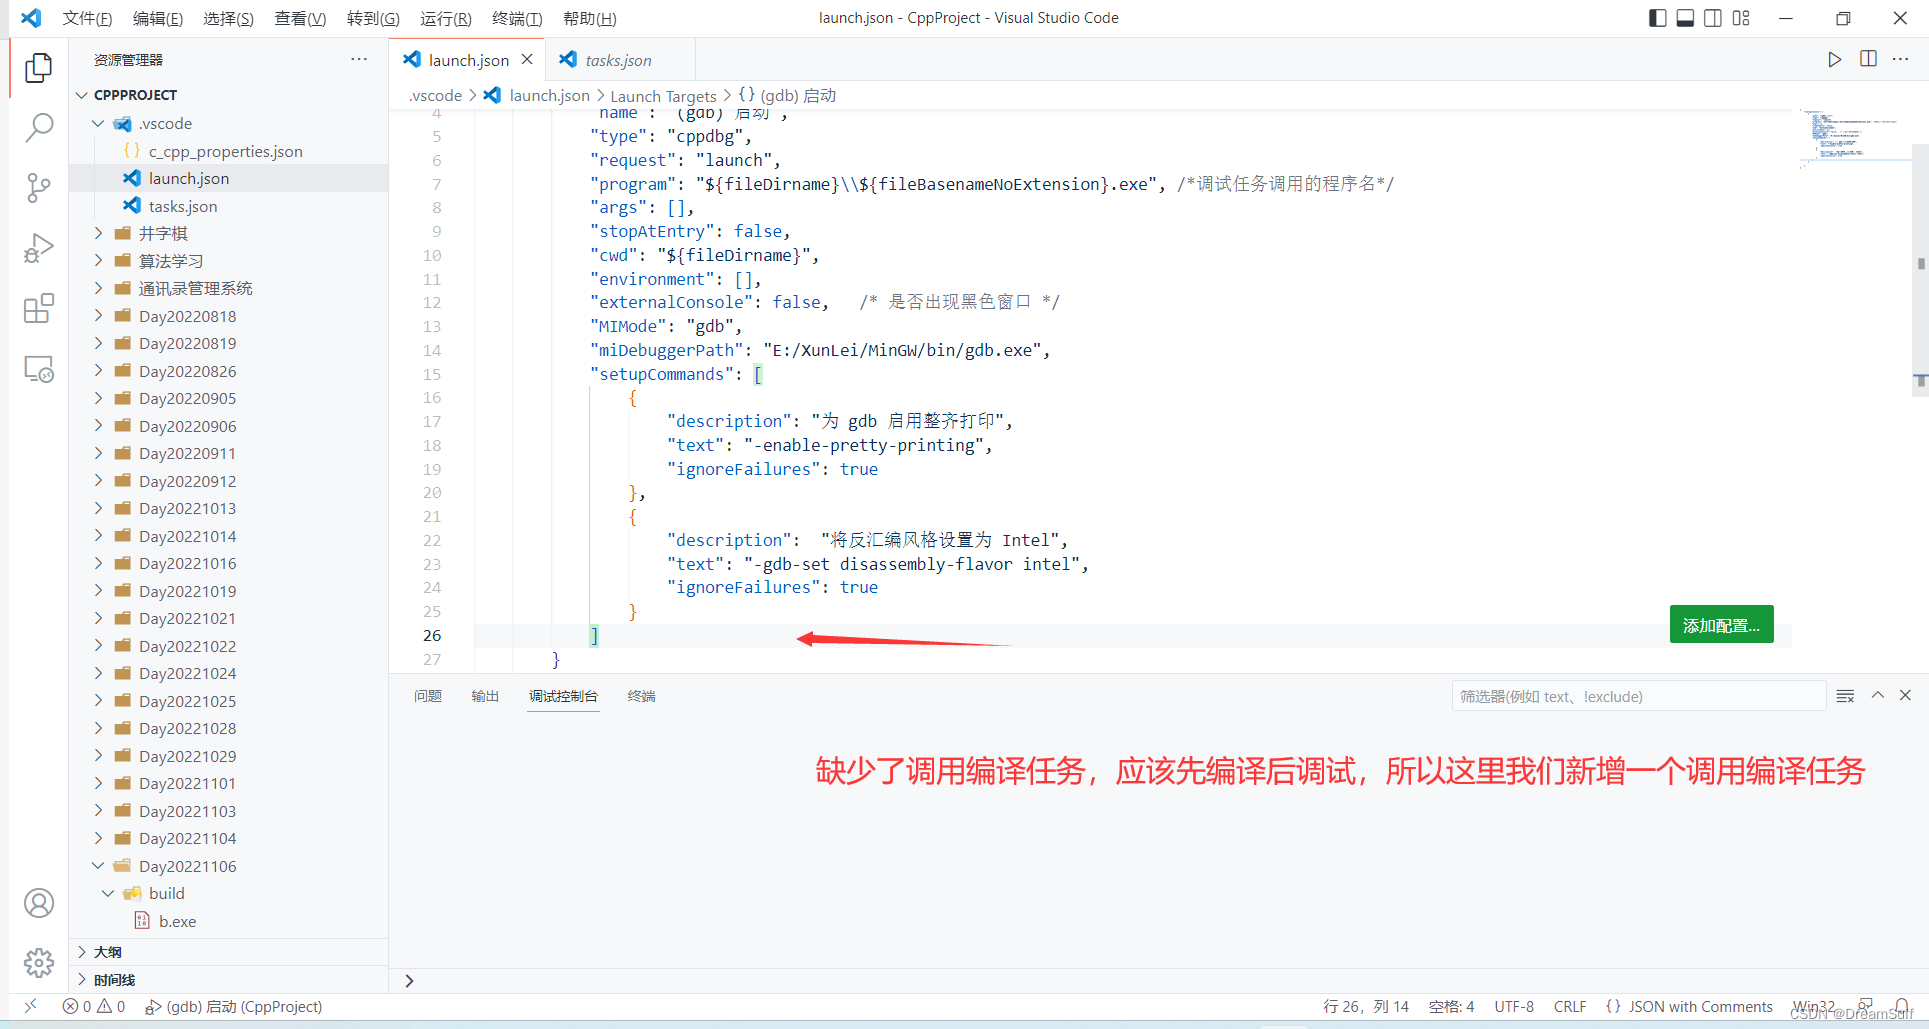
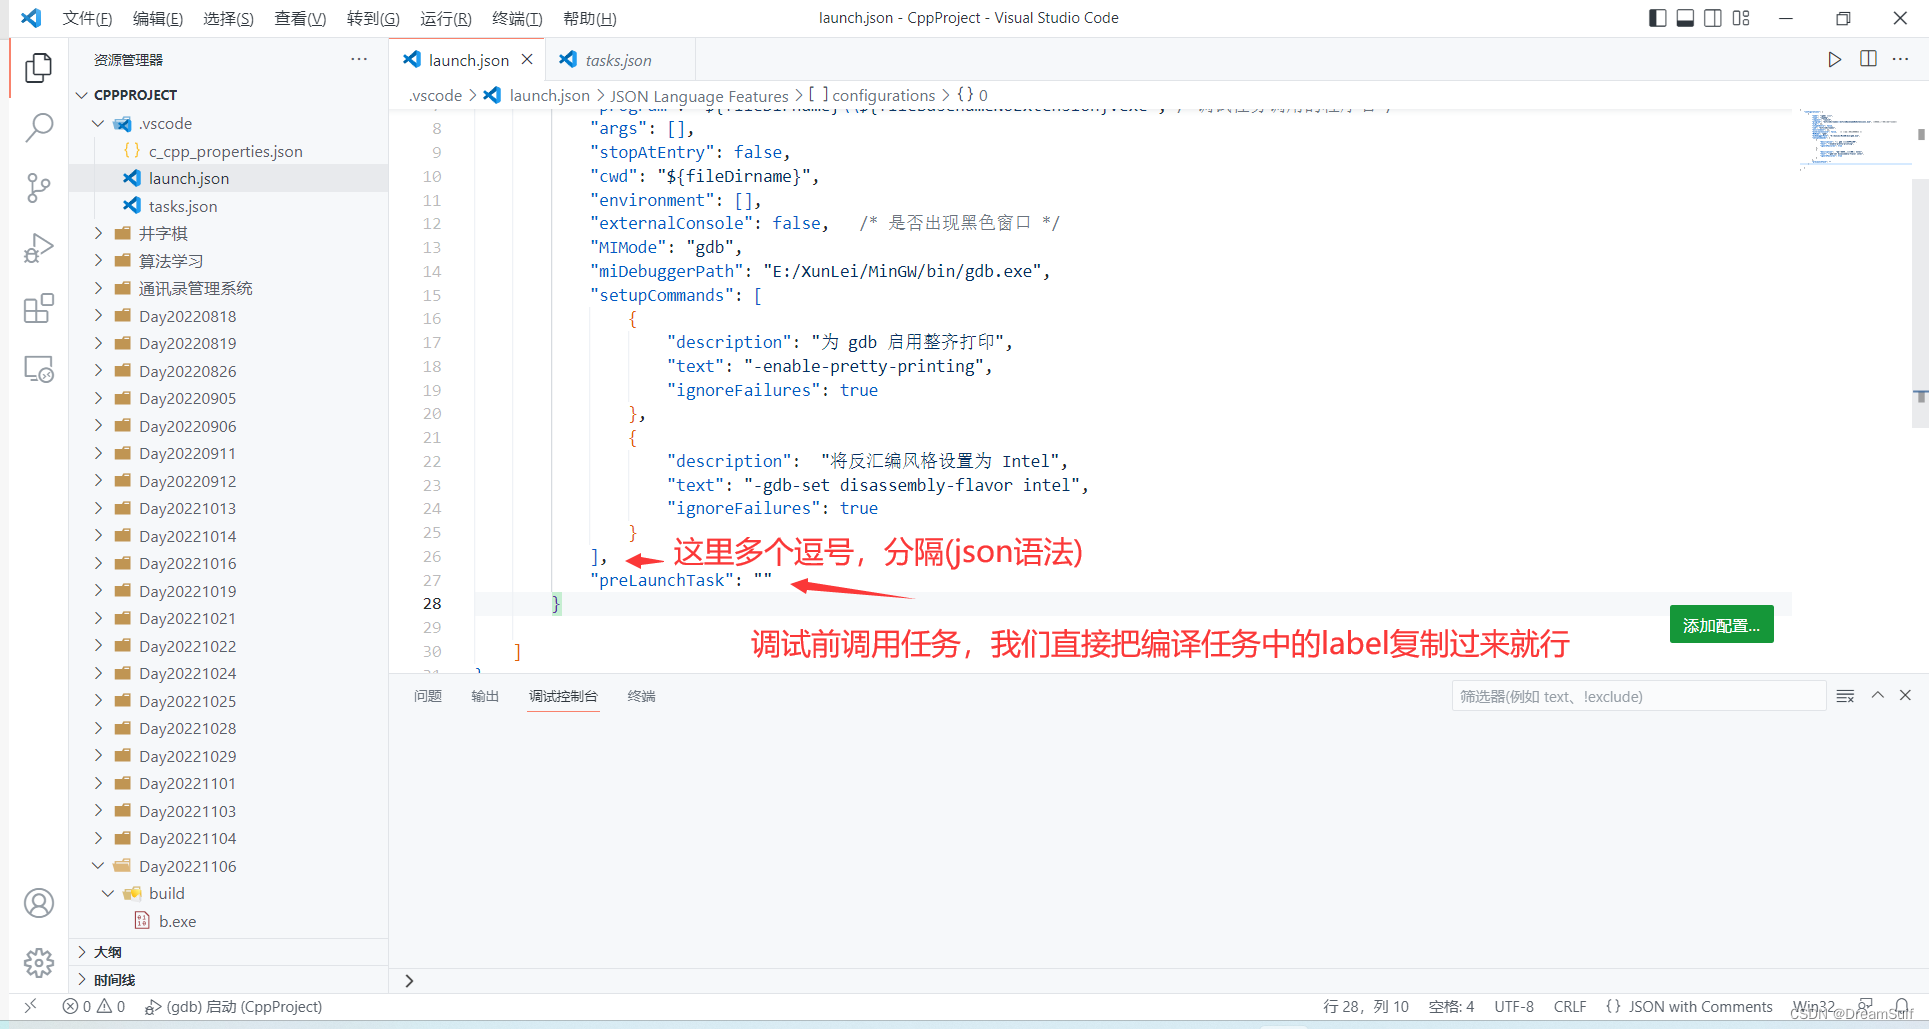
保存,重启一下编辑器,我们就可以按F5调试程序了
注意:任何文件做出更改后都需要保存,新内容才会生效,我们可以按 ctrl + s 快速保存文件
一些问题 问题1
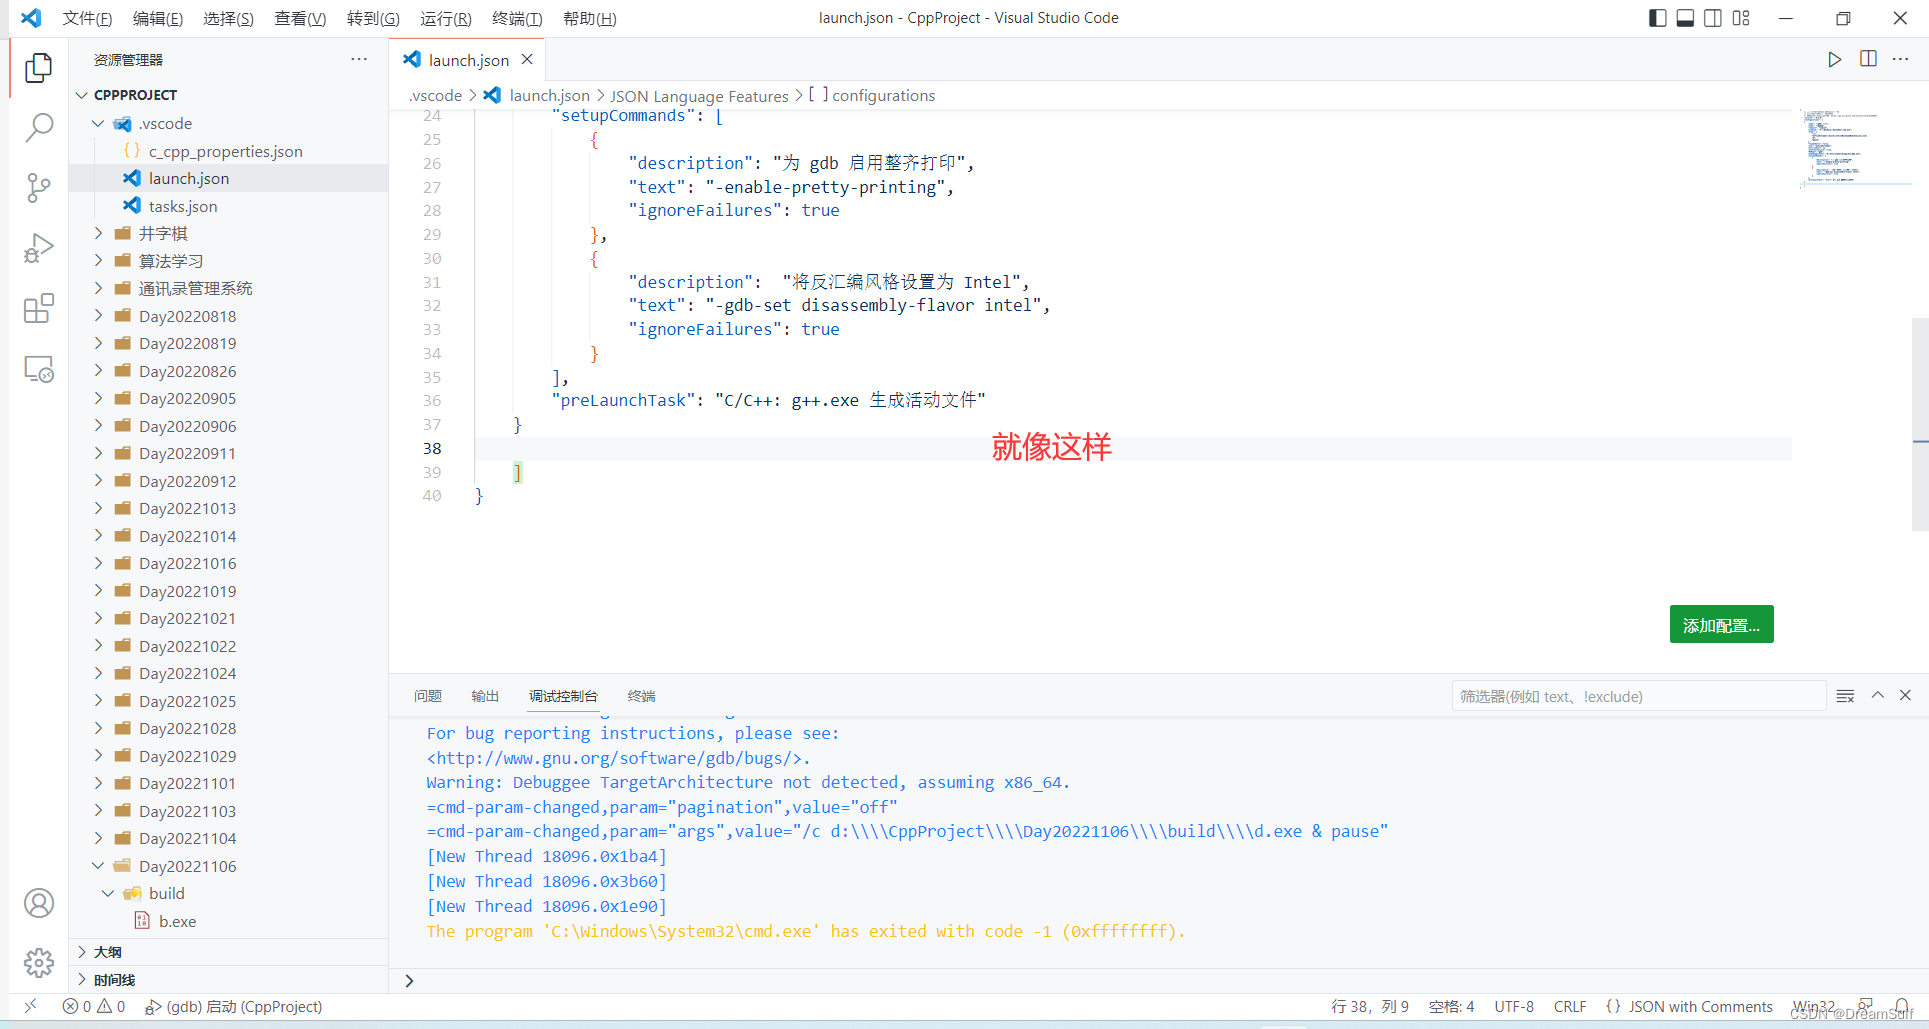
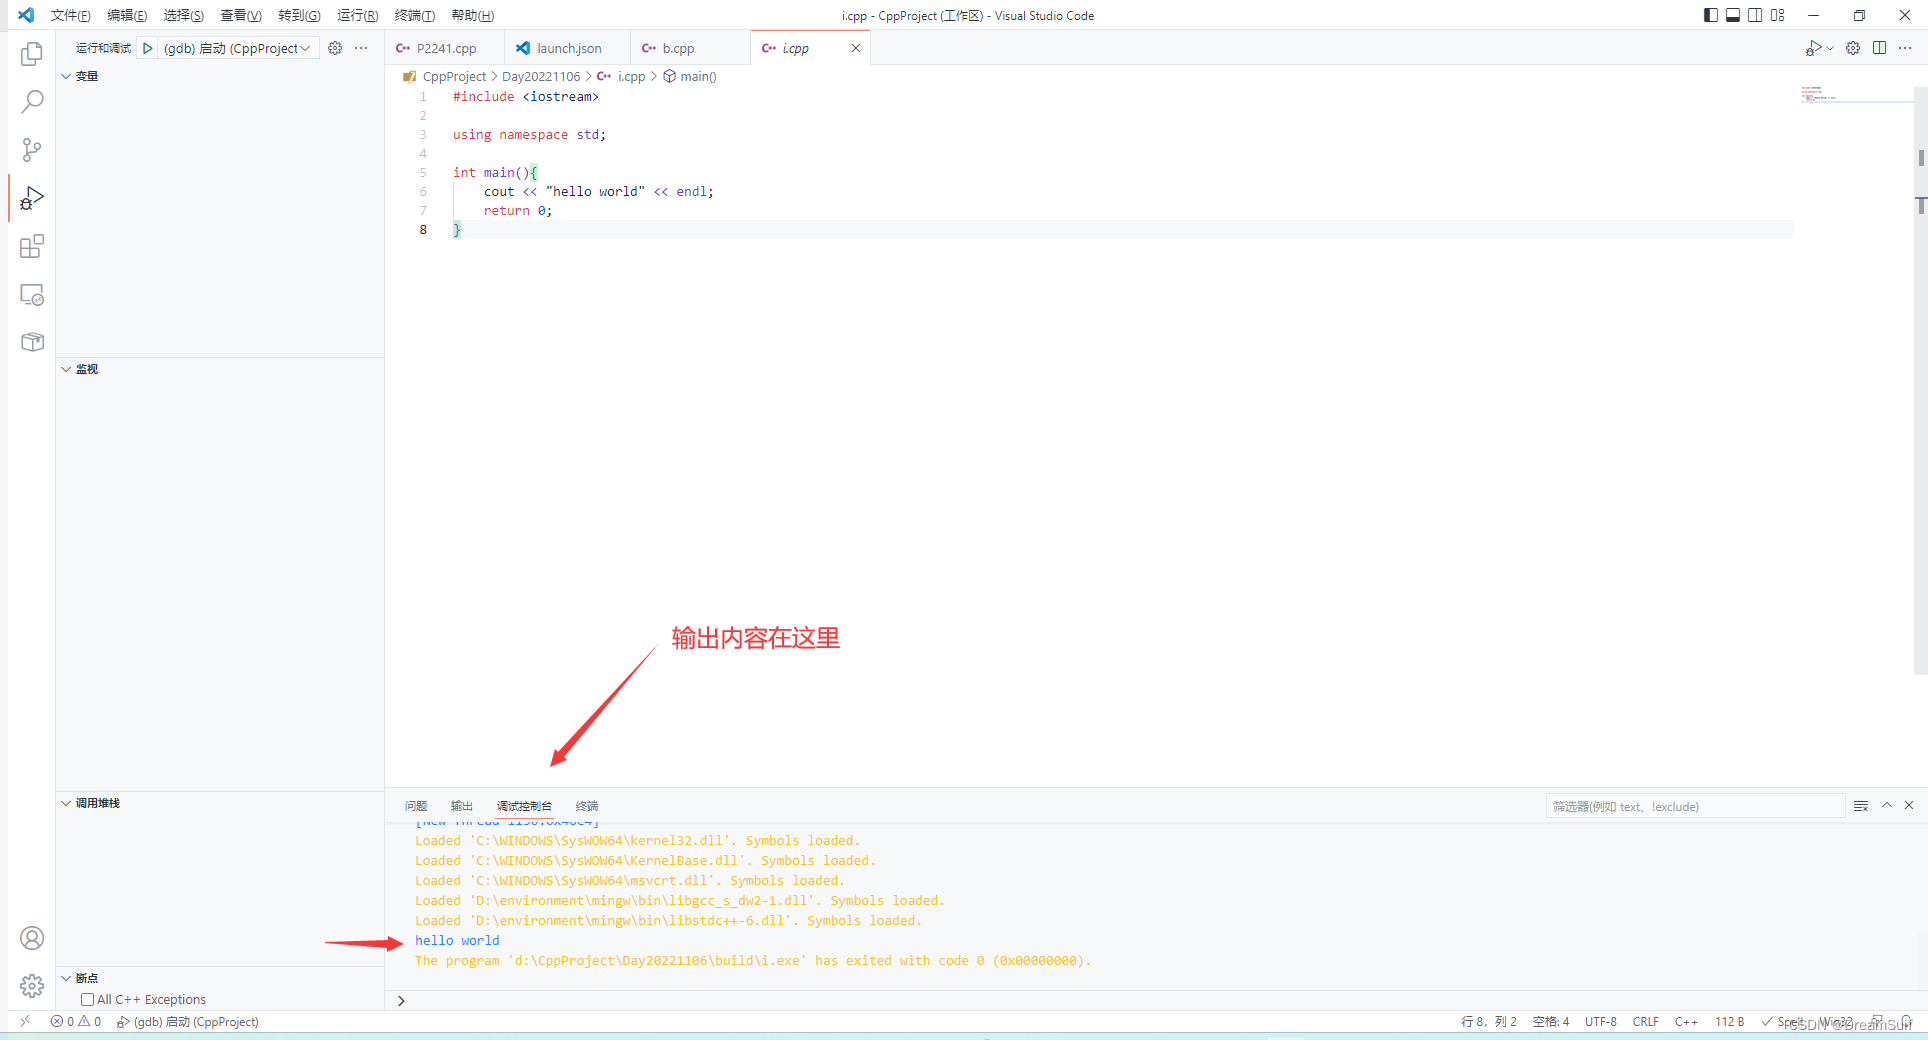
问:为什么按F5后出现这个报错信息,没有输出结果

答:这并不是报错信息,而是编译调试命令,输出的结果在调试控制台中显示。
进阶 设置成经典的弹出黑窗运行程序的形式(在系统终端中运行程序)
有的小伙伴可能觉得调试控制台不太好用,想要vscode编译运行c/c++程序时弹出终端,在终端中运行程序,这点其实也很简单,我们只需要改变launch.json中的 program 和 args 中的内容,然后设置一下黑窗弹出即可。
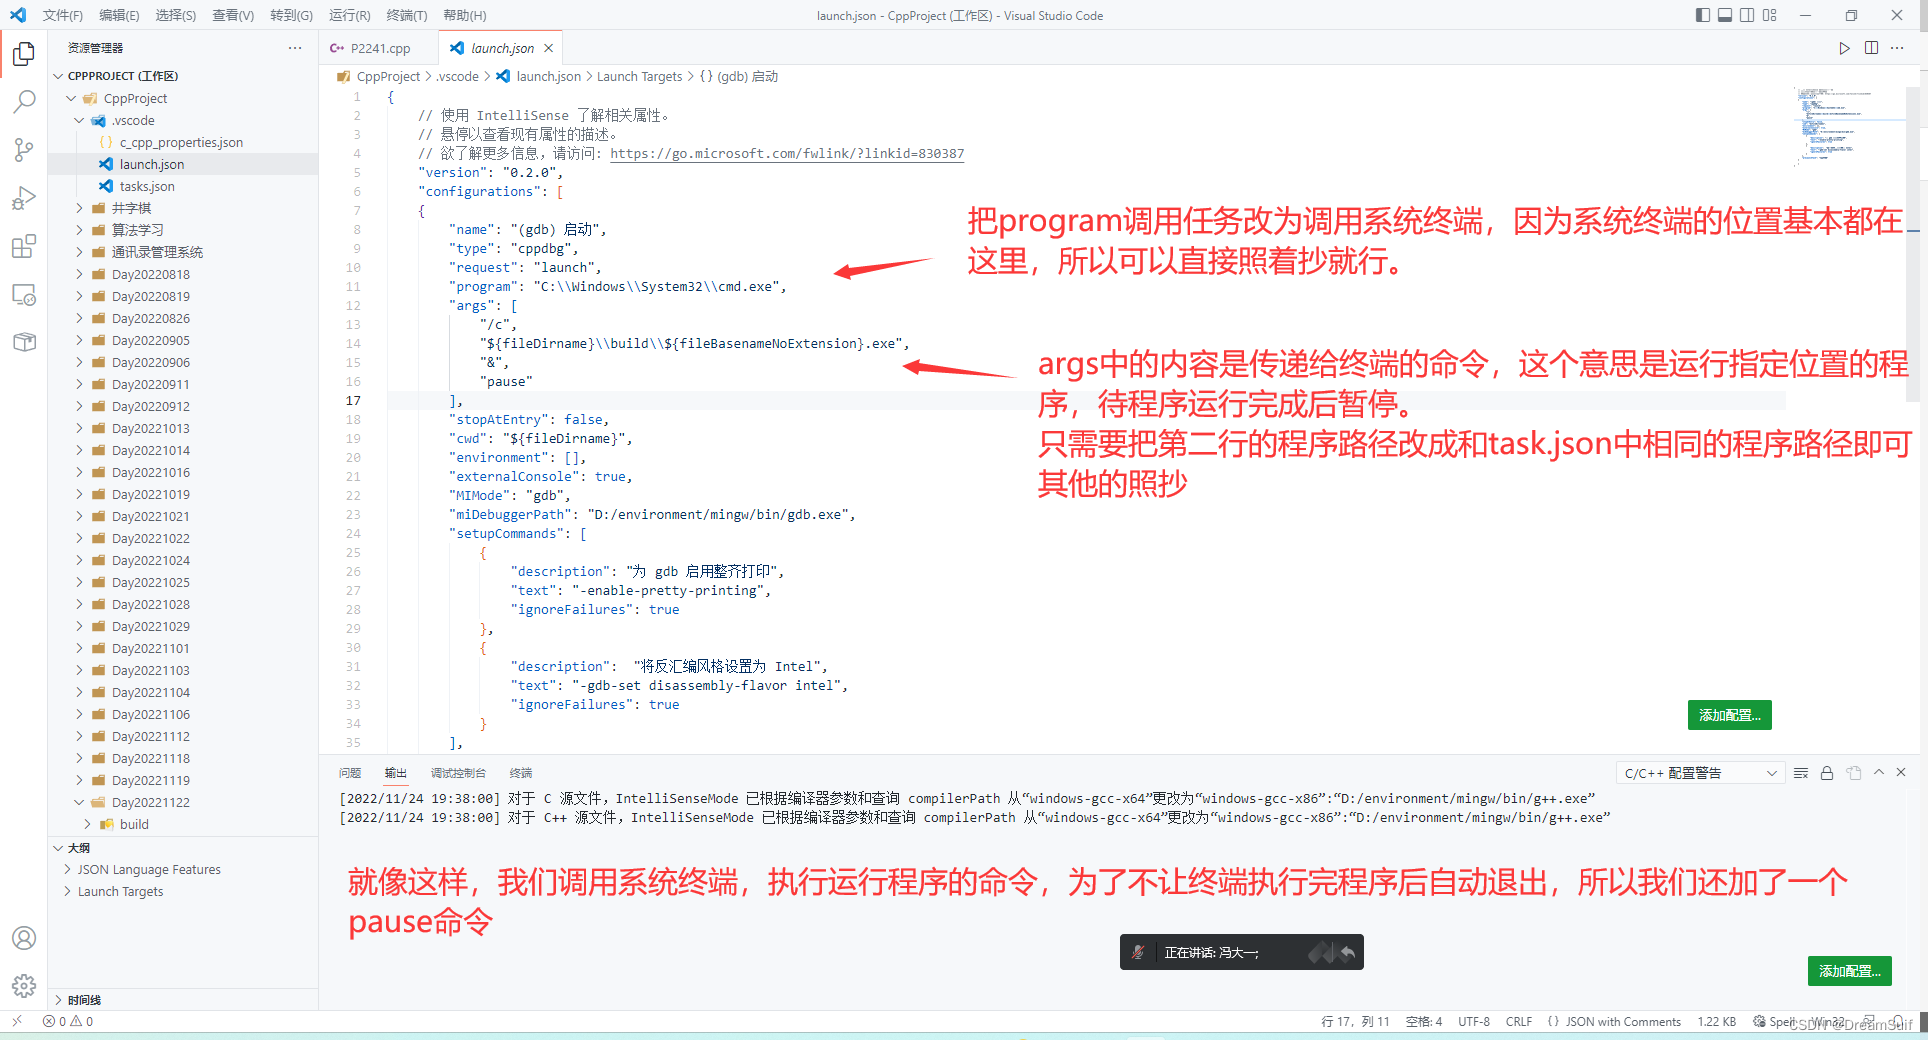

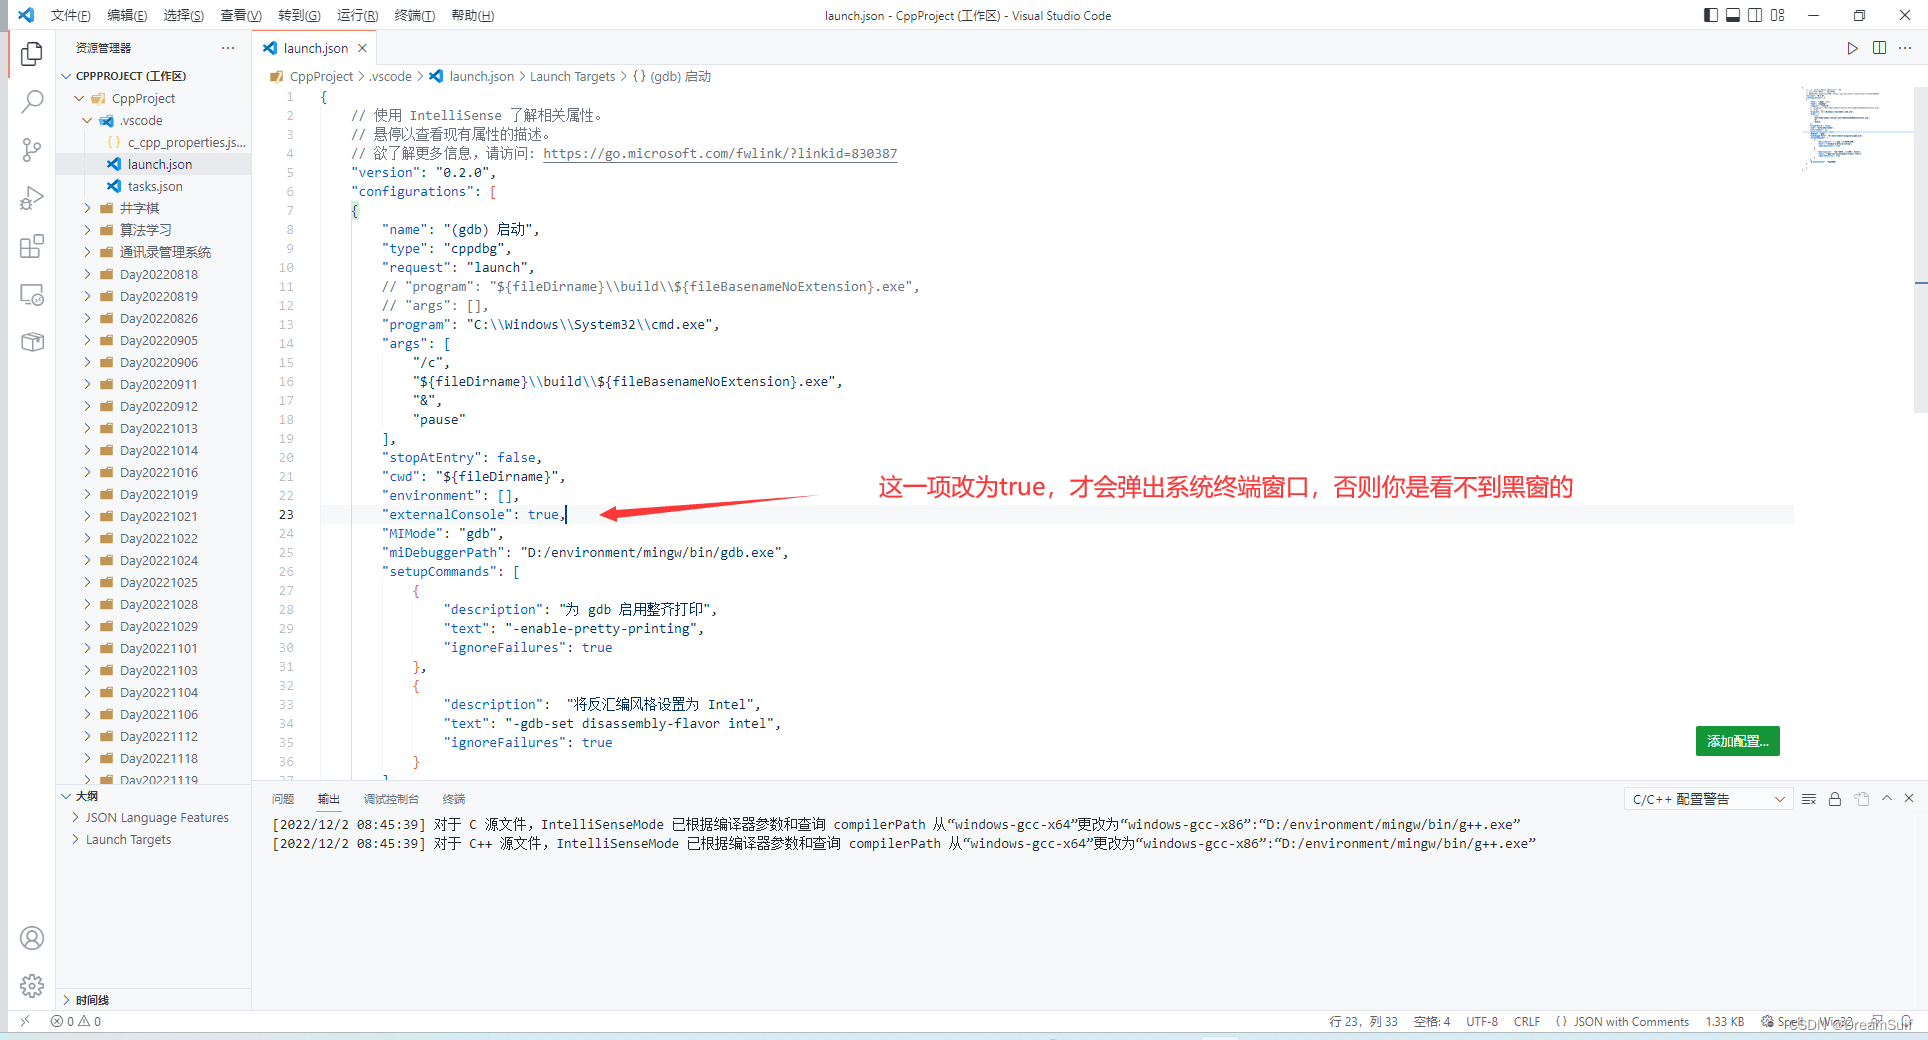
我的program 和 args 中的内容:
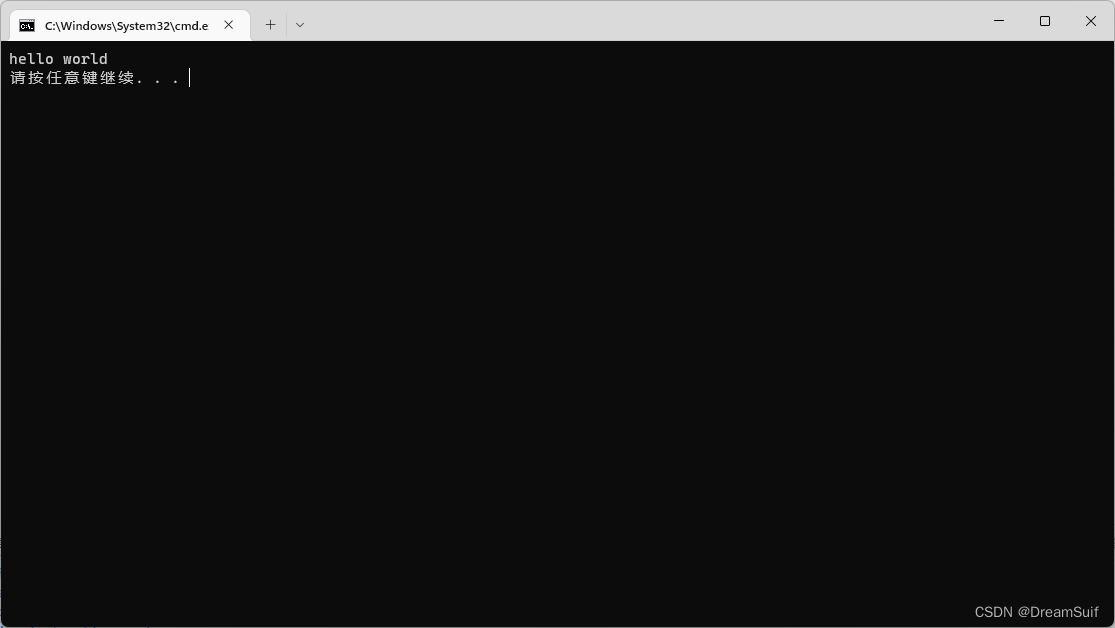
完成后的效果
进阶 设置在vscode内置终端中执行程序
有的小伙伴既不想用run code等插件,又想要在vscode内置终端中运行程序,这种方法我们当然也有!
我们只需要改变launch.json中的内容即可。(因为gdb调试不能在vscode内置终端中执行,所以我们得选择window启动调试任务)
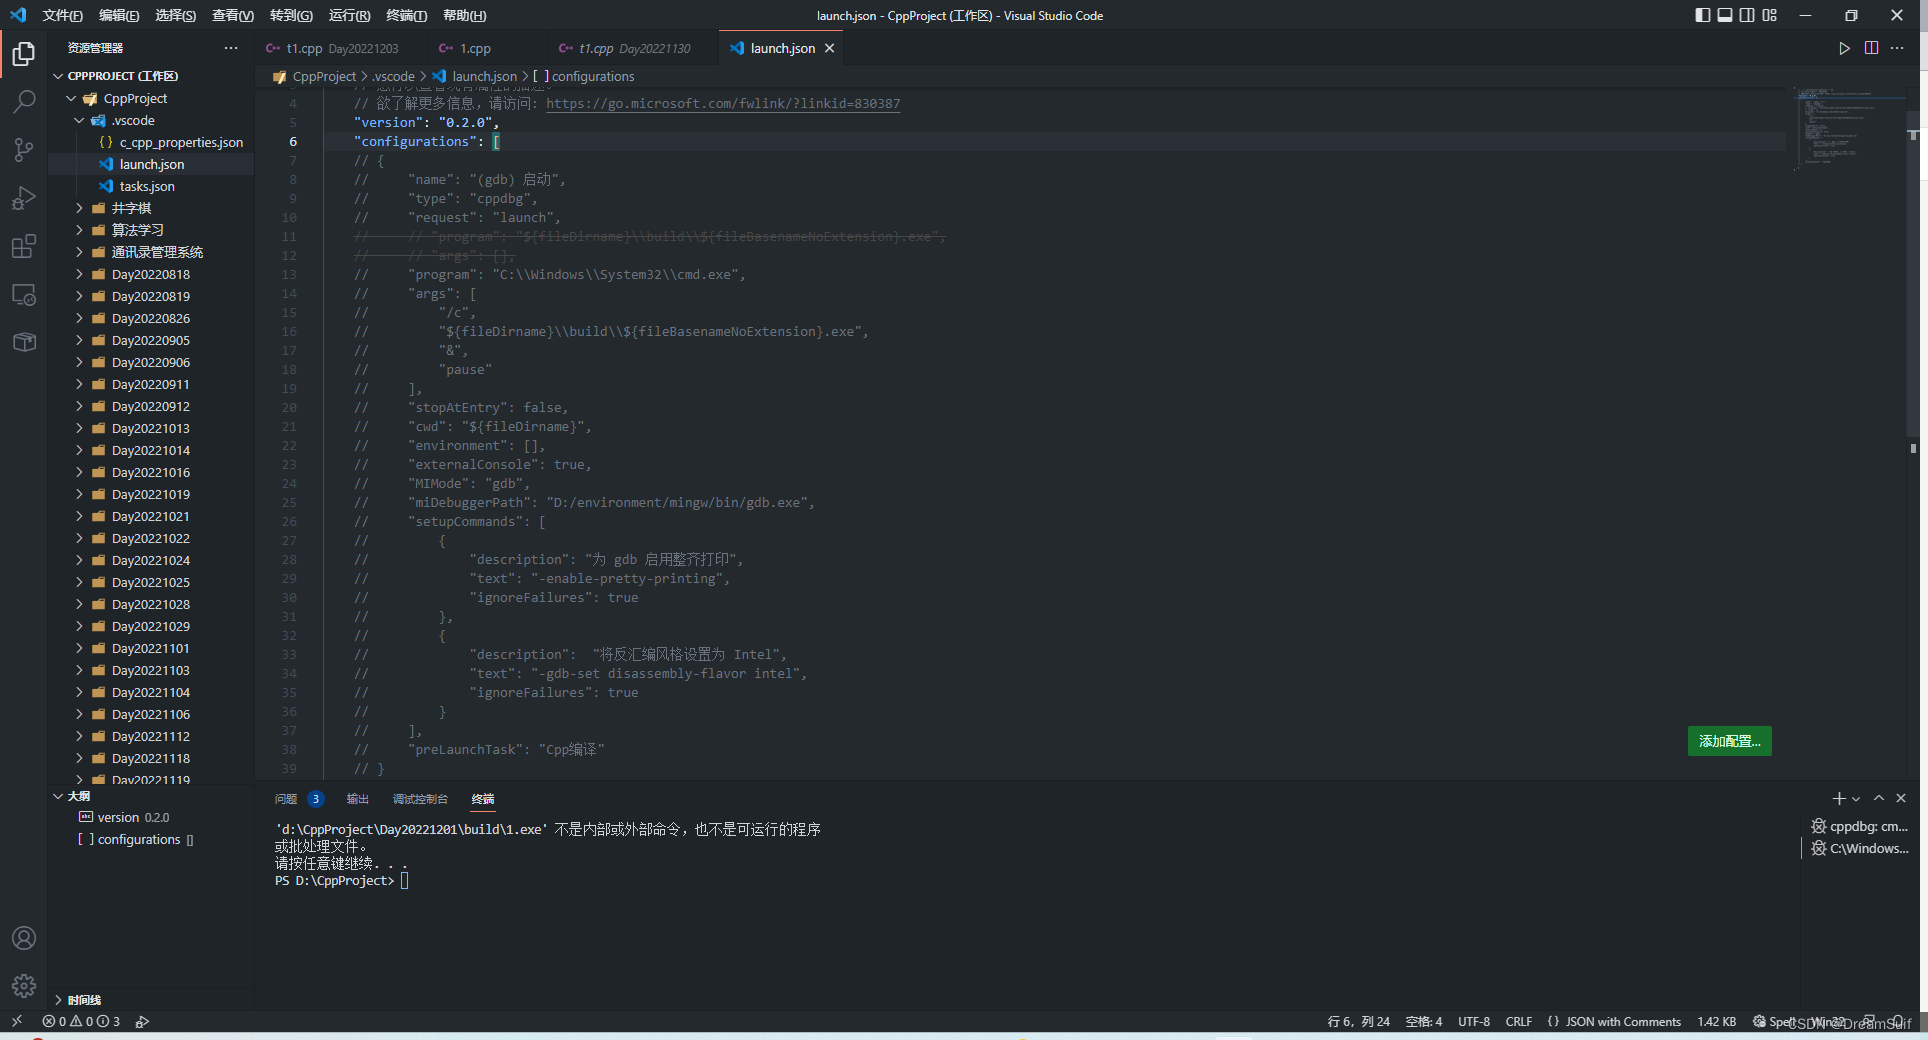
先把configurations中的内容注释掉(因为后面配置过程中需要用到之前的一些内容),全选configurations中的内容,按下快捷键ctrl + / 即可快速注释选中内容,
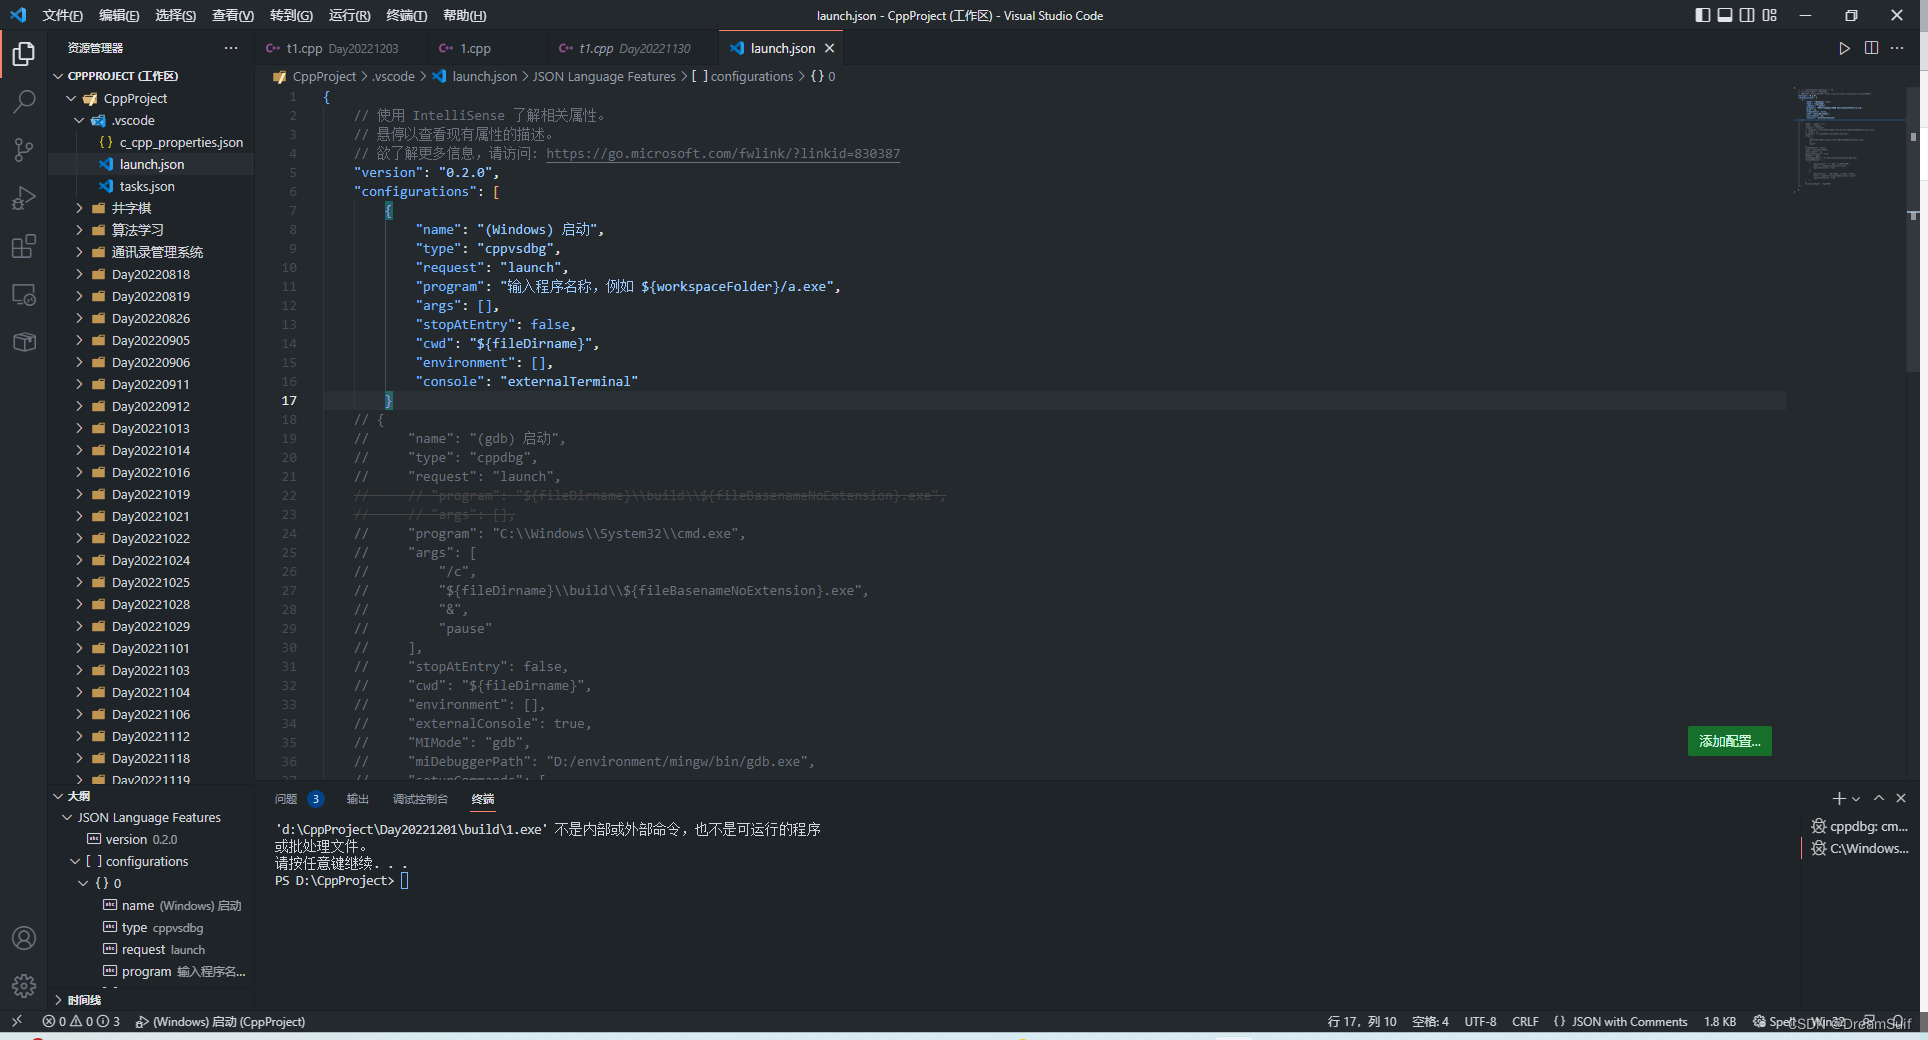
然后我们点击添加配置,选择windows启动,我们就会得到这样的一些内容:
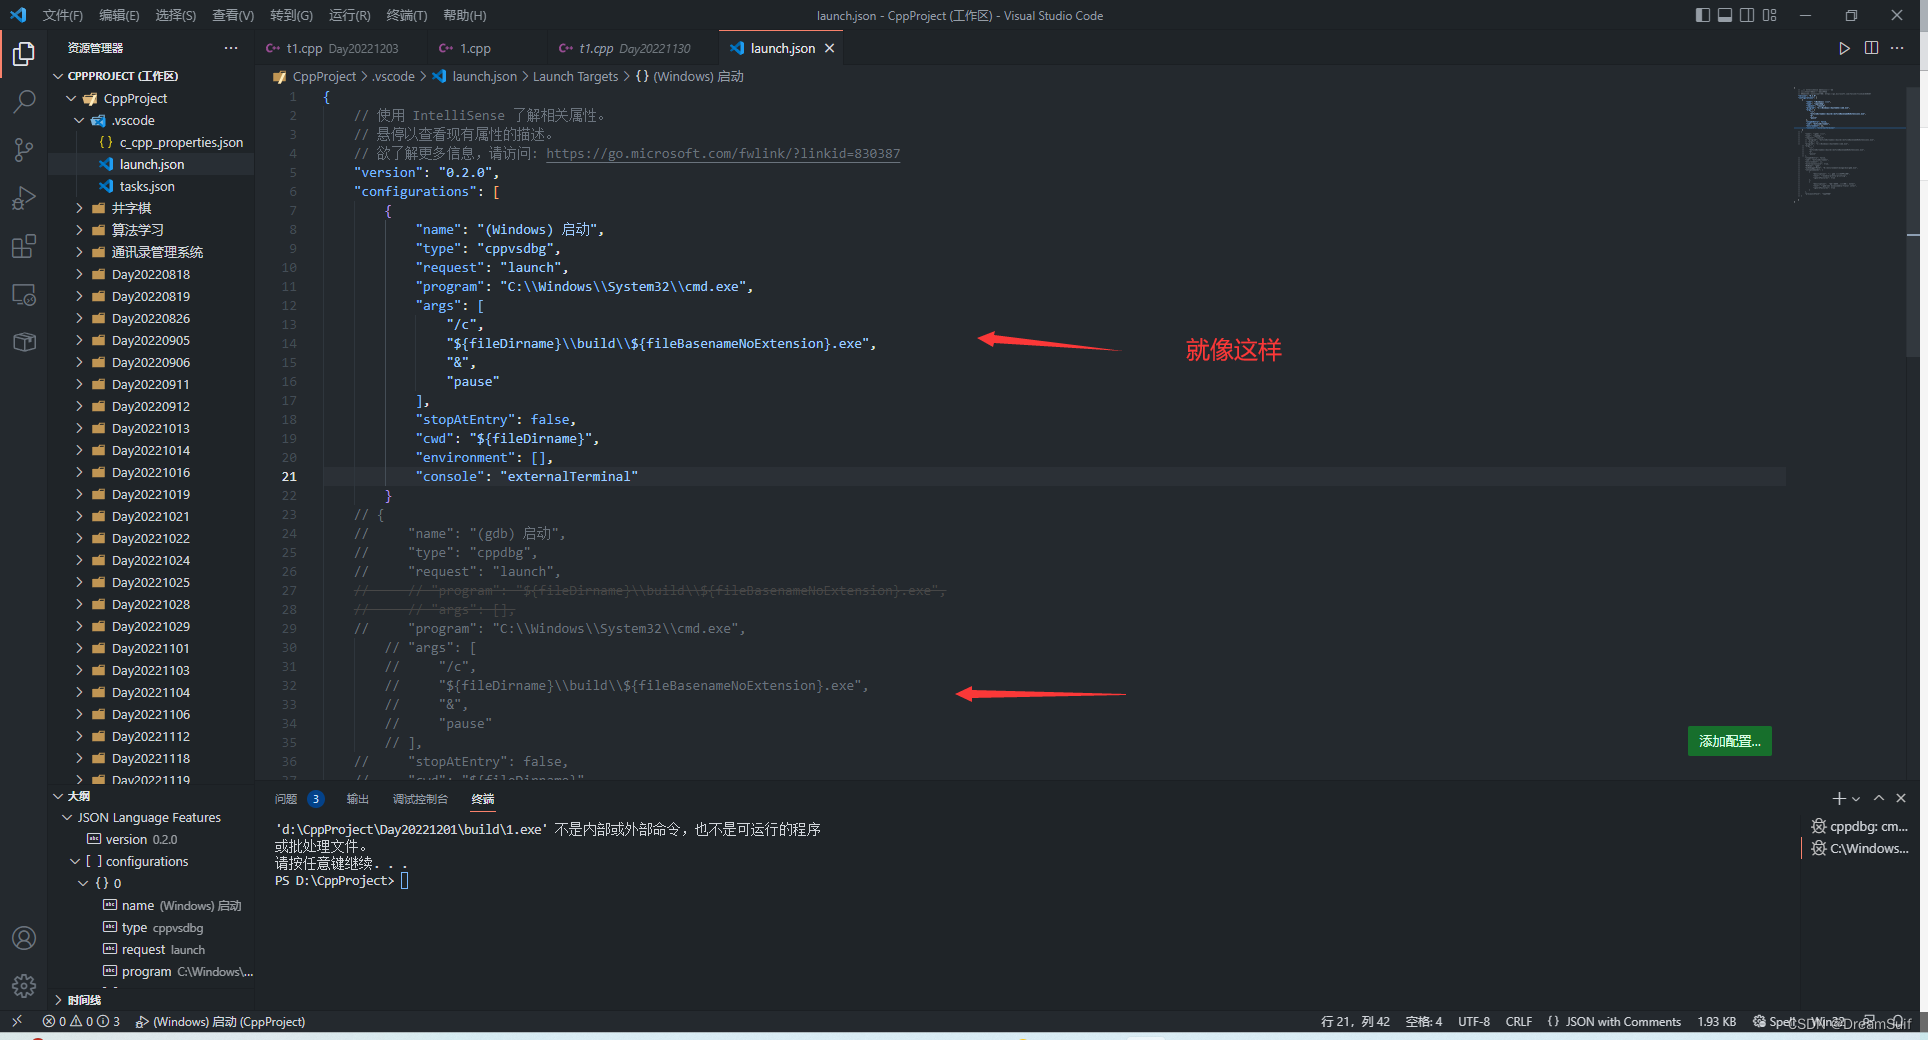
program, args中的内容改成和原来的program,args中的内容一样,我们直接复制粘贴过来即可(这个内容不需要和我的一样,我只是给个示范)
同样的我们需要调试前调用编译任务生成文件

然后我们只需要改变console中的内容即可控制是在系统终端中运行程序还是在vscode终端中运行程序
该项值为 externalTerminal 则是在系统终端中运行程序
该项值为 integratedTerminal 则是在vscode终端中运行程序

我们把该项值改为 integratedTerminal 即可在vscode终端中运行程序
最终效果:
全篇结束,感谢阅读!如果有任何疑问可以评论区留言!
在 Vscode 里配置C/C++运行环境,首先,需要下载 C/C++ 的开发环境,然后将 C/C++ 的开发环境添加至系统变量中。
第一步 下载vscode
VsCode大家应该都会下,这里就不提供VsCode的下载与安装教程了
具体的可以查看这篇文章 https://www.jb51.net/softjc/860164.html
第二步 下载mingw
这里采用mingw作为 C/C++ 开发环境,官网链接如下
官网链接:MinGW官网
下载完成后我们会得到这样一个安装程序
双击打开
然后我们找到mingw的安装文件夹
依次输入
mingw-get install gcc
mingw-get install g++
mingw-get install gdb
然后mingw就下载完成了
第三步 将mingw添加至系统变量中
这一步就是告诉电脑,可以在哪个文件夹里找到 C/C++ 的运行环境
这样我们的系统环境就配置完成了
我们可以来检验一下是否配置正确
按住 win + r 打开以下界面
输入 cmd, 然后点确定
依次输入
gcc -v
g++ -v
gdb -v
看看是否显示正常结果
结果正常显示就表示系统环境配置正确,这时候建议重启一下电脑(当然也可以不重启)
第四步 打开VsCode安装一下必要的插件
我们的vscode配置 C/C++ 的准备工作就完成了
正式开始配置 第一步 新建个存放C/C++文件的文件夹,并新建个cpp文件
我们在vscode中打开那个文件夹
然后我们就可以开始配置环境了,配置的环境只适用于这个大文件夹内
第二步 (1)简单的环境配置方法 - run code调试
这个方法需要用到一个插件, run code,我们打开扩展商店安装一下run code插件
安装完成了后,我们会发现右键多了个run code
直接点run code就能够编译运行程序了,当然,这样只能得到输出结果,而不能直接在vscode中向程序中输入内容,所以我们还需要一些设置来调整一下run code,我们按 ctrl + ,进入设置(,是一个按键,在M键旁边)
重启一下vscode,这样我们就可以在vscode中向程序输入内容了
问题1:run code执行代码出现gcc(或g++) :error; no such file or directory的错误 原因分析
这个错误可能是编译命令执行前没有进入指定的文件夹前导致的,所以我们加一个cd 目标文件夹路径即可
解决办法 第一步 打开code runner扩展设置
第二步 进入指令设置界面
第三步 修改编译指令
"c": "cd $dir && gcc $fileName -o $fileNameWithoutExt && $dir$fileNameWithoutExt",
"cpp": "cd $dir && g++ $fileName -o $fileNameWithoutExt && $dir$fileNameWithoutExt",
第二步 (2)复杂的环境配置方法 - gdb调试
当然,不借助run code的方法我们也有,而且,我个人更推荐这种环境配置方法。
第一步 配置编译器环境
我们按住 ctrl + shift + p
我们配置一下编译器路径
然后关闭这个界面,我们会发现CppProject文件夹中多了一个.vscode文件夹
第二步 配置task编译任务
同样,我们按住 ctrl + shift + p
此时我们会发现.vscode文件夹中多了tasks.json
简单地介绍一下tasks.json中需要注意的内容
第三步 配置launch调试任务
因为C/C++插件不会自动生成launch.json,因此launch.json需要我们自己编写,在.vscode文件夹内新建一个launch.json文件
我们会发现,这里有个添加配置
我们点添加配置,选择gdb启动
我们需要修改3个地方
第一处
第二处
第三处
保存,重启一下编辑器,我们就可以按F5调试程序了
注意:任何文件做出更改后都需要保存,新内容才会生效,我们可以按 ctrl + s 快速保存文件
一些问题 问题1
问:为什么按F5后出现这个报错信息,没有输出结果
答:这并不是报错信息,而是编译调试命令,输出的结果在调试控制台中显示。
进阶 设置成经典的弹出黑窗运行程序的形式(在系统终端中运行程序)
有的小伙伴可能觉得调试控制台不太好用,想要vscode编译运行c/c++程序时弹出终端,在终端中运行程序,这点其实也很简单,我们只需要改变launch.json中的 program 和 args 中的内容,然后设置一下黑窗弹出即可。
我的program 和 args 中的内容:
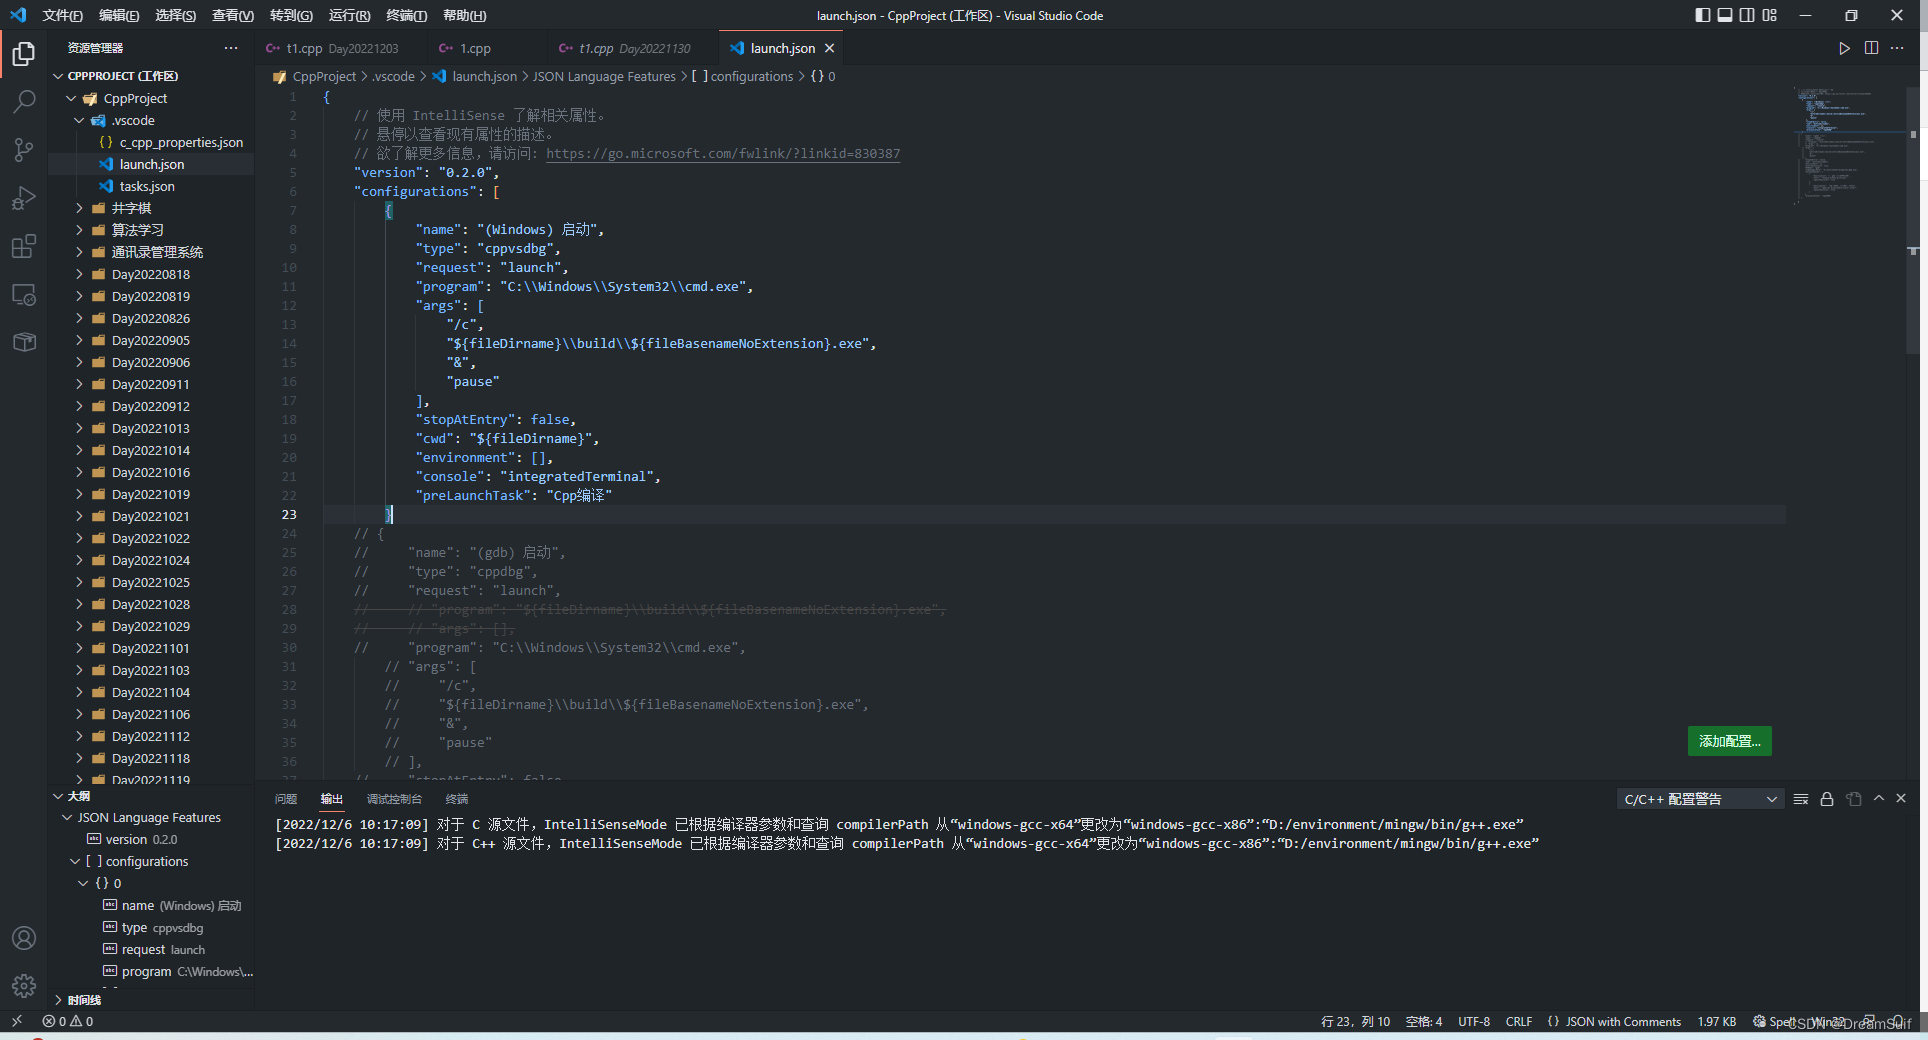
        "program": "C:\\Windows\\System32\\cmd.exe",
        "args": [
            "/c",
            "${fileDirname}\\build\\${fileBasenameNoExtension}.exe",
            "&",
            "pause"
        ],
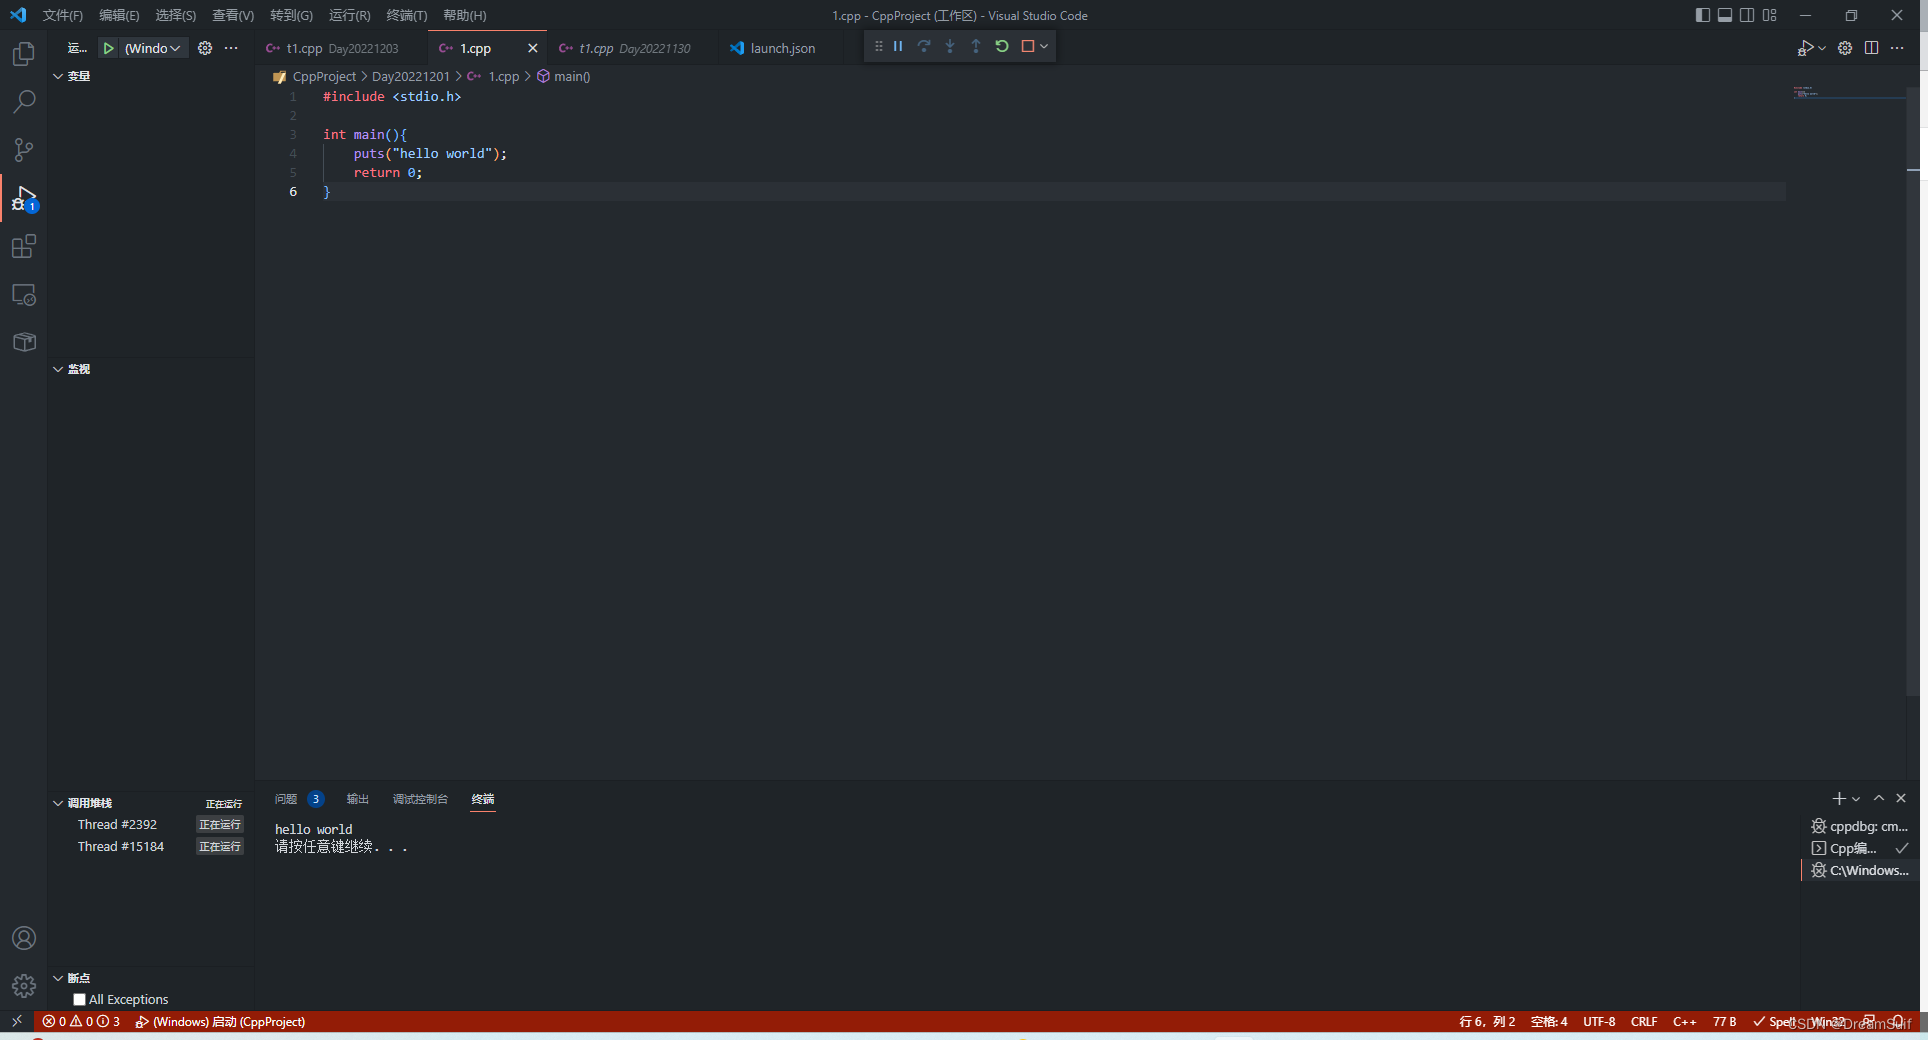
完成后的效果
进阶 设置在vscode内置终端中执行程序
有的小伙伴既不想用run code等插件,又想要在vscode内置终端中运行程序,这种方法我们当然也有!
我们只需要改变launch.json中的内容即可。(因为gdb调试不能在vscode内置终端中执行,所以我们得选择window启动调试任务)
先把configurations中的内容注释掉(因为后面配置过程中需要用到之前的一些内容),全选configurations中的内容,按下快捷键ctrl + / 即可快速注释选中内容,
然后我们点击添加配置,选择windows启动,我们就会得到这样的一些内容:
program, args中的内容改成和原来的program,args中的内容一样,我们直接复制粘贴过来即可(这个内容不需要和我的一样,我只是给个示范)
同样的我们需要调试前调用编译任务生成文件
然后我们只需要改变console中的内容即可控制是在系统终端中运行程序还是在vscode终端中运行程序
该项值为 externalTerminal 则是在系统终端中运行程序
该项值为 integratedTerminal 则是在vscode终端中运行程序
我们把该项值改为 integratedTerminal 即可在vscode终端中运行程序
最终效果:
全篇结束,感谢阅读!如果有任何疑问可以评论区留言!


