MongoDB快速入门及其SpringBoot实战教程
目录
- MongoDB快速入门及其SpringBoot实战
- MongoDB简介
- MongoDB概念解析
- MongoDB数据类型
- MongoDB特点
- MongoDB下载与安装
- SpringBoot实战
MongoDB快速入门及其SpringBoot实战
MongoDB简介
MongoDB 是一个基于分布式文件存储的数据库。由 C++ 语言编写。旨在为 WEB 应用提供可扩展的高性能数据存储解决方案。
MongoDB是一个开源、高性能、无模式的文档型数据库,当初的设计就是用于简化开发和方便扩展,是NoSQL数据库产品中的一种。是最像关系型数据库(MySQL)的非关系型数据库。
它支持的数据结构非常松散,是一种类似于JSON的格式叫BSON,所以它既可以存储比较复杂的数据类型,又相当的灵活。
MongoDB概念解析
| SQL术语/概念 | MongoDB术语/概念 | 解释/说明 |
|---|---|---|
| database | database | 数据库 |
| table | collection | 数据库表/集合 |
| row | document | 数据记录行/文档 |
| column | field | 数据字段/域 |
| index | index | 索引 |
| table joins | 表连接,MongoDB不支持 | |
| primary key | primary key | 主键,MongoDB自动将_id字段设置为主键 |
SQL与MongoDB数据存储形式对比如下图所示:

MongoDB数据类型
| 数据类型 | 描述 |
|---|---|
| String | 字符串。存储数据常用的数据类型。在 MongoDB 中,UTF-8 编码的字符串才是合法的。 |
| Integer | 整型数值。用于存储数值。根据你所采用的服务器,可分为 32 位或 64 位。 |
| Boolean | 布尔值。用于存储布尔值(真/假)。 |
| Double | 双精度浮点值。用于存储浮点值。 |
| Min/Max keys | 将一个值与 BSON(二进制的 JSON)元素的最低值和最高值相对比。 |
| Array | 用于将数组或列表或多个值存储为一个键。 |
| Timestamp | 时间戳。记录文档修改或添加的具体时间。 |
| Object | 用于内嵌文档。 |
| Null | 用于创建空值。 |
| Symbol | 符号。该数据类型基本上等同于字符串类型,但不同的是,它一般用于采用特殊符号类型的语言。 |
| Date | 日期时间。用 UNIX 时间格式来存储当前日期或时间。你可以指定自己的日期时间:创建 Date 对象,传入年月日信息。 |
| Object ID | 对象 ID。用于创建文档的 ID。 |
| Binary Data | 二进制数据。用于存储二进制数据。 |
| Code | 代码类型。用于在文档中存储 JavaScript 代码。 |
| Regular expression | 正则表达式类型。用于存储正则表达式。 |
MongoDB特点
- 高性能:MongoDB提供高性能的数据持久性。特别是,对嵌入式数据模型的支持减少了数据库系统上的I/O活动。索引支持更快的查询。
- 高可用性:MongoDB的复制工具称为副本集(replica set),它可提供自动故障转移和数据冗余。
- 高扩展性:MongoDB提供了水平可扩展性作为其核心功能的一部分。分片将数据分布在一组集群的机器上。(海量数据存储,服务能力水平扩展)
- 丰富的查询支持:MongoDB支持丰富的查询语言,支持读和写操作(CRUD),比如数据聚合、文本搜索和地理空间查询等。
MongoDB下载与安装
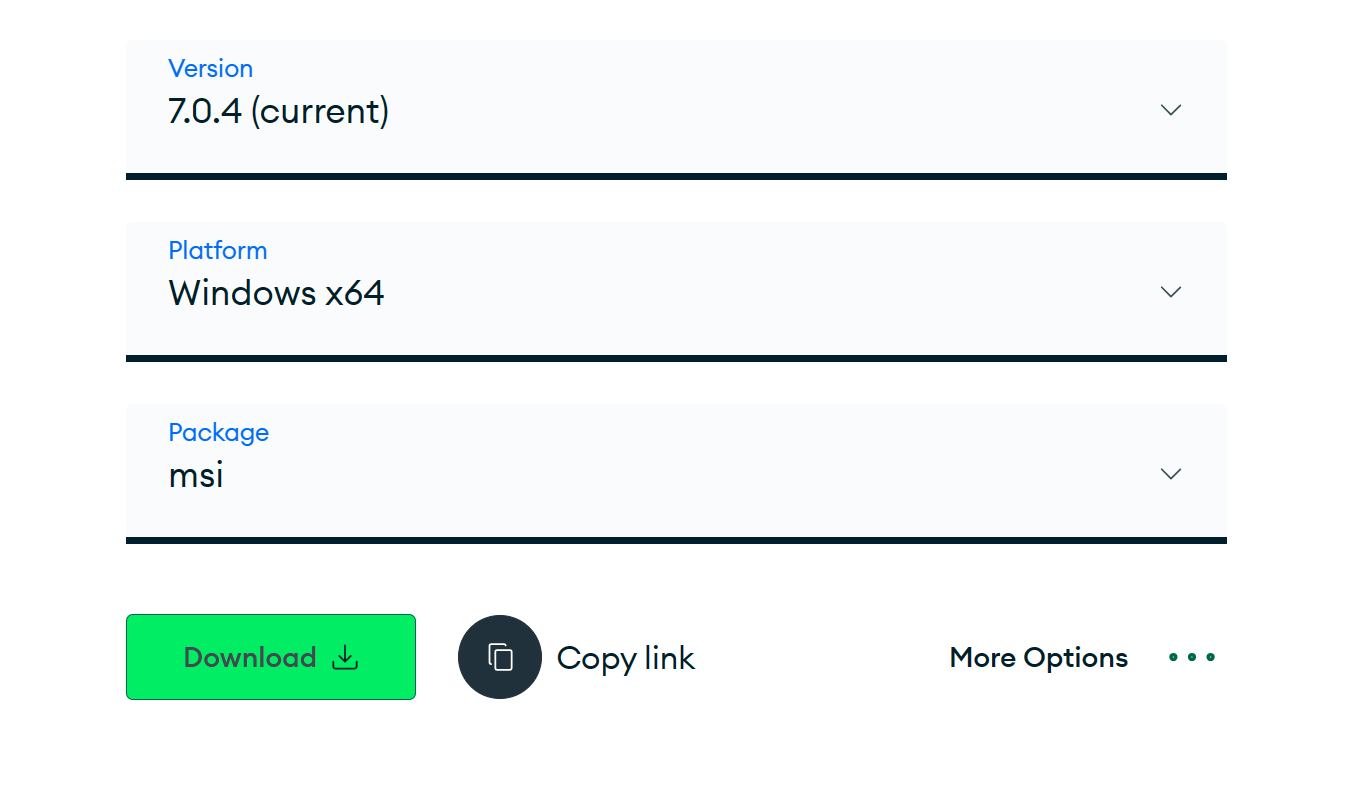
MongoDB下载网址:https://www.mongodb.com/try/download/community

图形化界面MongoDB Compass下载网址: https://www.mongodb.com/try/download/compass

创建数据目录
MongoDB 将数据目录存储在 db 目录下。但是这个数据目录不会主动创建,我们在安装完成后需要创建它。
例如:在D盘创建一个 data 的目录,然后在 data 目录里创建 db 目录。
启动MongoDB
在MongoDB 目录的 bin 目录中执行 mongod.exe 文件
D:\MongoDB\bin>mongod --dpath d:\data\db
MongoDB启动成功后,默认端口是27017
Compass连接MongoDB

连接成功后界面如下:

SpringBoot实战
功能需求
实现文章评论的增删改查,参考示例如图所示:

表结构分析
数据库:articledb
| 字段名称 | 字段含义 | 字段类型 | 备注 |
|---|---|---|---|
| _id | ID | ObjectId或String | Mongo的主键的字段 |
| articleid | 文章ID | String | |
| content | 评论内容 | String | |
| userid | 评论人ID | String | |
| nickname | 评论人昵称 | String | |
| createdatetime | 评论的日期时间 | Date | |
| likenum | 点赞数 | Int32 | |
| replynum | 回复数 | Int32 | |
| state | 状态 | String | 0:不可见;1:可见; |
| parentid | 上级ID | String | 如果为0表示文章的顶级评论 |
文章微服务模块搭建
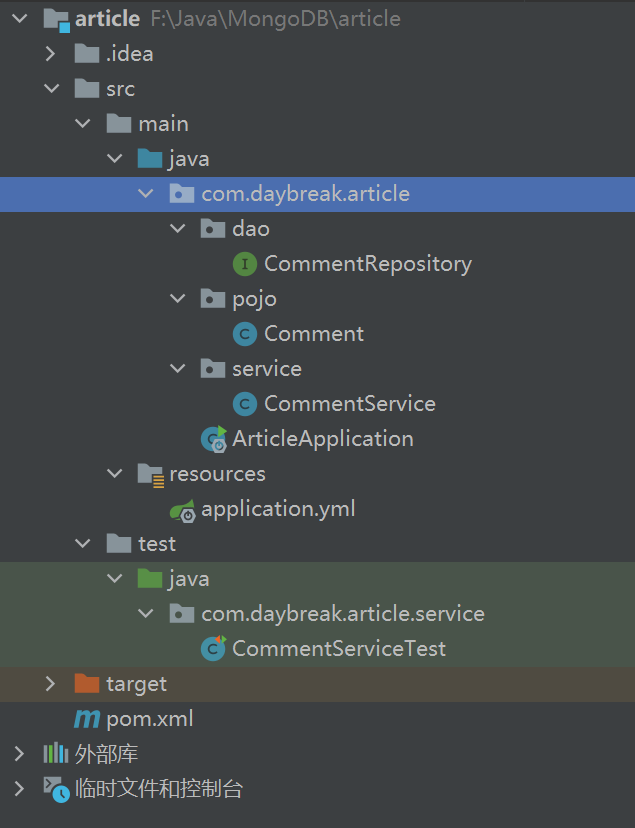
搭建项目工程article,项目目录结构如下

引入MongoDB依赖
<dependency>
    <groupId>org.springframework.boot</groupId>
    <artifactId>spring-boot-starter-data-mongodb</artifactId>
</dependency>
创建application.yml
注意,需先在MongonDB中创建articledb数据库
spring:
  data:
    mongodb:
      host: 127.0.0.1
      database: articledb
      port: 27017
创建启动类
@SpringBootApplication
public class ArticleApplication {
    public static void main(String[] args) {
        SpringApplication.run(ArticleApplication.class, args);
    }
}
启动项目,看能否正常运行。
文章实体类的创建
@Data
@Document(collection = "comment")  // 指定为comment集合
@CompoundIndex(def = "{'userid':1}")  // 在userid上建立升序索引
public class Comment implements Serializable {
    @Id
    private String id;//主键
    //该属性对应mongodb的字段的名字,如果一致,则无需该注解
    @Field("content")
    private String content;//评论内容
    private Date publishtime;//发布日期
    //添加了一个单字段的索引
    @Indexed
    private String userid;//发布人ID
    private String nickname;//昵称
    private LocalDateTime createdatetime;//评论的日期时间
    private Integer likenum;//点赞数
    private Integer replynum;//回复数
    private String state;//状态
    private String parentid;//上级ID
    private String articleid;
}
文章评论持久层的创建
创建持久层时,需继承MongoRepository接口
public interface CommentRepository extends MongoRepository<Comment, String> {
}
文章评论service层的创建
@Service
public class CommentService {
    @Autowired
    private CommentRepository commentRepository;
    /**
     * 保存评论
     * @param comment
     */
    public void saveComment(Comment comment){
        commentRepository.save(comment);
    }
    /**
     * 更新评论
     * @param comment
     */
    public void updateComment(Comment comment){
        commentRepository.save(comment);
    }
    /**
     * 根据id删除评论
     * @param id
     */
    public void deleteCommentById(String id){
        commentRepository.deleteById(id);
    }
    /**
     * 查询所有评论
     * @return
     */
    public List<Comment> findCommentList(){
        return commentRepository.findAll();
    }
    /**
     * 根据id查询评论
     * @param id
     * @return
     */
    public Comment findCommentById(String id){
        return commentRepository.findById(id).get();
    }
    /**
     * 文章评论点赞,点赞数+1
     * @param id
     */
    public void updateCommentLikenum(String id){
        Query query = new Query(Criteria.where("_id").is(id));
        Update update = new Update();
        update.inc("likenum");
        mongoTemplate.updateFirst(query, update, Comment.class);
    }
}
文章评论微服务测试
@SpringBootTest(classes = ArticleApplication.class)
@RunWith(SpringRunner.class)
public class CommentServiceTest {
    @Autowired
    private CommentService commentService;
    @Test
    public void testFindComment(){
        List<Comment> commentList = commentService.findCommentList();
        System.out.println(commentList);
    }
    @Test
    public void testFindCommentById(){
        Comment comment = commentService.findCommentById("1");
        System.out.println(comment);
    }
    @Test
    public void testSaveComment(){
        Comment comment = new Comment();
        comment.setArticleid("100002");
        comment.setContent("樊神yyds");
        comment.setCreatedatetime(LocalDateTime.now());
        comment.setUserid("1003");
        comment.setNickname("随缘夏沫");
        comment.setState("1");
        comment.setLikenum(0);
        comment.setReplynum(0);
        commentService.saveComment(comment);
    }
    @Test
    public void testFindCommentListByParentid(){
        Page<Comment> page = commentService.findCommentListByParentid("1", 1, 2);
        System.out.println(page.getContent());
    }
    @Test
    public void testUpdateCommentLikenum(){
        commentService.updateCommentLikenum("2");
    }
}
到此这篇关于MongoDB快速入门及其SpringBoot实战的文章就介绍到这了,更多相关MongoDB入门内容请搜索电脑手机教程网以前的文章或继续浏览下面的相关文章希望大家以后多多支持电脑手机教程网!


